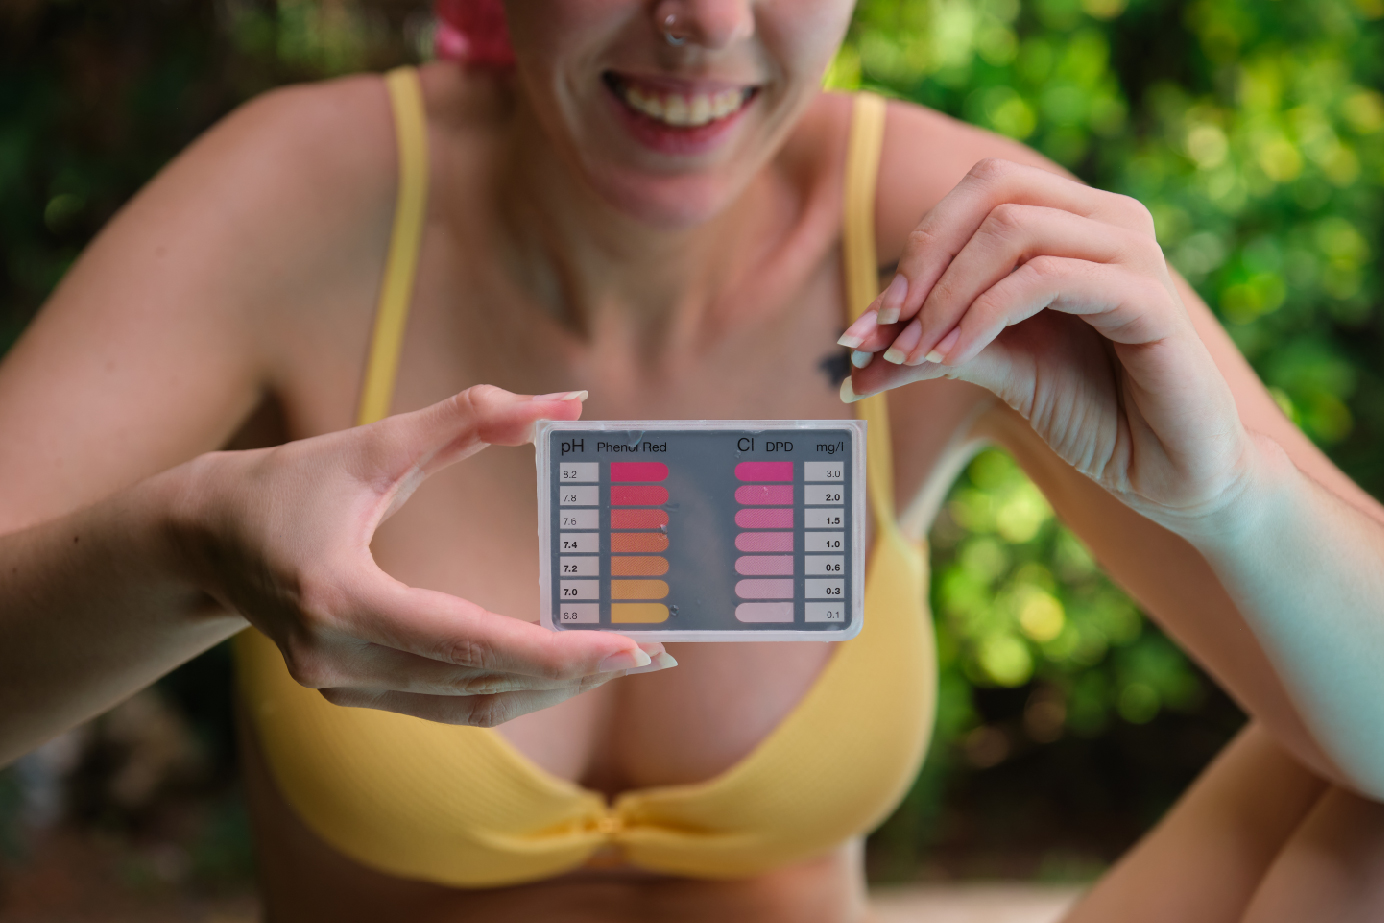
A New Pool Owner’s Guide to Swimming Pool Chlorine Types

Understanding the Pros and Cons of Different Chlorine Products for Pool Sanitation

As a new pool owner, choosing the right type of chlorine for your swimming pool can be a daunting task. Chlorine is a popular pool sanitizer due to its effectiveness, affordability, and ease of use. This article will help you understand the different kinds of swimming pool chlorine and their pros and cons so you can make an informed decision for your pool sanitation needs.

  1. Types of Swimming Pool Chlorine

There are three main types of swimming pool chlorine: liquid chlorine, granular chlorine, and chlorine tablets.

a) Liquid Chlorine: Also known as sodium hypochlorite, liquid chlorine is similar to household bleach but with a higher concentration of chlorine. It is easy to use, as it can be poured directly into the pool or added through an automatic chlorinator.

Pros:

  • Fast-acting and highly effective.
  • Easy to apply.
  • Low cost.

Cons:

  • Short shelf life.
  • Can be corrosive to pool equipment.
  • Requires frequent monitoring and application.

b) Granular Chlorine: This type of chlorine is available in various formulations, such as calcium hypochlorite (Cal-Hypo) and di-chlor. Granular chlorine is typically dissolved in a bucket of water and then poured into the pool.

Pros:

  • Easy to measure and control the dosage.
  • Can be used as a shock treatment or for regular sanitization.
  • Longer shelf life compared to liquid chlorine.


Cons:

  • Can cause cloudiness if not dissolved properly.
  • May require more frequent application than other forms of chlorine.
  • Can be hazardous if not stored and handled correctly.

c) Chlorine Tablets: Chlorine tablets are made from trichloro-s-triazinetrione (Trichlor) and are designed to dissolve slowly in a floating dispenser, skimmer, or automatic chlorinator.

Pros:

  • Slow-release formula provides consistent chlorination.
  • Long shelf life.
  • Easy to handle and store.

Cons:

  • More expensive than liquid and granular chlorine.
  • Can cause damage to pool equipment if not used correctly.
  • May not be suitable for all pool types or situations.
  1. Choosing the Right Chlorine for Your Pool

When selecting a type of chlorine for your pool, consider the following factors:

a) Pool Type: Some chlorine types may be more suitable for specific pool types. For instance, liquid chlorine is often preferred for vinyl liner pools, as it is less likely to cause damage compared to granular chlorine.

b) Maintenance Schedule: Your pool maintenance routine may dictate the type of chlorine you choose. If you are unable to monitor and adjust your pool’s chlorine levels frequently, chlorine tablets may be a better option due to their slow-release formula.

c) Cost: If cost is a significant concern, liquid chlorine and granular chlorine are typically more affordable than chlorine tablets.

d) Storage and Handling: Consider your ability to safely store and handle chlorine products. Chlorine tablets have a longer shelf life and are easier to store, while liquid chlorine can be more hazardous due to its corrosive nature.

Understanding the different types of swimming pool chlorine and their pros and cons is essential for new pool owners. Each chlorine type has its advantages and disadvantages, so consider your specific pool type, maintenance schedule, and personal preferences when making your decision. By selecting the right chlorine product for your needs, you can maintain a clean, safe, and enjoyable swimming environment for you and your family.

Chlorine Generators: A Modern Approach to Pool Sanitization

Understanding the Electrolysis Process, Maintenance, and the Advantages and Disadvantages of Saltwater Systems

Chlorine generators, also known as saltwater chlorinators or saltwater pool systems, are gaining popularity as an alternative to traditional chlorine-based pool sanitization methods. These systems utilize an electrolysis process to convert salt into chlorine, providing continuous and efficient pool sanitization. In this article, we will explore the electrolysis process, the importance of maintaining proper salt concentration, how to care for the electrolysis cell, and the pros and cons of chlorine generators compared to traditional chlorine.

The Electrolysis Process: Converting Salt to Chlorine

Chlorine generators utilize an electrolysis process to convert dissolved salt (sodium chloride) into chlorine gas (Cl2), hypochlorous acid (HClO), and sodium hydroxide (NaOH). When pool water containing salt passes through the generator’s electrolysis cell, an electric current is applied to the cell’s metal plates. This current causes a chemical reaction, separating the sodium and chloride ions in the salt. The chloride ions combine to form chlorine gas, which dissolves in the water, creating hypochlorous acid, the active sanitizing agent.


Maintaining Proper Salt Concentration

For a chlorine generator to work efficiently, the pool water must have a proper salt concentration, typically between 2,500 and 3,500 parts per million (ppm). Maintaining the correct salt level is crucial for several reasons:

  1. Optimal chlorine production: Insufficient salt levels can lead to inadequate chlorine production, compromising pool sanitization and water quality.
  2. System efficiency: Excess salt can cause the generator to work harder, leading to increased wear and tear and a shorter lifespan.
  3. Water balance: An appropriate salt concentration helps maintain water balance, preventing issues like scaling or corrosion.

It is essential to test salt levels regularly and adjust them as needed to ensure optimal system performance.

Caring for the Electrolysis Cell

Regular maintenance of the electrolysis cell is crucial for the longevity and efficiency of a chlorine generator. Follow these steps to care for your cell:

  1. Inspect and clean the cell regularly: Check the cell for any signs of calcium buildup or scaling. If necessary, clean the cell using a mild acid wash (usually a mixture of water and muriatic acid) or a specialized cell cleaner as per the manufacturer’s instructions.
  2. Check and replace the cell as needed: Over time, the cell’s metal plates will wear out and require replacement. Follow the manufacturer’s guidelines for cell replacement to ensure optimal system performance.

Chlorine Generators vs. Traditional Chlorine: Pros and Cons

Pros:

  1. Consistent chlorine levels: Chlorine generators provide a continuous supply of chlorine, maintaining consistent sanitization and reducing the need for manual chlorine adjustments.
  2. Reduced chemical handling: Since the generator converts salt into chlorine, there’s less need to handle and store hazardous chemicals.
  3. Softer water: Saltwater pools often feel softer and less irritating to the skin and eyes compared to traditional chlorine pools.
  4. Cost-effective: Although the initial investment is higher, chlorine generators can save money in the long run due to reduced chemical costs.

Cons:

  1. Initial cost: Chlorine generators have a higher upfront cost compared to traditional chlorination methods.
  2. Complex technology: These systems can be more complicated than traditional chlorination methods, requiring proper installation and regular maintenance.
  3. Potential for corrosion: Salt can cause corrosion in pool fixtures and equipment if not adequately maintained and balanced.
  4. Inadequate for certain pool types: Some pool materials, such as certain natural stones, may not be suitable for saltwater systems due to the risk of damage or erosion.


Chlorine generators offer an innovative and efficient method for pool sanitization, using an electrolysis process to convert salt into chlorine. Proper maintenance, including maintaining appropriate salt concentration and caring for the electrolysis cell, is crucial for ensuring the system’s longevity and effectiveness.

While saltwater systems have their advantages, such as consistent chlorine levels, reduced chemical handling, and softer water, they also come with some drawbacks, including a higher initial cost, potential for corrosion, and compatibility concerns with certain pool materials. By understanding the pros and cons of chlorine generators compared to traditional chlorine, pool owners can make an informed decision on the best sanitization method for their specific needs and preferences.

Mastering the Art of pH Balance: A Comprehensive Guide to Maintaining Optimal pH Levels in Swimming Pools

A well-maintained swimming pool not only looks inviting but also ensures the safety and comfort of swimmers. One crucial aspect of pool maintenance is maintaining a balanced pH level. This article will delve into the importance of balanced pH in swimming pool water, the types of chemicals used to adjust pH, and the best test kits for measuring pH levels.

  1. The Importance of Balanced pH in Swimming Pool Water

Maintaining a balanced pH is essential for a variety of reasons:

  • Swimmer Comfort: Unbalanced pH levels can cause skin and eye irritation, making the swimming experience uncomfortable for swimmers.
  • Chemical Efficiency: A balanced pH ensures that chlorine and other sanitizers work effectively to eliminate bacteria, algae, and other contaminants.
  • Equipment Longevity: Unbalanced pH levels can lead to corrosion of pool equipment, fixtures, and surfaces, reducing their lifespan and causing costly repairs.
  • Water Clarity: Balanced pH levels contribute to crystal-clear water by preventing the formation of scale and minimizing the risk of algae growth.
  1. Ideal pH Range for Swimming Pools

The ideal pH range for swimming pool water is between 7.4 and 7.6. This range not only provides a comfortable swimming environment but also ensures optimal chemical efficiency.

  1. Types of Chemicals to Adjust pH Levels

There are two primary chemicals used to adjust pH levels in swimming pools:

a. pH Increasers (pH Up)

pH increasers, also known as pH up or alkaline additives, are used to raise the pH level of pool water. The most common pH increaser is sodium carbonate (soda ash).

b. pH Reducers (pH Down)

pH reducers, also known as pH down or acid additives, are used to lower the pH level of pool water. The most common pH reducer is sodium bisulfate, although muriatic acid can also be used.

  1. Best Test Kits for Measuring pH Levels

Regularly testing the pH level of your pool is crucial for maintaining balanced water chemistry. Here are some of the top test kits for measuring pH levels:

a. Taylor Technologies K-2006 Complete Swimming Pool Water Test Kit

This liquid test kit provides accurate readings for pH, free and total chlorine, bromine, alkalinity, calcium hardness, and cyanuric acid, making it a comprehensive choice for maintaining balanced pool water.

b. LaMotte ColorQ Pro 7 Digital Pool Test Kit

The LaMotte ColorQ Pro 7 is a digital test kit that offers precise readings for pH, free chlorine, total chlorine, bromine, alkalinity, calcium hardness, and cyanuric acid. Its user-friendly interface and digital results eliminate the guesswork associated with color-matching.

c. AquaChek Select 7-in-1 Pool and Spa Test Strips

For a more affordable option, the AquaChek Select 7-in-1 test strips offer accurate readings for pH, free chlorine, total chlorine, bromine, alkalinity, calcium hardness, and cyanuric acid. These test strips are easy to use and provide quick results.

  1. How to Adjust pH Levels in Swimming Pools

To adjust the pH level in your swimming pool, follow these steps:

  1. Test the pool water using a reliable test kit to determine the current pH level.
  2. If the pH is below 7.4, add a pH increaser (soda ash) according to the manufacturer’s instructions.
  3. If the pH is above 7.6, add a pH reducer (sodium bisulfate or muriatic acid) according to the manufacturer’s instructions.
  4. Allow the pool water to circulate for at least 2-4 hours to distribute the chemicals evenly.
  5. Retest the pH level after the circulation period to ensure it has reached the desired range (7.4 to 7.6). If necessary, repeat the process of adding pH increaser or reducer until the ideal pH is achieved.
  6. Test your pool water regularly (at least once a week) and make adjustments as needed to maintain a balanced pH.
  7. Additional Tips for Maintaining Balanced pH Levels

In addition to adjusting pH levels, consider the following tips to maintain balanced pool water chemistry:

  • Monitor total alkalinity: Total alkalinity (TA) acts as a buffer for pH levels, so it’s essential to maintain the recommended TA range of 80-120 ppm. An imbalanced TA can cause pH levels to fluctuate.
  • Maintain sanitizer levels: Ensure that the sanitizer (chlorine or bromine) levels are within the recommended range to keep the water clean and prevent algae growth.
  • Regularly clean and backwash the pool filter: A clean and well-functioning filter helps maintain water clarity and balanced water chemistry.
  • Shock your pool as needed: Regular pool shocking, usually once a week, can help break down organic contaminants and maintain water quality.

Maintaining balanced pH levels in your swimming pool is essential for ensuring a comfortable and safe swimming environment, protecting pool equipment, and maintaining water clarity. By using the appropriate chemicals, reliable test kits, and adhering to best practices, you can easily achieve and maintain optimal pH levels in your pool, ensuring a delightful swimming experience for everyone.


Clearing the Green: A Homeowner’s Guide to a Sparkling Swimming Pool

A green swimming pool is every homeowner’s nightmare. Not only is it unappealing to look at, but it can also pose health risks due to algae growth and unbalanced chemicals. Fear not! With the right tools, some patience, and a systematic approach, you can clear your green pool and enjoy crystal-clear water once more. In this article, we will guide you through the steps to achieve a sparkling swimming pool.

1. Assess the Situation

First, inspect the overall condition of the pool. Check for debris, dirt, and algae, as well as the water’s color and cloudiness. This will help you determine the severity of the problem and the necessary steps to clear the pool.

2. Remove Debris

Use a pool skimmer or leaf rake to remove any floating debris such as leaves, twigs, and insects. This will not only improve the pool’s appearance but also prevent clogging in the filtration system.

3. Test and Balance the Water Chemistry

Before treating the pool, test the water using a pool test kit or test strips. Pay close attention to the chlorine, pH, and alkalinity levels. Balancing these levels is essential for preventing algae growth and maintaining clear water.
Chlorine: A minimum of 2-4 ppm (parts per million) is recommended to effectively sanitize the pool.  pH: Maintain a pH level of 7.4-7.6 to optimize chlorine efficiency and prevent scaling or corrosion.
Alkalinity: Aim for an alkalinity level of 80-120 ppm to stabilize the pH level.

4. Shock the Pool

“Shocking” the pool involves adding a large dose of chlorine (or non-chlorine shock) to eliminate algae, bacteria, and other contaminants. For a green pool, use a high-strength shock treatment, typically a calcium hypochlorite product, and follow the manufacturer’s instructions for dosage. Ensure proper circulation by running the pool pump. Apply the shock treatment in the evening or on a cloudy day to prevent sunlight from degrading the chlorine. Brush the pool surfaces to help distribute the shock treatment and loosen algae.

5. Use Algaecide

If algae are present, add an algaecide to kill and prevent future growth. Follow the manufacturer’s instructions for dosage, and ensure the pool pump is running for proper distribution.

6. Run the Filter

After shocking and treating the pool with algaecide, run the filter continuously for 24-48 hours. This will help remove dead algae and other contaminants from the water.

7. Clean the Filter

Check and clean the filter regularly during the clearing process. A dirty or clogged filter will reduce the efficiency of the circulation system, hindering your pool’s recovery.

8. Vacuum the Pool

Once the water begins to clear, vacuum the pool to remove dead algae and other debris that have settled on the bottom. Use a manual pool vacuum or an automatic pool cleaner, ensuring thorough coverage of the pool floor.


9. Re-test and Balance the Water

After the pool has cleared, re-test the water chemistry and adjust as needed. Maintaining balanced water chemistry is crucial for preventing future algae growth and keeping your pool sparkling clean.

10. Regular Maintenance

Once your pool is clear, establish a regular maintenance routine to prevent future problems. This includes:
Skimming debris daily.
Vacuuming the pool weekly.
Testing and balancing water chemistry weekly.
Cleaning the filter as needed.
Shocking the pool every 1-2 weeks, or as needed.

Clearing a green swimming pool can be a daunting task, but with the right approach and dedication, you can restore your pool and be swimming again in no time.

An AI Guide to Adding Chlorine and Shocking Your Swimming Pool

Chlorine plays a vital role in maintaining the cleanliness and safety of your swimming pool by eliminating harmful bacteria, algae, and other contaminants. This article provides a step-by-step guide on adding chlorine to your pool, testing the water, and shocking the pool to ensure a clean and enjoyable swimming experience.

Testing Your Pool Water
Before adding chlorine to your pool, it’s essential to test the water to determine the current chlorine levels and other chemical parameters. Use a reliable test kit or test strips to measure the following:

Free Chlorine: 2 to 4 ppm (parts per million)
pH: 7.4 to 7.6
Total Alkalinity: 80 to 120 ppm
Calcium Hardness: 200 to 400 ppm
Cyanuric Acid (for outdoor pools): 30 to 50 ppm
Test the water at least twice a week to ensure the chemical levels remain within the recommended ranges.

Adding Chlorine to Your Pool
Chlorine is available in various forms, including liquid, granular, and tablet. Follow the manufacturer’s instructions for the appropriate dosage based on your pool’s volume and the current chlorine levels. Here are some general guidelines for each form:

Liquid Chlorine: Pour the recommended amount of liquid chlorine directly into the pool water, preferably near the return jets for better distribution. Use a clean and dedicated container for measuring and pouring.

Granular Chlorine: Pre-dissolve the granules in a bucket of water before adding the solution to the pool. Pour the mixture around the perimeter of the pool, ensuring even distribution.


Chlorine Tablets: Place the required number of tablets in a floating dispenser or an automatic chlorinator, following the manufacturer’s guidelines. Do not add tablets directly to the skimmer, as this can cause damage to your pool equipment.

Circulating the Water
Run your pool’s pump and filter system for at least 8 to 12 hours per day to ensure proper circulation and distribution of the chlorine. This will help maintain consistent chlorine levels and promote overall water quality.

Shocking Your Swimming Pool
Shocking your pool involves adding a high dose of chlorine to eliminate contaminants and restore water clarity. Perform this process at least once every 1-2 weeks, or more frequently if the pool has heavy use, after heavy rainfall, or if you notice water quality issues. Follow these steps to shock your pool:

Test the water and adjust the pH to between 7.2 and 7.4, if necessary.

Wait until evening or dusk to shock the pool, as sunlight can break down the chlorine more quickly.

Measure the appropriate amount of pool shock product (either chlorine or non-chlorine) based on the manufacturer’s instructions and your pool’s volume.

Pre-dissolve granular shock in a bucket of water before adding it to the pool. Pour the solution evenly around the pool’s perimeter.

For liquid shock, pour the recommended amount directly into the pool near the return jets.

Run the pump and filter for at least 24 hours to ensure thorough circulation and distribution of the shock treatment.

Test the water again before swimming. The free chlorine level should be below 5 ppm before it is safe to swim.

Adding chlorine and shocking your swimming pool are crucial steps in maintaining a clean, safe, and enjoyable swimming environment. Regular testing, proper dosage, and adherence to the recommended guidelines will help ensure your pool remains in optimal condition throughout the swimming season.

Chlorine Alternatives for Swimming Pools: Are They Really Worth It?

As swimming pool owners seek innovative solutions to maintain clean and clear water throughout the swimming season, the market is flooded with various chlorine alternatives. From saltwater generators to non-chlorine systems such as ozone generators and UV light systems, these options claim to provide a better experience. But are these alternatives really worth the investment, or do they end up causing more problems than they solve?

Saltwater Generators
Saltwater generators have gained popularity as a seemingly eco-friendly and low-maintenance alternative to traditional chlorine systems. While they do produce chlorine from salt, the levels are generally lower than in a traditional chlorine pool. However, they come with their own set of challenges.

One significant issue is the replacement cost of the salt cell. Over time, wear and tear can lead to salt cell malfunction, requiring replacement. Depending on the warranty, replacing a salt cell can be more expensive than the initial cost of the entire system. Additionally, if the system breaks down and needs replacement, you must resort to chlorine shock treatment to restore the water to optimal levels.

Ozone Generators and UV Light Systems
Ozone generators and UV light systems are non-chlorine alternatives that promise clean and clear pool water without relying on traditional chlorine sanitizers. However, these systems have their limitations.

Hayward Chlorine Generator

When turned off or malfunctioning, ozone and UV generators do not leave any residual disinfectant in the water. This lack of residual protection can lead to more severe outbreaks of algae and other contaminants if the water is not carefully monitored. In some cases, these outbreaks can include mustard algae, black algae, and even harmful pink slime, all of which are resistant to many disinfectants.

Eliminating these contaminants can be a challenging and time-consuming process. It may require daily chlorine shocking for over a week to clear the outbreak, and even then, pink slime can reappear within weeks if it wasn’t entirely eradicated from areas such as ladders, corners, and filters.

Weighing the Costs and Benefits

When considering an alternative to a chlorine-based swimming pool, it’s essential to evaluate the potential consequences and costs associated with the alternative system. While these options may seem appealing, they can present their own set of challenges, often requiring the use of chlorine shock treatment to remedy issues that arise.

In some cases, the expense and effort needed to maintain and repair alternative systems can outweigh the perceived benefits. As a result, using traditional chlorine sanitizers may still prove to be a more cost-effective and reliable way to keep your swimming pool clean and clear throughout the swimming season.

Chlorine vs. Hydrogen Peroxide: Why Chlorine Reigns Supreme as a Swimming Pool Sanitizer

Maintaining clean and hygienic swimming pools is crucial for the health and safety of swimmers. Among the many sanitizers available, chlorine and hydrogen peroxide are two popular choices. This article will delve into the reasons why chlorine is considered a better sanitizer for swimming pools compared to hydrogen peroxide.

Powerful Oxidizing and Sanitizing Capabilities
Chlorine is a highly effective oxidizer, destroying organic matter such as bacteria, algae, and other contaminants by breaking down their cell walls. This powerful oxidizing action also helps to remove swimmer waste, such as body oils, sweat, and urine. Hydrogen peroxide, though an oxidizer as well, is less effective in maintaining the water quality and requires a higher concentration to match the sanitizing capabilities of chlorine.

Chlorine Tablets

Stability and Persistence
Chlorine’s stability and persistence in pool water make it an ideal sanitizer. It maintains its sanitizing properties for a longer period, ensuring consistent water quality. Hydrogen peroxide, on the other hand, breaks down quickly in the presence of sunlight and loses its sanitizing power. This means that pool owners must add hydrogen peroxide more frequently, making it less convenient and cost-effective.

Easier Measurement and Control
Chlorine levels in swimming pools can be easily measured and controlled using commercially available test kits and automatic systems. This allows pool owners to ensure that the water is consistently safe and sanitized. Hydrogen peroxide levels are more challenging to measure and maintain, as there are fewer commercially available testing options and no widely accepted standard levels for pool sanitation.


Chlorine Tablets

Proven Effectiveness Against a Wide Range of Microorganisms
Chlorine has a long history of use in swimming pool sanitation and has proven effective against a wide range of harmful microorganisms, including bacteria, viruses, and protozoa. Hydrogen peroxide has not been as extensively studied for pool sanitation, and its effectiveness against certain microorganisms, such as Cryptosporidium, is still uncertain.

Algae Control
Algae growth is a common problem in swimming pools, and chlorine is highly effective at inhibiting and killing algae. It achieves this by disrupting the algae’s cellular processes, preventing growth and reproduction. Hydrogen peroxide, though it can kill algae at high concentrations, is less effective in controlling algae growth in pools, often requiring the use of additional algaecides.

Compatibility with Other Pool Chemicals
Chlorine is compatible with most other pool chemicals, such as pH adjusters, clarifiers, and algaecides, simplifying the pool maintenance process. Hydrogen peroxide, however, can react with certain chemicals, producing undesirable byproducts and reducing its effectiveness as a sanitizer.

Algaecide

While hydrogen peroxide is a viable option for some swimming pool applications, its limitations in terms of effectiveness, stability, measurement, and compatibility make chlorine the preferred choice for most pool owners. Chlorine’s powerful sanitizing and oxidizing capabilities, combined with its proven track record and ease of use, make it the superior choice for maintaining clean, safe, and enjoyable swimming pools.