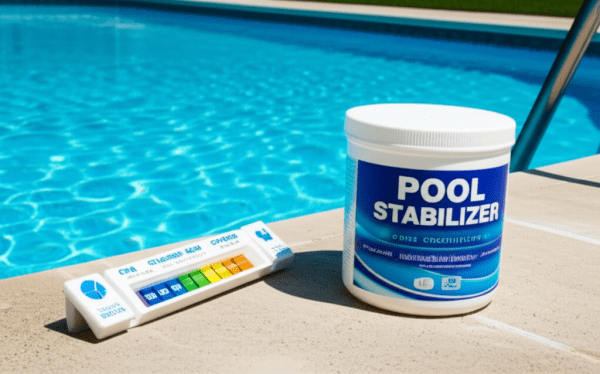
Understanding the Timing: When to Shock Your Pool After Adding Algaecide

Maintaining a clean and algae-free pool requires a combination of preventive measures and reactive treatments. Algaecide and shock treatments are two essential components of pool maintenance, but understanding the proper timing between these treatments is crucial for maximizing their effectiveness. In this article, we’ll delve into the question of how long you should wait after adding algaecide before shocking your pool, providing insights to help you keep your pool water clean, clear, and algae-free.

The Role of Algaecide and Shock in Pool Maintenance:

Algaecide is a chemical treatment specifically designed to prevent and control algae growth in pool water. It works by disrupting algae cell membranes, inhibiting photosynthesis, and preventing algae from thriving and multiplying. Algaecide is typically added to the pool water on a regular basis as part of routine maintenance to prevent algae outbreaks and maintain water clarity.

Shock treatments, on the other hand, are powerful oxidizing agents that help eliminate organic contaminants, bacteria, and algae spores from pool water. Shocking the pool involves adding a concentrated dose of chlorine or other oxidizing agents to rapidly raise the chlorine level and sanitize the water. Shock treatments are used as a reactive measure to address existing algae blooms, cloudy water, or chlorine demand spikes.

Timing Considerations: When to Shock After Adding Algaecide

  1. Follow Manufacturer’s Instructions: The timing between adding algaecide and shocking your pool may vary depending on the specific products used. Always read and follow the manufacturer’s instructions on the product labels carefully for guidance on application rates, dosing intervals, and compatibility with other pool chemicals.
  2. Wait at Least 24 Hours: In general, it’s advisable to wait at least 24 hours after adding algaecide before shocking your pool. This allows sufficient time for the algaecide to disperse and circulate throughout the pool water, maximizing its effectiveness in controlling algae growth.
  3. Consider Algaecide Type: The type of algaecide used may influence the timing of shock treatments. Quaternary ammonium-based algaecides, for example, may require longer waiting periods before shocking the pool compared to copper-based algaecides. Refer to the manufacturer’s instructions for specific guidance based on the algaecide type.
  4. Monitor Water Conditions: Pay close attention to water conditions and visual cues to determine if and when shock treatment is needed after adding algaecide. If algae growth persists or water clarity issues persist despite algaecide treatment, it may be necessary to shock the pool to eliminate remaining algae spores and organic contaminants.

Best Practices for Pool Maintenance:

  1. Regular Testing and Monitoring: Maintain proper pool water balance and sanitation levels by regularly testing water chemistry parameters, including pH, chlorine, alkalinity, and cyanuric acid. Monitor water clarity and appearance for signs of algae growth or contamination.
  2. Preventative Maintenance: Incorporate algaecide treatments into your regular pool maintenance routine to prevent algae growth and maintain water clarity. Follow a consistent schedule for adding algaecide and shock treatments as recommended by the manufacturer.
  3. Address Issues Promptly: Address any signs of algae growth, cloudy water, or water chemistry imbalances promptly to prevent further deterioration and potential algae outbreaks. Act quickly to treat and resolve issues using appropriate pool chemicals and treatments.

Conclusion:

Maintaining a clean and algae-free pool requires proper timing and coordination between algaecide and shock treatments. While it’s generally advisable to wait at least 24 hours after adding algaecide before shocking the pool, specific timing may vary depending on the products used and water conditions. By following manufacturer’s instructions, monitoring water conditions closely, and addressing issues promptly, you can effectively control algae growth, maintain water clarity, and enjoy a clean and inviting swimming environment all season long.

Dealing with Excess Algaecide in Your Pool: Causes and Solutions

Algaecides are essential chemicals used in pool maintenance to prevent and treat algae growth, helping to keep pool water clean and clear. However, using too much algaecide can lead to unintended consequences and potential problems for pool owners. In this article, we’ll explore the causes of excess algaecide in your pool, the signs to look out for, and actionable solutions to address this issue and restore optimal water balance.

Understanding Algaecide in Pool Water:

Algaecides are chemical compounds specifically formulated to inhibit the growth of algae in pool water. They work by disrupting algae cell walls or inhibiting photosynthesis, preventing algae from thriving and multiplying. While algaecides are effective at controlling algae, using them in excess can lead to imbalanced water chemistry and potential side effects.

Causes of Excess Algaecide:

  1. Overdosing: Adding too much algaecide to your pool water, either intentionally or inadvertently, can lead to excess levels of the chemical. Overdosing may occur when following incorrect dosage instructions, using a concentrated algaecide product, or adding algaecide too frequently.
  2. Cumulative Buildup: Algaecide residues can accumulate in pool water over time, especially if algaecide treatments are applied frequently or if a residual algaecide product is used. This buildup can result in excess algaecide levels and potential water chemistry imbalances.

Signs of Excess Algaecide:

  1. Foaming: Excess algaecide in pool water can cause foaming, especially when combined with other pool chemicals or agitation from pool equipment. Foam may accumulate on the pool surface or persist when water is agitated, indicating a potential imbalance.
  2. Cloudy Water: Cloudiness or turbidity in pool water can result from excess algaecide levels, as well as other water chemistry imbalances. Cloudiness may indicate a buildup of algaecide residues or reaction byproducts, impairing water clarity.
  3. Skin and Eye Irritation: High concentrations of algaecide in pool water can cause skin and eye irritation in swimmers. Symptoms may include redness, itching, or discomfort after swimming, indicating a potential imbalance or chemical overdose.

Solutions for Addressing Excess Algaecide:

  1. Dilute the Pool Water: If you suspect excess algaecide levels in your pool, diluting the water by partially draining and refilling the pool can help reduce algaecide concentrations. Monitor water chemistry and adjust chemical levels as needed to restore balance.
  2. Enhance Filtration and Circulation: Increasing filtration and circulation in your pool can help remove excess algaecide residues and restore water clarity. Run the pool pump and filter system for longer periods, and clean or backwash the filter as needed to improve efficiency.
  3. Test and Adjust Water Chemistry: Regularly test pool water chemistry using a reliable pool water test kit and adjust chemical levels as needed to maintain balance. Pay close attention to algaecide levels, as well as pH, chlorine, and alkalinity, and take corrective action to restore optimal water balance.
  4. Consult a Pool Professional: If you’re unsure how to address excess algaecide in your pool or if the problem persists despite your efforts, consider consulting with a pool professional or water chemistry expert. They can assess the situation, provide recommendations for corrective action, and help restore water quality.

Conclusion:

While algaecides are valuable tools for preventing and treating algae growth in pools, using too much algaecide can lead to unintended consequences and potential water chemistry imbalances. By understanding the causes and signs of excess algaecide and taking proactive measures to address the issue, pool owners can restore optimal water balance and maintain a clean and healthy swimming environment. Regular monitoring of water chemistry, proper dosage of algaecide, and prompt corrective action are essential for ensuring the effective and safe use of algaecides in pool maintenance.

The Benefits of Adding Salt to Your Freshwater Pool: Exploring a Safer and More Comfortable Swimming Experience

When it comes to pool maintenance, many homeowners seek alternatives to traditional chlorine-based systems. One increasingly popular option is converting a freshwater pool into a saltwater pool by adding salt. While it may seem counterintuitive to add salt to a freshwater pool, the benefits of doing so are numerous. In this article, we’ll explore why someone might consider adding salt to their freshwater pool and the advantages it offers for a safer, more comfortable, and lower-maintenance swimming experience.

1. Gentler on Skin and Eyes:

One of the primary reasons for converting to a saltwater pool is the softer feel of the water. Saltwater pools have lower chlorine concentrations compared to traditional chlorine pools, resulting in water that is gentler on the skin and eyes. Swimmers are less likely to experience skin irritation, redness, or dryness after swimming in a saltwater pool, making it a more comfortable experience overall.

2. Reduced Chlorine Smell and Taste:

Saltwater pools produce chlorine through electrolysis, resulting in a more consistent and controlled release of chlorine into the water. This means there is less chloramine formation, which is responsible for the strong chlorine smell and taste often associated with traditional chlorine pools. As a result, swimmers in saltwater pools are less likely to experience unpleasant odors or tastes, enhancing the swimming experience.

3. Lower Maintenance Requirements:

Saltwater pools require less frequent monitoring and maintenance compared to traditional chlorine pools. Once the salt level is properly balanced, the salt chlorinator system automatically generates chlorine as needed, eliminating the need for manual chlorine additions. This can save homeowners time and effort in maintaining their pool, allowing them to spend more time enjoying it.

4. Cost Savings Over Time:

While the initial cost of installing a salt chlorinator system may be higher than traditional chlorine systems, saltwater pools can lead to cost savings over time. With fewer chemical additions and lower maintenance requirements, homeowners can reduce their spending on pool chemicals and maintenance products in the long run. Additionally, the extended lifespan of pool equipment due to reduced exposure to harsh chemicals can further contribute to cost savings.

5. Eco-Friendly Option:

Saltwater pools are often considered a more environmentally friendly option compared to traditional chlorine pools. With fewer chemical additions and lower chlorine concentrations, saltwater pools produce fewer harmful byproducts and reduce the overall environmental impact associated with pool maintenance. Additionally, salt is a natural and abundant resource, making it a sustainable choice for pool sanitation.

Conclusion:

Adding salt to a freshwater pool to convert it into a saltwater pool offers numerous benefits for homeowners seeking a safer, more comfortable, and lower-maintenance swimming experience. From gentler water that is easier on the skin and eyes to reduced chlorine smell and taste, saltwater pools provide a more enjoyable swimming environment for the whole family. With lower maintenance requirements and cost savings over time, saltwater pools are an attractive option for homeowners looking to enhance their pool experience while minimizing the environmental impact. If you’re considering converting your freshwater pool to a saltwater pool, explore the benefits further and consult with a pool professional to determine if it’s the right choice for you.

The Complete Guide to Saltwater Pool Maintenance: Tips for Crystal-Clear Water All Season Long

Saltwater pools have gained popularity in recent years due to their softer feel and lower chemical maintenance requirements compared to traditional chlorine pools. However, proper maintenance is still essential to keep your saltwater pool clean, clear, and inviting for swimming. In this comprehensive guide, we’ll explore the ins and outs of saltwater pool maintenance, including tips and best practices to help you enjoy crystal-clear water all season long.

Understanding Saltwater Pool Maintenance:

Unlike traditional chlorine pools, saltwater pools use a chlorine generator, also known as a salt chlorinator, to produce chlorine from dissolved salt in the water. While saltwater pools require less frequent additions of chlorine compared to traditional pools, they still require regular maintenance to ensure optimal water quality and safety.

Tips for Saltwater Pool Maintenance:

  1. Monitor Salt Levels: Regularly test the salt levels in your pool using a salt test kit or electronic salt meter. The ideal salt level for most saltwater pools is between 2,500 to 3,500 parts per million (ppm). Add salt as needed to maintain the recommended range.
  2. Check Chlorine Levels: Although salt chlorinators generate chlorine automatically, it’s important to monitor chlorine levels regularly using a test kit or electronic tester. Aim for a chlorine level between 1 to 3 ppm to ensure effective sanitation.
  3. Balance pH Levels: Maintain proper pH levels in your pool by testing the water weekly and adjusting as needed using pH increaser (sodium carbonate) or pH decreaser (muriatic acid). The ideal pH range for saltwater pools is between 7.2 to 7.6.
  4. Inspect and Clean the Chlorine Generator: Periodically inspect the salt chlorinator cell for any buildup of scale or debris. Clean the cell as needed using a mild acid solution (vinegar or muriatic acid) to remove scale and maintain efficient chlorine production.
  5. Backwash and Clean the Filter: Regularly backwash or clean your pool filter according to the manufacturer’s recommendations to remove dirt, debris, and contaminants from the water. Clean cartridge filters with a hose or filter cleaner solution, and backwash sand filters as needed to maintain proper filtration.
  6. Skim and Vacuum Debris: Use a skimmer net to remove leaves, insects, and other debris from the surface of the pool regularly. Additionally, vacuum the pool floor and walls weekly to remove sediment and prevent algae growth.
  7. Shock the Pool Periodically: Occasionally shock the pool with a non-chlorine shock or oxidizing shock treatment to oxidize organic contaminants and maintain water clarity. Follow the manufacturer’s instructions for dosage and application.
  8. Inspect and Maintain Equipment: Check pool equipment, including pumps, motors, and valves, regularly for signs of wear or damage. Lubricate o-rings and gaskets as needed, and schedule routine maintenance or repairs as necessary.
  9. Winterize the Pool: If you live in a region with cold winters, winterize your saltwater pool to protect it from freezing temperatures. Lower the water level, clean and winterize the equipment, and add winterizing chemicals as recommended by a pool professional.

Conclusion:

Maintaining a saltwater pool requires regular attention to ensure optimal water quality and safety for swimmers. By following these tips and best practices for saltwater pool maintenance, you can enjoy crystal-clear water and a hassle-free swimming experience all season long. Remember to test water chemistry regularly, clean and maintain equipment, and address any issues promptly to keep your saltwater pool in top condition. With proper care and maintenance, your saltwater pool will provide endless enjoyment for years to come.

Acid Washing Your Swimming Pool: A Comprehensive Guide

Over time, swimming pool surfaces can develop unsightly stains, mineral deposits, or algae growth that regular cleaning methods may not effectively remove. In such cases, acid washing can be a powerful solution to restore the appearance of pool surfaces and rejuvenate their beauty. In this blog post, we’ll delve into what acid washing a swimming pool entails, when it’s needed, and how to do it safely and effectively.

What is Acid Washing?

Acid washing is a process used to remove stubborn stains, mineral deposits, algae, or other contaminants from swimming pool surfaces. It involves applying a diluted acid solution to the pool’s walls, floors, or tile surfaces to dissolve and lift away buildup and discoloration. Acid washing can rejuvenate the appearance of pool surfaces and restore their original luster.

When is Acid Washing Needed?

Acid washing may be necessary under the following circumstances:

  1. Stubborn Stains: Despite regular cleaning efforts, certain stains or discoloration may persist on pool surfaces, including calcium deposits, rust stains, or organic stains.
  2. Algae Infestation: Severe algae infestations that have penetrated the surface of pool plaster or tile may require acid washing to effectively remove the algae and prevent regrowth.
  3. Mineral Deposits: Hard water or high calcium levels can lead to the buildup of mineral deposits on pool surfaces, resulting in scaling or scaling. Acid washing can help dissolve and remove these deposits.
  4. Preparation for Resurfacing: Before resurfacing or replastering a pool, acid washing may be necessary to clean and prepare the existing surface for the application of new materials.

How to Acid Wash a Swimming Pool:

  1. Preparation: Before beginning the acid washing process, drain the pool to the desired level below the stained or affected areas. Disconnect any pool equipment, such as pumps and filters, to prevent damage from the acid solution.
  2. Safety Precautions: Wear appropriate protective gear, including gloves, goggles, and a respirator mask, to protect against contact with acid fumes or splashes.
  3. Prepare Acid Solution: Dilute muriatic acid (hydrochloric acid) with water in a ratio of approximately one part acid to ten parts water. Add the acid to the water slowly and carefully to avoid splashing or generating heat.
  4. Apply Acid Solution: Using a sprayer or watering can, apply the diluted acid solution evenly to the stained or affected areas of the pool surface. Work in small sections to ensure thorough coverage.
  5. Scrubbing: After applying the acid solution, use a stiff-bristled brush or scrubbing pad to agitate the surface and loosen stubborn stains or deposits. Take care not to apply excessive pressure or scrub too vigorously, as this can damage the pool surface.
  6. Rinse Thoroughly: Once the stains have been loosened, rinse the pool surface thoroughly with water to remove the acid solution and any dissolved debris. Use a hose or pressure washer to ensure complete removal.
  7. Neutralize Acid: After rinsing, neutralize any remaining acid on the pool surface by applying a baking soda solution (approximately one pound of baking soda per gallon of water) and scrubbing gently. Rinse again to remove the neutralizing solution.
  8. Refill Pool: Once the acid washing process is complete and the pool surface has been thoroughly rinsed and neutralized, refill the pool with fresh water to the desired level.
  9. Balance Water Chemistry: Test the pool water and adjust chemical levels as needed to ensure proper water balance and safety for swimming.

Conclusion:

Acid washing is a powerful method for removing stubborn stains, mineral deposits, algae, and other contaminants from swimming pool surfaces. When performed correctly and with proper safety precautions, acid washing can rejuvenate the appearance of pool surfaces and restore their original beauty. Whether addressing persistent stains, preparing for resurfacing, or combating algae infestations, acid washing can be an effective solution for maintaining a clean and inviting swimming environment. If you’re unsure about how to acid wash your pool safely and effectively, consider consulting with a professional pool service technician for assistance.

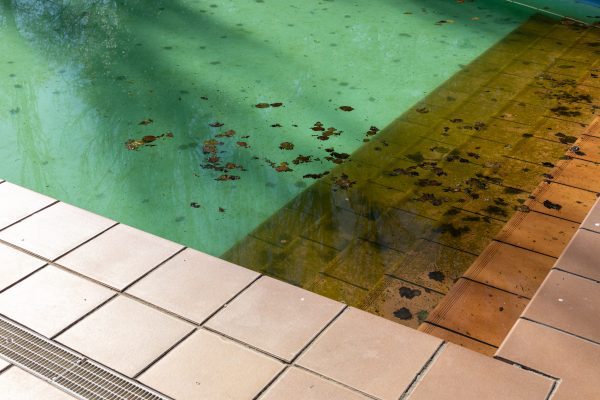
Dealing with Black Spots in Your Pool: Causes and Solutions

Black spots in a pool can be a frustrating sight for any pool owner, especially when they persist despite regular cleaning and maintenance efforts. While black spots are often associated with algae growth, they can also be caused by other factors such as mineral deposits, metal staining, or even organic debris. In this blog post, we’ll explore the possible causes of black spots in a pool that aren’t algae and discuss effective strategies for getting rid of them to restore your pool’s clarity and beauty.

Identifying the Causes of Black Spots:

  1. Metal Staining: Metals such as iron, copper, or manganese can leach into pool water from various sources, including water sources, pool equipment, or metal fixtures. When these metals oxidize, they can form dark stains or discoloration on pool surfaces.
  2. Mineral Deposits: Calcium, magnesium, and other minerals present in pool water can accumulate on pool surfaces over time, especially in areas with high evaporation rates or hard water. These deposits can appear as dark spots or scaling on pool walls, floors, or tile grout.
  3. Organic Debris: Decomposing organic matter, such as leaves, twigs, or insects, can settle on pool surfaces and create black spots or stains as they break down. These spots may appear in areas with poor circulation or where debris tends to accumulate.

Strategies for Removing Black Spots:

  1. Metal Stain Removers: Commercial metal stain removers are available that can effectively dissolve and remove metal stains from pool surfaces. Follow the manufacturer’s instructions carefully when using these products and consider conducting a spot test in an inconspicuous area before widespread application.
  2. Ascorbic Acid Treatment: Ascorbic acid, commonly known as vitamin C, can be used to effectively remove metal stains from pool surfaces. Dissolve ascorbic acid powder in water and apply the solution directly to affected areas. Allow the solution to sit for several minutes, then scrub the stains with a pool brush before rinsing thoroughly.
  3. Chelating Agents: Chelating agents such as EDTA (ethylenediaminetetraacetic acid) or HEDP (1-hydroxyethylidene-1,1-diphosphonic acid) can help sequester metals in the water, preventing them from depositing onto pool surfaces. Regular use of chelating agents can help prevent future metal staining.
  4. Acid Washing: In severe cases of mineral deposits or staining, acid washing may be necessary to restore the appearance of pool surfaces. Acid washing involves applying a diluted acid solution to the pool surfaces to dissolve and remove stubborn stains and deposits. Due to the caustic nature of acid washing, it’s best left to professional pool service technicians.
  5. Preventative Measures: To prevent the recurrence of black spots, maintain proper water chemistry and balance, including pH, alkalinity, and calcium hardness levels. Regularly clean and brush pool surfaces to remove debris and prevent buildup.

Conclusion:

Black spots in a pool can be unsightly and frustrating to deal with, especially when they’re not caused by algae growth. By identifying the underlying causes of black spots and implementing appropriate removal strategies, you can effectively restore your pool’s clarity and beauty. Whether dealing with metal staining, mineral deposits, or organic debris, there are various solutions available to address the issue and prevent recurrence. With proper maintenance and preventative measures, you can enjoy a clean and inviting swimming environment all season long.

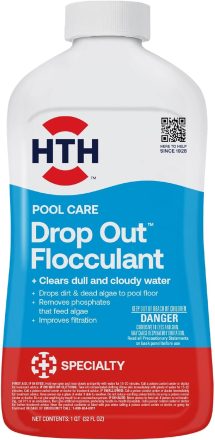
Clarifier vs. Flocculant: Understanding Their Role in Pool Maintenance

Clear, sparkling pool water is not only aesthetically pleasing but also essential for a safe and enjoyable swimming experience. To achieve pristine water clarity, pool owners often turn to chemical additives such as clarifiers and flocculants. In this blog post, we’ll explore the differences between clarifiers and flocculants, how they work, and when to use them in pool maintenance routines.

Clarifier: Enhancing Water Clarity

Clarifiers are chemical additives designed to improve water clarity by coagulating small particles suspended in the pool water. These particles, including dirt, debris, and microscopic algae, are often too small to be captured by the pool’s filtration system and can contribute to cloudy or dull water. Clarifiers work by causing these tiny particles to clump together, forming larger aggregates that are easier for the filter to trap and remove.

How Clarifiers Work:

  1. Dispersing Agent: Clarifiers contain a dispersing agent that helps evenly distribute the chemical throughout the pool water.
  2. Coagulation: Once dispersed, the clarifier attracts and binds to suspended particles, causing them to clump together.
  3. Filtration: The larger particle aggregates formed by the clarifier are captured by the pool’s filter, resulting in clearer water.

When to Use Clarifiers:

  • Use clarifiers when pool water appears cloudy or dull due to the presence of fine particles that cannot be effectively filtered out.
  • Clarifiers are especially helpful after heavy pool usage, following a storm, or during periods of high pollen or debris accumulation.

Flocculant: Settling Suspended Particles

Flocculants, often referred to as “floc,” are powerful chemical agents that work by causing suspended particles in the pool water to clump together and settle to the bottom of the pool. Unlike clarifiers, which form larger particle aggregates that are captured by the filter, flocculants create visible clumps that can be vacuumed or manually removed from the pool.

How Flocculants Work:

  1. Aggregation: Flocculants bind to suspended particles in the water, causing them to aggregate and form visible clumps.
  2. Settling: The heavy clumps created by the flocculant quickly settle to the bottom of the pool, taking the suspended particles with them.
  3. Removal: Once settled, the particles can be removed from the pool by vacuuming the pool floor or manually scooping them out.

When to Use Flocculants:

  • Flocculants are best used when pool water is excessively cloudy or turbid, indicating a high concentration of suspended particles.
  • Use flocculants as a last resort when other methods, such as filtration and clarifiers, have failed to improve water clarity.

Conclusion:

Clarifiers and flocculants are valuable tools in the pool owner’s arsenal for achieving and maintaining clear, sparkling water. While clarifiers work by coagulating small particles to improve filtration efficiency, flocculants cause suspended particles to settle to the bottom of the pool for easy removal. By understanding the differences between clarifiers and flocculants and knowing when to use each product, pool owners can effectively combat cloudy water and enjoy a pristine swimming environment all season long. Remember to follow manufacturer instructions and proper dosing guidelines when using clarifiers and flocculants to ensure safe and effective results.

Mastering the pH of Your Swimming Pool

Having a swimming pool in your backyard is undeniably one of the most satisfying feelings, especially during a hot summer day. But like all good things, a pool comes with responsibilities. One of the critical aspects of pool maintenance is managing the pool’s pH level. Let’s embark on a journey to understand the pool’s pH and the chemicals essential for its equilibrium.

1. What is pH, and Why Should You Care?

In simplest terms, pH measures how acidic or basic water is on a scale from 0-14. A pH of 7 is neutral. Anything below 7 is acidic, while anything above is basic or alkaline. For swimming pools, the ideal pH range is between 7.2 and 7.8.

A balanced pH is crucial because:

  • It ensures that chlorine and other sanitizers work effectively.
  • It prevents skin and eye irritation for swimmers.
  • It protects your pool equipment from potential damage.

2. The Yin and Yang of Pool Chemicals:

a) To Raise pH (pH is too low or acidic):

  • Soda Ash (Sodium Carbonate): This is the most common chemical to raise pH. It’s quick, efficient, and relatively easy to apply.
  • Baking Soda (Sodium Bicarbonate): While primarily used to raise alkalinity, it can also increase pH, albeit slowly.

b) To Lower pH (pH is too high or alkaline):

  • Muriatic Acid (Hydrochloric Acid): Highly effective and acts quickly. However, it’s caustic, so handle with care and always read the label.
  • Dry Acid (Sodium Bisulfate): It’s a granular form and a safer alternative to muriatic acid. It’s easier to store and handle.

3. Factors Affecting Pool pH:

Several factors can sway your pool’s pH:

  • Rain and Tap Water: Depending on your region, both might be acidic or alkaline, affecting your pool’s balance.
  • Swimmers: Oils, sweat, lotions, and other contaminants from swimmers can alter pH levels.
  • Chemicals: Algaecides, chlorine, and other pool additives can influence pH.

4. Testing and Adjusting Regularly:

Regular testing is the key to maintaining balanced water. Using test kits or test strips, check pH levels at least once a week, more if the pool is used heavily.

When adjusting pH:

  1. Test first and determine how much of a chemical you need.
  2. Add chemicals in small amounts, retest, and then add more if necessary.
  3. Always follow the manufacturer’s instructions when adding chemicals.

Conclusion:

Understanding and managing your pool’s pH is an art as much as it is a science. By staying vigilant, testing regularly, and using the right chemicals, you can ensure that your pool remains a safe and pleasant oasis for everyone. Dive in with confidence, knowing you’ve mastered the balancing act!

Warmth Amidst Winter: Gearing Up Your Spa for Frosty Days Ahead

Winter’s chilly embrace doesn’t mean saying farewell to the soothing sanctuary of your spa. In fact, sinking into warm waters while surrounded by frosty landscapes is a surreal experience. But to ensure those bubbly moments aren’t interrupted, it’s vital to prepare your spa for winter usage. Let’s unfurl the steps, chemicals, and accessories essential for a winter-ready spa.

1. Winter Opening Chemicals: Setting the Foundation
Ensuring water purity and safety is paramount. Using the right chemicals when you open your spa for winter use can prevent issues down the line.

  • Spa Sanitizers: Chlorine or bromine, which one is your pick? These sanitize your spa, keeping algae and bacteria at bay. Remember to monitor levels throughout winter.
  • Balancers: For optimum spa enjoyment, the water should be neither too acidic nor too alkaline. Use pH increasers or decreasers accordingly.
  • Algaecides: Even in winter, algae can be a concern. Add an algaecide to prevent any blooms.
  • Shock Treatment: A non-chlorine shock will oxidize contaminants and ensure your sanitizer works efficiently.

2. Essential Accessories for Winter Bliss

  • Insulated Spa Cover: A well-insulated cover retains heat, keeps out debris, and reduces energy costs. They’re essential for winter when the temperature gap between the spa and environment is significant.
  • Floating Thermal Blankets: These float on the water’s surface beneath the main cover, adding an additional layer of insulation and reducing evaporation.
  • Spa Cover Lifter: Wet winter spa covers can be heavy. A lifter makes it easier to remove and replace the cover.
  • Anti-Freezing Devices: These will monitor the water temperature and turn on the spa’s circulation system if it approaches freezing. This prevents water from freezing in the pipes.
  • Handrails and Non-slip Mats: Frost and moisture can make surfaces slippery. Ensure you have sturdy handrails for safe entry and exit, and non-slip mats to prevent any unfortunate mishaps.

3. Routine Checks and Maintenance

  • Filtration: Check and clean filters regularly. A clogged filter can overwork the spa’s circulation system.
  • Water Levels: In freezing conditions, water can evaporate rapidly. Ensure the water level doesn’t drop too low to prevent pump damage.
  • Regular Testing: Use a testing kit to monitor pH, alkalinity, and sanitizer levels. Adjust chemicals as necessary.

Conclusion:
Winter and spa sound like an unlikely pairing, but with the right preparation, it’s a match made in frosty heaven. As snowflakes dance around, immersing yourself in a steamy spa becomes a wintertime ritual you’ll look forward to year after year. So, prepare well, ensure safety, and let your spa be your warm hug during the cold months. Cheers to warm bubbles amidst cool breezes!

A New Homeowner’s Guide to Using Muriatic Acid in Swimming Pools

Discover the purpose of using muriatic acid in swimming pools and learn how to safely and effectively apply it as a new homeowner.

Introduction

As a new homeowner with a swimming pool, you might be wondering about the different chemicals and treatments required to maintain clean and safe pool water. One such chemical, muriatic acid, is commonly used to adjust pH levels and remove stains in swimming pools. In this article, we will explain why muriatic acid is essential and provide a step-by-step guide on how to safely and effectively use it in your swimming pool.

Why Use Muriatic Acid in Your Swimming Pool?

Muriatic acid, also known as hydrochloric acid, serves two main purposes in pool maintenance:

  1. Adjusting pH levels: Maintaining balanced pH levels (between 7.4 and 7.6) is crucial for ensuring the comfort of swimmers, as well as the effectiveness of sanitizing chemicals such as chlorine. If your pool’s pH level is too high (above 7.6), it can reduce the efficacy of sanitizers, cause cloudy water, and lead to scaling on pool surfaces. Muriatic acid is an effective solution for lowering the pH level in your pool.
  2. Removing stains and cleaning pool surfaces: Muriatic acid can be used to remove stains and deposits from pool surfaces, including plaster, tile, and concrete. The acid dissolves the deposits, allowing them to be scrubbed away easily.

How to Use Muriatic Acid in Your Swimming Pool Safely

Before using muriatic acid, it’s essential to understand the risks associated with handling this potent and potentially dangerous chemical. Always wear protective gear, including gloves, goggles, and a mask, and follow these steps for safe and effective use:


Step 1: Test Your Pool Water

Before using muriatic acid, test your pool’s pH levels using a reliable pool water testing kit. If the pH is above 7.6, you may need to add muriatic acid to lower it. Follow the manufacturer’s recommendations for the ideal pH range for your pool.

Step 2: Determine the Required Amount of Muriatic Acid

Refer to the muriatic acid packaging or consult a pool professional to determine the appropriate amount of acid needed to adjust the pH in your pool. The required quantity will depend on the size of your pool, the current pH level, and the desired pH level.

Step 3: Dilute the Muriatic Acid

In a well-ventilated area, carefully pour the muriatic acid into a large bucket of water, following a 1:10 ratio (1 part acid to 10 parts water). Always add the acid to the water, not the other way around, to avoid a dangerous chemical reaction. Stir the solution gently using a non-metallic object, such as a plastic or wooden rod.

Step 4: Add the Diluted Acid to Your Pool

Turn on your pool’s circulation system to ensure the muriatic acid is evenly distributed throughout the pool. Slowly pour the diluted acid solution into the deep end of the pool, avoiding contact with the pool walls and surfaces.

Step 5: Monitor the pH Levels

Wait for at least 4 hours after adding the muriatic acid, and then test the pH levels again. If the pH is still too high, repeat the process until the desired pH is reached. If the pH is too low (below 7.4), use a pH increaser to raise the pH to the appropriate level.

Conclusion

Muriatic acid is a useful tool for maintaining the proper pH levels in your swimming pool and removing unsightly stains and deposits from pool

surfaces. As a new homeowner, it’s essential to understand the importance of balanced pool water and how to safely handle and use chemicals like muriatic acid.

Always remember to wear protective gear and follow proper safety precautions when handling muriatic acid. By doing so, you can effectively maintain the health and cleanliness of your pool, ensuring a safe and enjoyable swimming experience for you and your family.

In addition to using muriatic acid, maintaining a regular pool maintenance routine, including skimming, vacuuming, and monitoring sanitizer levels, will help keep your pool in pristine condition. By investing time and effort in pool care, you can enjoy the benefits of a sparkling and inviting swimming pool in your new home.