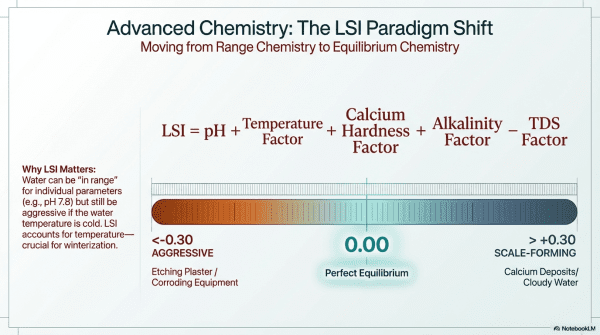
Dealing with Low Cyanuric Acid Levels in Your Pool: Causes and Solutions

Maintaining proper cyanuric acid levels in your pool is crucial for ensuring effective chlorine stabilization and protection against UV degradation. When cyanuric acid levels drop too low, it can compromise the efficiency of chlorine and leave your pool vulnerable to bacterial growth and algae infestation. In this article, we’ll explore the causes of low cyanuric acid levels in pools and provide actionable solutions to address this issue and restore optimal water balance.

Understanding Cyanuric Acid in Pool Water:

Cyanuric acid, also known as stabilizer or conditioner, is a chemical compound commonly used in outdoor pools to stabilize chlorine and protect it from degradation caused by UV sunlight. It forms a protective shield around chlorine molecules, prolonging their lifespan and enhancing their effectiveness in sanitizing pool water. The ideal cyanuric acid level for most pools is between 30 to 50 parts per million (ppm).

Causes of Low Cyanuric Acid Levels:

  1. Dilution from Heavy Rainfall or Backwashing: Heavy rainfall or frequent backwashing can dilute cyanuric acid levels in pool water, leading to a decrease in concentration over time. This is especially common in outdoor pools exposed to weather elements.
  2. Overdilution from Excessive Water Replacement: If you frequently drain and refill your pool water or have a high rate of water evaporation, it can result in the loss of cyanuric acid and other pool chemicals. Over time, this can lead to low cyanuric acid levels in the pool.
  3. Use of Unstabilized Chlorine Products: Using unstabilized chlorine products, such as liquid chlorine or calcium hypochlorite, without supplemental cyanuric acid can contribute to low cyanuric acid levels in the pool. These products do not contain cyanuric acid and can deplete existing levels over time.

Solutions for Increasing Cyanuric Acid Levels:

  1. Add Cyanuric Acid Directly: The most direct solution for increasing cyanuric acid levels is to add cyanuric acid directly to the pool water. Cyanuric acid is typically available in granular or powdered form and can be added directly to the pool according to the manufacturer’s instructions. Be sure to distribute it evenly across the pool surface and allow time for it to dissolve completely.
  2. Use Stabilized Chlorine Products: Switching to stabilized chlorine products, such as dichlor or trichlor, can help maintain cyanuric acid levels in the pool while simultaneously sanitizing the water. These products contain cyanuric acid as an active ingredient, providing ongoing stabilization and protection against chlorine degradation.
  3. Reduce Water Replacement: Minimize the frequency of draining and refilling your pool water to prevent excessive loss of cyanuric acid and other pool chemicals. Implement water conservation measures and address leaks or evaporation issues to reduce the need for water replacement.
  4. Monitor and Adjust Regularly: Test cyanuric acid levels in your pool water regularly using a reliable pool water test kit. Adjust cyanuric acid levels as needed to maintain the recommended range of 30 to 50 ppm, especially during periods of heavy rainfall or water replacement.

Conclusion:

Low cyanuric acid levels in your pool can compromise water balance and chlorine effectiveness, leaving your pool vulnerable to bacterial growth and algae infestation. By understanding the causes of low cyanuric acid levels and implementing appropriate solutions, you can restore optimal water balance and ensure a clean and safe swimming environment for yourself and your family. Be proactive in monitoring cyanuric acid levels and take necessary steps to maintain them within the recommended range, protecting your pool investment and enhancing your swimming experience.

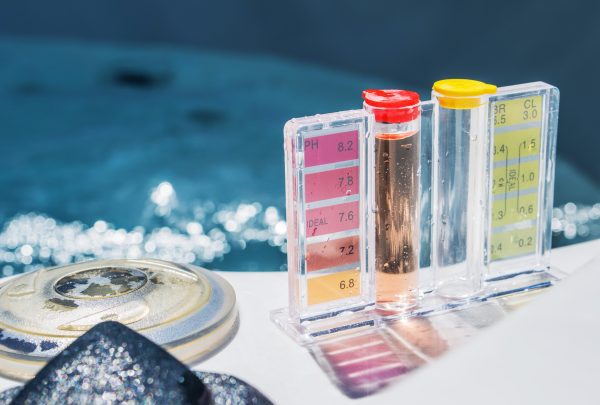
A Complete Guide to Testing, Raising, and Lowering Pool pH Levels

Maintaining proper pH levels in your pool is crucial for ensuring water clarity, comfort, and safety. pH, which measures the acidity or alkalinity of the water, directly impacts the effectiveness of chlorine and other pool chemicals, as well as the overall swimming experience. In this comprehensive guide, we’ll walk you through the process of testing, raising, and lowering pool pH levels to help you achieve optimal water balance and enjoy a pristine swimming environment.

Step 1: Testing Pool pH Levels

  1. Select a Reliable Test Kit: Choose a high-quality pool water test kit that includes pH testing reagents and a color comparator for accurate results.
  2. Collect a Water Sample: Use a clean container to collect a water sample from elbow depth in your pool, away from return jets and skimmers.
  3. Follow Test Kit Instructions: Follow the manufacturer’s instructions carefully to perform the pH test, adding the appropriate reagents and comparing the resulting color to the provided chart.
  4. Interpret Results: Determine the pH level of your pool water based on the color match obtained from the test. The ideal pH range for pool water is typically between 7.2 and 7.6.

Step 2: Raising Pool pH Levels

  1. Use Sodium Carbonate (Soda Ash): To raise pH levels in your pool, add sodium carbonate (soda ash) according to the manufacturer’s instructions. Start with a small amount and retest after several hours to avoid overcorrection.
  2. Broadcast Distribution: Broadcast the soda ash evenly across the pool surface, using a pool brush or skimmer to help disperse the chemical throughout the water.
  3. Circulate Water: Turn on your pool pump and circulation system to help distribute the soda ash and facilitate mixing with the pool water.
  4. Retest and Adjust: After allowing time for the soda ash to dissolve and mix thoroughly, retest the pool pH levels and adjust as needed until the desired pH range is achieved.

Step 3: Lowering Pool pH Levels

  1. Use Muriatic Acid: To lower pH levels in your pool, add muriatic acid (hydrochloric acid) according to the manufacturer’s instructions. Be sure to wear appropriate protective gear, including gloves and goggles, when handling acid.
  2. Add Acid Slowly: Carefully add the muriatic acid to the pool water in small increments, pouring it evenly around the pool perimeter to prevent localized areas of high acidity.
  3. Allow Mixing: Allow the acid to mix thoroughly with the pool water by running the pump and filtration system for several hours.
  4. Retest and Adjust: After giving the acid time to disperse and lower pH levels, retest the pool water and adjust as needed until the desired pH range is achieved.

Additional Tips for pH Maintenance:

  • Regular Testing: Test pool pH levels weekly and after heavy pool usage or rainfall to ensure ongoing balance.
  • Adjustments After Chemical Treatments: Make pH adjustments after adding other pool chemicals, as they can affect pH levels.
  • Avoid Drastic Changes: Avoid making large pH adjustments at once, as this can lead to rapid pH swings and imbalances.
  • Consult a Professional: If you’re unsure about how to adjust pool pH levels safely and effectively, consider consulting with a pool professional for guidance.

Conclusion:

Maintaining proper pH levels in your pool is essential for achieving clear, balanced water and ensuring a safe and enjoyable swimming environment. By following the steps outlined in this guide and testing, raising, or lowering pH levels as needed, you can effectively manage water chemistry and enjoy a pristine pool all season long. Remember to handle pool chemicals with care and always follow manufacturer instructions and safety precautions for best results.

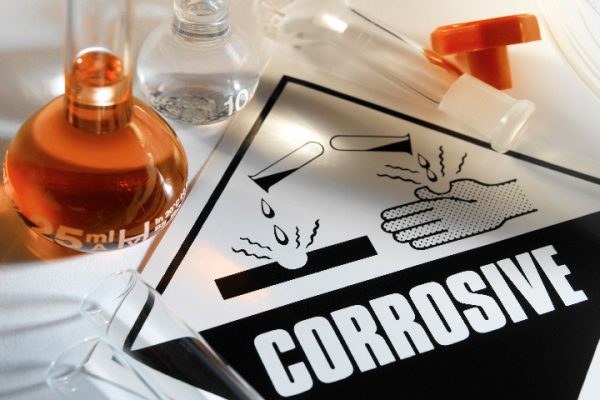
Using Sulfuric Acid in Swimming Pools: Should You Use It or Is There a Better Option?

Explore the use of sulfuric acid in swimming pools, its applications, and whether there are safer and more effective alternatives for pool maintenance.

Maintaining a healthy and balanced swimming pool requires various chemicals to manage pH levels, sanitize the water, and prevent algae growth. While sulfuric acid is a potential option for pool maintenance, it’s essential to understand its specific applications, safety concerns, and whether there are better alternatives. This article will discuss the use of sulfuric acid in swimming pools and provide recommendations on whether to use it or opt for a different option.

Sulfuric Acid and Its Use in Swimming Pools

Sulfuric acid (H2SO4) is a strong, corrosive acid commonly used in various industrial applications, such as battery manufacturing, fertilizer production, and water treatment. In swimming pools, sulfuric acid can serve as an alternative to muriatic acid (hydrochloric acid) for lowering the pH and total alkalinity levels.

Although sulfuric acid can be effective in adjusting the water balance, it’s not commonly used in residential pools due to its highly corrosive nature and the availability of safer alternatives.

Safety Concerns with Sulfuric Acid

Handling sulfuric acid requires extreme caution as it poses several risks, including:

  1. Corrosion: Sulfuric acid is highly corrosive and can damage pool equipment, including pumps, filters, and heaters, if not used correctly.
  2. Toxic fumes: When added to water, sulfuric acid produces toxic fumes that can cause respiratory issues if inhaled.
  3. Skin and eye irritation: Direct contact with sulfuric acid can lead to severe skin burns and eye damage. Proper protective gear, such as gloves, goggles, and a mask, is necessary when handling this chemical.

Alternative Options for pH and Alkalinity Control

Given the risks associated with sulfuric acid, several safer alternatives are commonly used for pool maintenance:

  1. Muriatic acid (hydrochloric acid): Muriatic acid is a popular option for lowering pH and total alkalinity levels in swimming pools. While still corrosive, it is generally considered safer and easier to handle than sulfuric acid. Always wear protective gear and follow the manufacturer’s guidelines when using muriatic acid.
  2. Sodium bisulfate (dry acid): Sodium bisulfate is a granular acid that can be used as a safer alternative to liquid acids. It’s easier to store and handle, making it an attractive option for residential pool owners. Follow the manufacturer’s instructions for dosage and application.

While sulfuric acid can be effective in managing pH and total alkalinity levels in swimming pools, its highly corrosive nature and associated safety risks make it a less desirable option for residential pool maintenance. Safer and more commonly used alternatives, such as muriatic acid and sodium bisulfate, provide effective pH control with fewer hazards.

When managing your pool’s water chemistry, always prioritize safety and follow the manufacturer’s instructions for handling and applying chemicals. By choosing the appropriate products for your pool and maintaining a regular maintenance routine, you can ensure a clean, healthy, and enjoyable swimming environment.

A New Homeowner’s Guide to Using Muriatic Acid in Swimming Pools

Discover the purpose of using muriatic acid in swimming pools and learn how to safely and effectively apply it as a new homeowner.

Introduction

As a new homeowner with a swimming pool, you might be wondering about the different chemicals and treatments required to maintain clean and safe pool water. One such chemical, muriatic acid, is commonly used to adjust pH levels and remove stains in swimming pools. In this article, we will explain why muriatic acid is essential and provide a step-by-step guide on how to safely and effectively use it in your swimming pool.

Why Use Muriatic Acid in Your Swimming Pool?

Muriatic acid, also known as hydrochloric acid, serves two main purposes in pool maintenance:

  1. Adjusting pH levels: Maintaining balanced pH levels (between 7.4 and 7.6) is crucial for ensuring the comfort of swimmers, as well as the effectiveness of sanitizing chemicals such as chlorine. If your pool’s pH level is too high (above 7.6), it can reduce the efficacy of sanitizers, cause cloudy water, and lead to scaling on pool surfaces. Muriatic acid is an effective solution for lowering the pH level in your pool.
  2. Removing stains and cleaning pool surfaces: Muriatic acid can be used to remove stains and deposits from pool surfaces, including plaster, tile, and concrete. The acid dissolves the deposits, allowing them to be scrubbed away easily.

How to Use Muriatic Acid in Your Swimming Pool Safely

Before using muriatic acid, it’s essential to understand the risks associated with handling this potent and potentially dangerous chemical. Always wear protective gear, including gloves, goggles, and a mask, and follow these steps for safe and effective use:


Step 1: Test Your Pool Water

Before using muriatic acid, test your pool’s pH levels using a reliable pool water testing kit. If the pH is above 7.6, you may need to add muriatic acid to lower it. Follow the manufacturer’s recommendations for the ideal pH range for your pool.

Step 2: Determine the Required Amount of Muriatic Acid

Refer to the muriatic acid packaging or consult a pool professional to determine the appropriate amount of acid needed to adjust the pH in your pool. The required quantity will depend on the size of your pool, the current pH level, and the desired pH level.

Step 3: Dilute the Muriatic Acid

In a well-ventilated area, carefully pour the muriatic acid into a large bucket of water, following a 1:10 ratio (1 part acid to 10 parts water). Always add the acid to the water, not the other way around, to avoid a dangerous chemical reaction. Stir the solution gently using a non-metallic object, such as a plastic or wooden rod.

Step 4: Add the Diluted Acid to Your Pool

Turn on your pool’s circulation system to ensure the muriatic acid is evenly distributed throughout the pool. Slowly pour the diluted acid solution into the deep end of the pool, avoiding contact with the pool walls and surfaces.

Step 5: Monitor the pH Levels

Wait for at least 4 hours after adding the muriatic acid, and then test the pH levels again. If the pH is still too high, repeat the process until the desired pH is reached. If the pH is too low (below 7.4), use a pH increaser to raise the pH to the appropriate level.

Conclusion

Muriatic acid is a useful tool for maintaining the proper pH levels in your swimming pool and removing unsightly stains and deposits from pool

surfaces. As a new homeowner, it’s essential to understand the importance of balanced pool water and how to safely handle and use chemicals like muriatic acid.

Always remember to wear protective gear and follow proper safety precautions when handling muriatic acid. By doing so, you can effectively maintain the health and cleanliness of your pool, ensuring a safe and enjoyable swimming experience for you and your family.

In addition to using muriatic acid, maintaining a regular pool maintenance routine, including skimming, vacuuming, and monitoring sanitizer levels, will help keep your pool in pristine condition. By investing time and effort in pool care, you can enjoy the benefits of a sparkling and inviting swimming pool in your new home.

A Step-by-Step Guide to Maintaining Your Chlorine Generator Cell for Salt Water Pool Owners

A salt water pool system offers a luxurious and gentle swimming experience for pool owners, but it also requires regular maintenance to keep it working efficiently. One of the essential components of a salt water pool system is the chlorine generator cell. It is responsible for converting salt into chlorine, keeping your pool water clean and free of harmful bacteria. In this article, we will walk you through how to check, clean, and replace your chlorine generator cell to ensure the longevity and effectiveness of your salt water pool system.

Step 1: Checking the Chlorine Generator Cell

  1. Turn off the pool system: For safety purposes, always turn off the power to your pool system before inspecting or working on the chlorine generator cell. This will help avoid any accidents caused by electrical shock.
  2. Locate the cell: The chlorine generator cell is usually installed near the pool equipment pad. It is a cylindrical component connected to the plumbing system and may have a clear housing that allows you to see inside.
  3. Inspect for damage or wear: Look for any signs of damage, such as cracks in the cell housing, broken wires, or corrosion. If you notice any issues, you may need to replace the cell.
  4. Check for scale buildup: Inspect the cell plates or electrodes for signs of calcium scale buildup. A small amount of buildup is normal, but excessive buildup can reduce the efficiency of the chlorine generator cell and may require cleaning.

Step 2: Cleaning the Chlorine Generator Cell

  1. Remove the cell: Turn off the power and disconnect the cell from the plumbing system. Be sure to follow the manufacturer’s instructions for removing the cell, as the process may vary by model.
  2. Mix a cleaning solution: Prepare a solution of 1 part muriatic acid to 4 parts water in a large, well-ventilated area. Always add the acid to the water, not the other way around. Make sure to wear proper protective gear, such as gloves, goggles, and a mask, when handling muriatic acid.
  3. Soak the cell: Submerge the cell in the cleaning solution for 5-15 minutes or until the scale dissolves. Do not leave the cell in the solution for too long, as it may cause damage to the cell plates.
  4. Rinse the cell: After soaking, remove the cell from the solution and rinse it thoroughly with fresh water. Ensure that all acid residue is removed from the cell before reinstalling it.
  5. Reinstall the cell: Once the cell is clean and dry, follow the manufacturer’s instructions to reconnect it to the pool system. Turn the power back on and monitor the cell to ensure it is working correctly.

Step 3: Replacing the Chlorine Generator Cell

If you have determined that your cell needs to be replaced due to damage, wear, or poor performance, follow these steps:

  1. Purchase a new cell: Choose a cell that is compatible with your salt water pool system. Consult the manufacturer’s documentation or seek advice from a pool professional to ensure you are buying the correct model.
  2. Turn off the power: Before removing the old cell, turn off the power to the pool system.
  3. Remove the old cell: Follow the manufacturer’s instructions to disconnect the old cell from the plumbing system.
  4. Install the new cell: Carefully connect the new cell to the pool system, ensuring all connections are secure and the cell is properly oriented. Consult the manufacturer’s instructions for specific installation guidelines.
  5. Turn on the power: Restore power to the pool system and monitor the new cell’s performance to ensure it is working as expected.

Maintaining your chlorine generator cell is crucial for the longevity and effectiveness of your salt water pool system. Regularly checking for signs of wear and scale buildup, as well as cleaning the cell as needed, can help keep your pool water clean and safe for swimming. Replacing a damaged or worn-out cell when necessary is essential to maintaining your pool’s overall health.

By following the steps outlined in this guide, you can extend the life of your chlorine generator cell and keep your salt water pool system running smoothly. As always, consult your pool system’s manufacturer for specific guidance and recommendations tailored to your unique setup. Don’t hesitate to reach out to a pool professional if you need further assistance or advice on maintaining your salt water pool.

Dealing with a Cracked Pool Filter Housing: Steps to Diagnose and Repair

A cracked pool filter housing can be a frustrating issue for any pool owner. Not only can it cause water leakage, but it can also reduce the efficiency of your pool’s filtration system. In this article, we will guide you through the steps to diagnose, repair, or replace a cracked pool filter housing, so you can get your pool back up and running as soon as possible.

  1. Diagnose the Problem

Before taking any action, it’s essential to confirm that the pool filter housing is indeed cracked. The signs of a cracked housing may include:

  • Visible cracks or damage to the housing
  • Unexplained water loss or leaks around the filter area
  • Reduced water pressure and filtration efficiency


Make sure to turn off your pool pump and filter system before inspecting the housing to avoid any injuries or further damage.

  1. Assess the Severity of the Crack

Once you’ve identified the crack, assess its severity to determine the best course of action. Small, hairline cracks may be repairable with a sealant or epoxy, while larger cracks or extensive damage may require a complete replacement of the housing.

  1. Repairing a Minor Crack

If the crack is minor and doesn’t compromise the structural integrity of the housing, you may be able to repair it using a pool-specific sealant or epoxy. Follow these steps:

  • Thoroughly clean the area around the crack, ensuring it’s free from dirt, algae, or debris.
  • Apply the sealant or epoxy according to the manufacturer’s instructions, making sure to completely cover the crack.
  • Allow the sealant or epoxy to cure for the recommended time before reassembling the filter and restarting the pool pump.
  1. Replacing the Filter Housing

If the crack is too severe for a simple repair, you’ll need to replace the entire filter housing. Here’s how:

  • Turn off the pool pump and filter system, and disconnect any electrical connections.
  • Consult your pool filter’s user manual to determine the correct replacement housing for your specific model.
  • Remove the existing housing according to the manufacturer’s instructions, taking care to avoid damage to any connecting pipes or components.
  • Install the new housing, ensuring a proper seal and alignment with the rest of the filter system.
  • Reconnect any electrical connections, and restart the pool pump to check for any leaks or issues.
  1. Preventing Future Cracks

To prevent future cracks or damage to your pool filter housing, follow these tips:

  • Maintain proper water chemistry, as unbalanced water can cause corrosion and damage to pool equipment.
  • Regularly clean and backwash your filter to prevent excessive pressure build-up that can stress the housing.
  • Inspect your pool equipment regularly for any signs of wear, damage, or leaks, and address issues promptly.

Conclusion:

Dealing with a cracked pool filter housing can be a challenging task, but with the right approach, you can quickly diagnose and resolve the issue. By regularly inspecting and maintaining your pool equipment, you can help prevent future problems and keep your pool in optimal condition all season long.

Splashing into the Tar Heel State: A Fun-Filled Guide to Opening Your North Carolina Swimming Pool

North Carolina pool owners, it’s time to gear up for a sun-soaked summer with our lively, laughter-inducing guide to opening your swimming pool!

Hey there, North Carolina pool enthusiasts! The days are getting longer, the sweet scent of honeysuckle fills the air, and the warm Southern sun is calling your name – all signs that it’s time to dust off your pool toys and get ready for a season of splashin’ good fun. But first, let’s tackle the annual ritual of opening your swimming pool. Whether you’re a seasoned pool pro or a first-time owner, our fun-filled guide is here to make the process easy, enjoyable, and downright entertaining.

Step 1: Say Goodbye to Winter

Before you dive into pool opening, take a moment to inspect your pool cover for damage caused by those frosty North Carolina winter nights. It’s always a good idea to repair or replace your pool cover if needed, ensuring your pool stays clean and protected when not in use.

Step 2: The Big Reveal

Grab a buddy (bonus points if they’re as excited about pool season as you are), and carefully remove your pool cover, making sure not to dump any accumulated debris into the water. Remember, slow and steady wins the race – and saves you hours of debris removal later.

Step 3: Pump Up the Jam (and Your Pool Pump)

Before you crank up your pool pump and filter system, give your equipment a thorough once-over. Check for any signs of damage or wear and ensure all connections are secure. A smooth-running pump is essential for a crystal-clear pool, so show it some love before turning it on.

Step 4: It’s Cleaning Time!

Channel your inner pool superhero and tackle the remnants of winter with your trusty pool skimmer and vacuum. This is your chance to rid your pool of pesky leaves, dirt, and other debris. Feel free to make up your own epic pool-cleaning soundtrack – after all, it’s not every day you get to save a pool from the clutches of winter.

Step 5: Balance, Shock, and Awe

Now it’s time to work some pool chemistry magic. Test your pool water for pH, chlorine, and alkalinity levels, and make adjustments as needed. Once your water is balanced, give your pool a good shock treatment to banish bacteria, algae, and other uninvited guests. Your pool will thank you for it!

Step 6: Dive into North Carolina Poolside Fun

Congratulations! Your pool is officially open for the season, and now it’s time to make it the go-to summer hangout spot. Deck out your pool area with comfy loungers, colorful pool floats, and a refreshment station stocked with sweet tea and your favorite North Carolina snacks.

Step 7: Share Your Pool Opening Adventure

Why keep your pool opening success to yourself? Snap some pictures of your sparkling pool and your epic poolside setup, and share your adventure on social media with the hashtag #NCPoolParty. Let’s spread the poolside joy and inspire others to make a splash this summer!

In conclusion, opening your swimming pool for the season in North Carolina is a fun and rewarding experience that sets the stage for a sun-soaked summer of laughter and relaxation. With our lively guide and a touch of humor, you’re well on your way to creating your very own pool paradise in the Tar Heel State. So grab your swimsuit, slather on some sunscreen, and get ready to make a splash – your North Carolina pool adventure awaits!

Pool Pumps: Lifespan and Signs It’s Time for a Replacement

How to know when your pool pump has reached the end of its life

Pool pumps play a crucial role in maintaining the cleanliness and overall health of your swimming pool. They circulate water through the filter, ensuring that debris and contaminants are removed, and the water remains crystal clear. Like any other piece of equipment, pool pumps have a limited lifespan and will eventually need to be replaced. In this article, we’ll discuss the average lifespan of a pool pump and the signs that indicate it’s time for a replacement.

Average Lifespan of Pool Pumps

The average lifespan of a pool pump depends on various factors, including the quality of the pump, how well it’s maintained, and how often it’s used. On average, a high-quality pool pump can last between 8 to 12 years with proper care and maintenance. However, some pumps may need to be replaced sooner due to heavy use or poor maintenance.


Signs That It’s Time to Replace Your Pool Pump

  1. Frequent Loss of Prime

If your pool pump is consistently losing prime, or the ability to maintain a vacuum, it may be time for a replacement. Loss of prime can be caused by several factors, such as a clogged impeller or a leak in the suction line. However, if the problem persists even after addressing these issues, it could be a sign of a failing pool pump.

  1. Increased Energy Consumption

As a pool pump ages, its efficiency can decrease, resulting in higher energy consumption. If you notice a sudden spike in your energy bill, it might be due to an aging pool pump that’s working harder to maintain proper water circulation. Replacing your old pump with a new, energy-efficient model can help you save on energy costs in the long run.

  1. Excessive Noise

Pool pumps naturally produce some noise during operation, but if your pump starts to make loud, unusual noises, it could be a sign of a problem. Grinding or screeching sounds can indicate a worn bearing or a failing motor, both of which are signs that it’s time to consider a replacement.

  1. Leaking Water

If you notice water leaking around the pool pump, it may be a sign that the pump’s seals or gaskets have worn out. In some cases, these components can be replaced, but if the pump continues to leak or if the damage is extensive, it’s more cost-effective to replace the entire pump.

  1. Decreased Water Flow

A decrease in water flow can be a sign that your pool pump is struggling to maintain proper circulation. This can result from a clogged filter or impeller, but if the issue persists even after cleaning these components, it may be time for a new pump.

  1. Visible Signs of Wear and Tear

Inspect your pool pump regularly for visible signs of wear and tear, such as rust, corrosion, or cracks in the housing. These issues can lead to reduced efficiency and potential leaks, and they’re often a sign that the pump is reaching the end of its lifespan.
Conclusion

Regular maintenance and proper care can help extend the life of your pool pump, but eventually, it will need to be replaced. Keep an eye out for the signs mentioned above and consult with a pool professional if you suspect your pump may be nearing the end of its life. Replacing your pool pump with a newer, more energy-efficient model will not only save you money on energy costs but also ensure that your pool remains clean and enjoyable for years to come.

Filling Your Pool with Well Water: Weighing the Benefits and Drawbacks

Explore the benefits and drawbacks of filling your swimming pool with well water. Learn whether this option is suitable for you and what to consider before making a decision.

Filling a swimming pool can be a significant expense, especially for those who rely on municipal water sources. An alternative option is using well water, which can potentially save money and conserve water resources. However, filling your pool with well water also comes with its own set of challenges. In this article, we will discuss the benefits and drawbacks of using well water to fill your swimming pool and help you decide if it is the right choice for you.

Benefits of Filling a Pool with Well Water

  1. Cost Savings: Filling a pool with well water can save you money on water bills, as you are not using municipal water. This cost-saving aspect can be particularly appealing to pool owners who need to top up or refill their pool frequently.
  2. Water Conservation: Using well water to fill your pool can be an environmentally friendly choice, as you are not putting additional strain on the municipal water supply.
  3. Self-Sufficiency: Relying on well water for your pool provides a level of self-sufficiency, as you are not dependent on external water sources. This can be particularly advantageous in areas prone to water restrictions or droughts.

Drawbacks of Filling a Pool with Well Water

  1. Water Quality Issues: Well water often contains minerals such as iron, manganese, and calcium, which can cause staining, scaling, and water discoloration in your pool. Additionally, well water may contain bacteria, which can pose a health risk if not properly treated.
  2. Additional Treatment Required: Filling your pool with well water may necessitate additional treatment, such as water softeners or specialized chemicals, to counteract high mineral content and balance the pool water. This can add extra time and cost to the pool maintenance process.
  3. Impact on Well and Pump System: Filling a large pool can put a significant strain on your well and pump system, potentially causing damage or reducing its lifespan. It is crucial to consider the capacity of your well and pump system before filling your pool to ensure it can handle the increased demand.

Should You Fill Your Pool with Well Water?

The decision to fill your pool with well water depends on several factors, including the quality of your well water, the capacity of your well and pump system, and your willingness to invest in additional water treatment. Here are some steps to consider before making a decision:

  1. Test your well water: Have your well water tested for mineral content, bacteria, and other contaminants to determine if it is suitable for pool use.
  2. Assess your well and pump system: Consult with a professional to ensure your well and pump system can handle the additional demand of filling a pool without causing damage or reducing its lifespan.
  3. Evaluate additional treatment costs: Consider the costs of additional water treatment, such as water softeners and specialized chemicals, needed to balance your pool water and maintain its clarity.

Conclusion

Filling your pool with well water can offer cost savings and self-sufficiency, but it is essential to weigh these benefits against the potential drawbacks, such as water quality issues and additional treatment requirements. By testing your well water, assessing your well and pump system, and evaluating the costs of additional treatment, you can make an informed decision about whether filling your pool with well water is the right choice for you. Always consult with a pool professional to ensure the best outcome for your pool’s health and longevity.

How To Use Chlorine Tablets: Mastering the Art of Pool Maintenance and Avoiding Common Pitfalls

Chlorine tablets play a crucial role in maintaining a clean, clear, and safe swimming pool. While these chemical tablets are highly effective in keeping your pool free from bacteria, algae, and other contaminants, improper use and handling can result in various problems. In this article, we will guide you through the proper way to use and handle chlorine tablets, along with common mistakes and how to avoid them. So, strap in for an epic chlorine tablet journey, and become the pool maintenance guru you’ve always wanted to be!

Step 1: Choose the Right Chlorine Tablets

Not all chlorine tablets are created equal, so it’s important to choose a reputable brand that offers high-quality tablets. Look for slow-dissolving, stabilized chlorine tablets that are designed for swimming pools. These tablets provide a consistent release of chlorine, ensuring optimal sanitation throughout the week.

Step 2: Proper Storage and Handling

Chlorine tablets can be hazardous if not stored and handled correctly. Follow these guidelines to ensure safety:

  • Store chlorine tablets in a cool, dry, and well-ventilated area away from direct sunlight and heat sources.
  • Keep the tablets in their original container, tightly sealed to prevent moisture and contamination.
  • Always wear gloves and protective eyewear when handling chlorine tablets to avoid skin and eye irritation.
  • Do not mix chlorine tablets with other chemicals, as this can cause a dangerous reaction.

Step 3: Utilize the Right Dispensing Methods

There are several methods for dispensing chlorine tablets in your pool:

  • Floating Dispensers: These dispensers hold the tablets and float on the pool’s surface, releasing chlorine gradually as the tablets dissolve. Be aware that floating dispensers can lead to uneven chlorine distribution and potential bleaching of your pool liner if they remain stationary for too long.
  • Automatic Chlorinators: These devices are connected to your pool’s circulation system and automatically dispense chlorine tablets at a controlled rate. This method offers more consistent chlorine distribution and is considered the most effective way to use chlorine tablets.
  • Skimmer Baskets: While placing chlorine tablets directly into your skimmer basket is an option, it can lead to corrosion of pool equipment due to the high concentration of chlorine. This method should only be used as a last resort.

Common Mistakes and How to Avoid Them:

Mistake 1: Using Too Many or Too Few Chlorine Tablets

Using an incorrect amount of chlorine tablets can result in either an over-chlorinated pool or insufficient sanitation. Both scenarios can lead to a variety of issues, including skin and eye irritation, damage to pool surfaces, and algae growth.


How to Avoid It: Follow the manufacturer’s recommendations for the appropriate number of chlorine tablets based on your pool’s size and the desired chlorine levels. Regularly test your pool water and adjust the number of tablets accordingly.

Mistake 2: Adding Chlorine Tablets Directly to the Pool

Placing chlorine tablets directly into your pool can cause the tablets to sink, leading to uneven chlorine distribution and potential damage to your pool surfaces.

How to Avoid It: Always use a proper dispensing method, such as a floating dispenser or automatic chlorinator, to ensure even chlorine distribution and minimize the risk of damage to your pool surfaces.

Mistake 3: Neglecting Regular Water Testing

Failing to regularly test your pool water can result in improper chlorine levels, unbalanced water chemistry, and potential health risks.

How to Avoid It: Test your pool water at least once a week using a reliable test kit or test strips. Monitor chlorine levels, pH, and other important water chemistry parameters to ensure a safe and comfortable swimming environment.

Conclusion:

Proper use and handling of chlorine tablets are essential for maintaining a healthy and safe swimming pool environment. By choosing the right chlorine tablets, following proper storage and handling guidelines, and utilizing appropriate dispensing methods, you can effectively keep your pool clean and free from harmful contaminants.

Moreover, avoiding common mistakes such as using an incorrect amount of tablets, adding tablets directly to the pool, or neglecting regular water testing can help prevent potential problems and ensure a consistently pleasant swimming experience.

Now that you’re armed with the knowledge of how to master the art of pool maintenance using chlorine tablets, it’s time to dive into action and make your pool the envy of the neighborhood. Follow these guidelines, share your newfound expertise with fellow pool owners, and watch as your chlorine tablet chronicles go viral!