Troubleshooting Suction Side Pool Vacuum Cleaners: A Guide to Diagnosing and Fixing Common Issues

Keep Your Pool Pristine by Properly Maintaining Your Suction Side Vacuum Cleaner

Introduction

Suction side pool vacuum cleaners are a popular and efficient way to keep your swimming pool clean and free of debris. However, like any other equipment, they can experience issues that may affect their performance. In this article, we will guide you through the process of troubleshooting, diagnosing, and fixing common problems with suction side pool vacuum cleaners.

Step 1: Understand How Suction Side Pool Vacuums Work

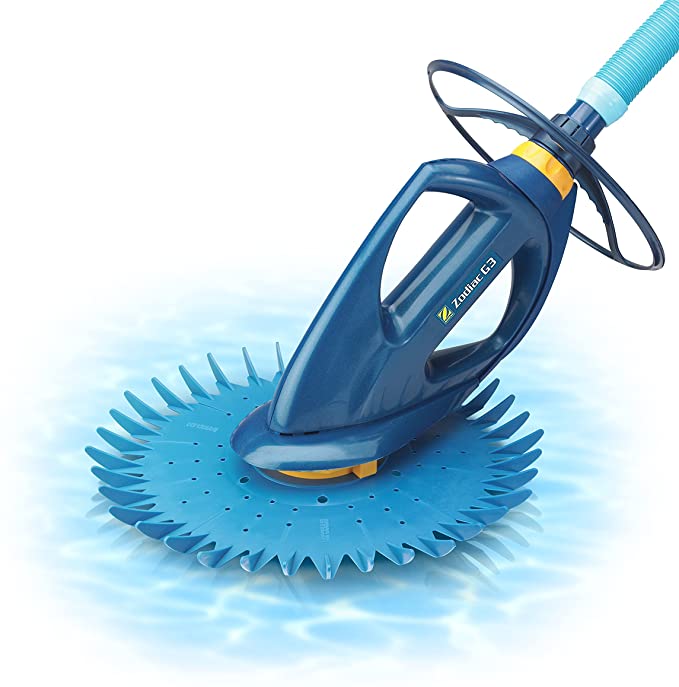
Before troubleshooting your suction side pool vacuum, it’s essential to understand how it operates. These vacuums work by attaching to your pool’s skimmer or dedicated suction line, using the pool pump’s suction power to move around the pool and collect debris. The vacuum’s components include the vacuum head, hose, and any moving parts or gears that control its movement.

Step 2: Identify Common Pool Vacuum Problems

Several common issues can affect the performance of a suction side pool vacuum cleaner. Some of these problems include:

  • Insufficient suction power
  • Hose leaks or obstructions
  • Vacuum head or moving parts malfunction
  • Debris buildup in the skimmer or pump basket
  • Incorrect hose length or connection issues


Step 3: Troubleshooting and Diagnosing Issues

Once you’ve identified the possible issues affecting your suction side pool vacuum, follow these steps to diagnose and repair the problem:

  1. Check the suction power: Insufficient suction can prevent the vacuum from moving or collecting debris. Ensure that your pool pump and filter are functioning correctly and that the water level in the pool is adequate. Clean the pump and skimmer baskets and backwash or clean the filter as needed to improve suction.
  2. Inspect the vacuum hose: Hose leaks or obstructions can reduce the vacuum’s suction power. Check the hose for any visible damage, such as cracks or holes, and replace it if necessary. Also, make sure there are no obstructions within the hose that may be blocking the flow of water.
  3. Examine the vacuum head and moving parts: A malfunctioning vacuum head or moving parts can prevent the vacuum from moving around the pool effectively. Check for any debris or damage that may be preventing the vacuum head from making proper contact with the pool floor or affecting its movement. Clean and repair or replace any damaged components as needed.
  4. Adjust the hose length and connections: Ensure that the vacuum hose is the correct length for your pool and that it is connected securely to the vacuum and suction line or skimmer. A hose that is too short or improperly connected can affect the vacuum’s performance and movement.
  5. Test the flow rate: Most suction side pool vacuums have a flow control valve or flow gauge that allows you to adjust the suction power to the vacuum. Consult your vacuum’s owner’s manual for the recommended flow rate and adjust the valve or gauge accordingly to ensure optimal performance.

Step 4: Consult a Professional Technician

If you’re unable to diagnose or repair the issue yourself, or if the problem persists, consult a professional pool technician. They will have the expertise and tools necessary to identify and fix any issues with your suction side pool vacuum efficiently and safely.

Conclusion

By understanding the basics of how your suction side pool vacuum works and being familiar with common issues, you can effectively troubleshoot and diagnose problems that may arise. Regular maintenance and proper care of your pool vacuum will ensure its longevity and optimal performance, keeping your pool clean and inviting for years to come.
Pool Shock 101: A Homeowner’s Guide to Different Pool Shock Methods

Discover the various methods to shock your swimming pool, understand their benefits, and learn how to choose the right one for your pool maintenance needs.

Regularly shocking your swimming pool is an essential part of proper pool maintenance. Pool shock treatments help eliminate contaminants, restore water clarity, and maintain a safe and healthy swimming environment. As a homeowner, understanding the different pool shock methods available can help you choose the most suitable one for your pool’s unique needs. In this article, we will explore the various ways to shock your pool and provide guidance on selecting the best method for your pool maintenance routine.

Different Methods to Shock Your Swimming Pool

  1. Calcium Hypochlorite (Cal-Hypo) Shock

Calcium hypochlorite, also known as Cal-Hypo, is a popular and powerful pool shock method. Cal-Hypo contains high levels of chlorine, typically around 65-75%, making it effective at killing bacteria, algae, and other organic contaminants.

Pros:

  • Strong oxidizing properties
  • Effective against a wide range of contaminants
  • Available in various strengths


Cons:

  • Can increase water hardness and calcium levels
  • Requires pre-dissolving in water before application
  • Must be added at night to prevent sunlight from breaking down the active chlorine
  1. Dichloro-S-Triazinetrione (Dichlor) Shock

Dichlor shock is a stabilized form of chlorine that contains cyanuric acid, which protects the chlorine from being broken down by sunlight. This makes it an excellent choice for outdoor pools that receive a lot of sun exposure.

Pros:

  • Stabilized chlorine resists UV degradation
  • Fast-dissolving and easy to apply
  • Compatible with most pool types

Cons:

  • May increase cyanuric acid levels with repeated use
  • Lower chlorine content compared to Cal-Hypo
  • More expensive than other shock methods
  1. Potassium Monopersulfate (Non-Chlorine) Shock

Potassium monopersulfate, also known as non-chlorine shock or MPS, is an oxygen-based shock treatment that does not contain chlorine. This type of shock is ideal for those who want to avoid using chlorine or need a shock treatment compatible with alternative sanitizers like bromine or biguanide.

Pros:

  • No chlorine odor
  • Compatible with alternative sanitizers
  • Can be used during the day, as it is not affected by sunlight

Cons:

  • Less effective against algae and bacteria than chlorine-based shocks
  • May be less compatible with certain pool surfaces or equipment
  • More expensive than chlorine-based shock options
  1. Liquid Chlorine Shock

Liquid chlorine, or sodium hypochlorite, is another option for shocking your pool. This method is easy to apply, as it can be poured directly into the pool without the need for pre-dissolving.

Pros:

  • Easy to apply, no pre-dissolving required
  • Works quickly and effectively
  • Less likely to increase calcium hardness

Cons:

  • Lower concentration of chlorine compared to Cal-Hypo
  • Can degrade quickly if not stored properly
  • Can be more expensive than other shock methods

How to Choose the Right Shock Method for Your Pool

To determine the best pool shock method for your needs, consider the following factors:

  1. Pool Type: Consider your pool’s surface material, as some shock treatments may be less compatible with certain surfaces or equipment.
  2. Sanitizing System: If you use an alternative sanitizer, like bromine or biguanide, choose a shock method compatible with your system, such as potassium monopersulfate.
  3. Sun Exposure: For outdoor pools with significant sun exposure, consider a stabilized shock treatment like Dichlor or a non-chlorine shock that is not affected by sunlight.
  1. Existing Water Chemistry: Analyze your pool’s current water chemistry, such as calcium hardness and cyanuric acid levels, and choose a shock treatment that will not exacerbate existing imbalances.
  2. Budget: Consider your budget and the cost of the shock treatments available, as some methods may be more expensive than others.
  3. Frequency of Use: If you use your pool frequently or host large gatherings, a stronger shock treatment like Cal-Hypo may be more appropriate to ensure proper sanitization.

Understanding the various pool shock methods available is crucial for any homeowner looking to maintain a clean and safe swimming environment. By considering your pool type, sanitizing system, sun exposure, existing water chemistry, budget, and usage, you can make an informed decision about which pool shock method best suits your needs. Regularly shocking your pool with the appropriate method will help you eliminate contaminants, maintain water clarity, and enjoy a healthy and enjoyable swimming experience.

Understanding Pool Chemistry: How Long to Wait Between Adding Chemicals to Your Pool

Maintaining a clean and healthy pool requires balancing the water’s chemistry, which involves adding various chemicals to adjust the pH, alkalinity, and sanitizer levels. However, it’s crucial to know how long to wait between adding chemicals to avoid unwanted chemical reactions, ineffective treatment, or damage to pool equipment. In this article, we’ll explore the appropriate waiting times between adding chemicals to your pool to ensure safe and effective pool maintenance.

Balancing Your Pool’s Chemistry: Key Chemicals

  1. Chlorine or other sanitizers: Used to kill bacteria, algae, and other microorganisms, ensuring a healthy swimming environment.
  2. pH increaser (sodium carbonate) and pH decreaser (sodium bisulfate or muriatic acid): Used to adjust the pool’s pH levels, which affect the efficiency of sanitizers and prevent damage to pool surfaces and equipment.
  3. Alkalinity increaser (sodium bicarbonate): Used to adjust the pool’s total alkalinity, which stabilizes the pH levels and prevents fluctuations.
  4. Calcium hardness increaser (calcium chloride): Used to adjust the water’s hardness, preventing scaling or corrosion of pool surfaces and equipment.

Waiting Times Between Adding Chemicals

  1. Chlorine and pH/Alkalinity Adjusters

When adjusting your pool’s pH or alkalinity, it’s essential to wait for the chemicals to circulate fully before testing the water and adding chlorine or other sanitizers. Generally, it would be best if you allowed at least 2 hours for the water to circulate after adding a pH or alkalinity increaser/decreaser before adding sanitizers. This waiting period ensures that the chemicals are thoroughly mixed and that your pool’s pH and alkalinity levels have stabilized.

  1. Chlorine and Calcium Hardness Increaser


Calcium hardness increasers, such as calcium chloride, can react with chlorine and other sanitizers, producing a cloudy or precipitate-filled pool. It’s important to wait at least 24 hours after adding a calcium hardness increaser before adding chlorine or other sanitizers.

  1. Shock Treatment

Shock treatments, which involve adding large amounts of chlorine or other sanitizers to the pool to kill algae and other contaminants, require a waiting period before swimmers can re-enter the pool. Depending on the strength of the shock treatment, this waiting period can range from 8 to 24 hours. It’s also essential to wait for the chlorine levels to drop below 5 ppm (parts per million) before adding other chemicals, such as pH or alkalinity adjusters.

Tips for Safe and Effective Pool Chemical Management

  1. Test your pool water regularly: Use a reliable test kit or test strips to monitor your pool’s chemistry, including chlorine or sanitizer levels, pH, alkalinity, and calcium hardness. Regular testing ensures that you can make adjustments as needed to maintain a balanced pool environment.
  2. Add chemicals separately: Never mix chemicals before adding them to the pool, as this can cause dangerous chemical reactions. Instead, pre-dissolve each chemical in a bucket of pool water and add it to the pool separately.
  3. Use a pool circulation system: Ensuring proper water circulation by running your pool pump and filtration system helps distribute chemicals evenly throughout the pool, promoting effective treatment and balanced water chemistry.
  4. Follow manufacturer guidelines: Always read and follow the instructions on the chemical packaging to ensure safe and effective pool treatment.

Maintaining your pool’s chemistry involves carefully managing the addition of chemicals, ensuring adequate waiting periods between treatments. By understanding the appropriate waiting times and following safe pool chemical management practices, you can maintain a clean, healthy, and well-balanced swimming environment for you and your family to enjoy.

Keeping Mosquitoes Away from Your Backyard Swimming Pool

Tips and Products for a Healthier, More Enjoyable Experience

Introduction

As the warmer months approach, backyard swimming pool owners look forward to spending quality time with family and friends in their own private oasis. However, mosquitoes can quickly turn this enjoyable experience into a bothersome and potentially hazardous one. In this article, we’ll discuss why it’s crucial to reduce mosquitoes around your swimming pool, the possible health risks they pose, and the products and methods available to mitigate their presence.

The Importance of Reducing Mosquitoes

Mosquitoes are more than just a nuisance; they are known carriers of several diseases that can pose serious health risks to humans. These include West Nile virus, Zika virus, dengue fever, and malaria. Reducing the mosquito population around your swimming pool not only improves your overall experience but also protects you and your loved ones from potential health hazards.


Products and Methods for Mosquito Control

  1. Remove Standing Water: Mosquitoes breed in standing water, so it’s essential to eliminate any sources of stagnant water around your pool area. Check for and empty any containers that may hold water, such as flower pots, toys, or pool equipment.
  2. Maintain Proper Pool Chemistry: Keeping your pool water clean and balanced is crucial in preventing mosquito infestations. Regularly test your pool water and adjust the chemical levels as needed to ensure a healthy and mosquito-free environment.
  3. Mosquito Dunks or Bits: These products contain a natural bacteria called Bacillus thuringiensis israelensis (BTI), which is toxic to mosquito larvae but safe for humans, pets, and other wildlife. Place these dunks or bits in your pool skimmers or other standing water sources to prevent mosquito larvae from developing into adult mosquitoes.
  4. Mosquito Traps: There are various mosquito traps available on the market that use CO2, heat, and other attractants to lure mosquitoes in and eliminate them. Place these traps strategically around your pool area to minimize the mosquito population.
  5. Mosquito Repellent Plants: Some plants, such as citronella, lavender, and marigolds, are known to naturally repel mosquitoes. Plant these in your pool area or place potted plants nearby to help deter mosquitoes.
  6. Insect Repellent Sprays and Lotions: Applying insect repellent on exposed skin when spending time around the pool can help keep mosquitoes at bay. Look for products containing DEET, picaridin, or oil of lemon eucalyptus, which are proven to be effective against mosquitoes.
  7. Mosquito Netting: If your pool area has a gazebo or pergola, consider installing mosquito netting around it to create a mosquito-free zone. This not only keeps mosquitoes away but also adds an extra layer of comfort and privacy.


Conclusion

By taking proactive measures to reduce mosquitoes around your backyard swimming pool, you can create a more enjoyable and healthier environment for you and your loved ones. Regular pool maintenance, using mosquito-repelling products, and implementing natural deterrents will go a long way in keeping mosquitoes at bay and ensuring that you can make the most of your pool experience.

Reasons Why Your Pool Has No Chlorine: An In-Depth Look

Chlorine is a vital component of swimming pool maintenance, as it serves as a disinfectant to keep the water clean and free of harmful bacteria and algae. However, there may be instances when your pool shows no signs of chlorine despite your best efforts to maintain it. In this article, we’ll explore several reasons why your pool may have no chlorine and offer solutions to help you restore and maintain proper chlorine levels.

  1. High levels of contaminants

Organic matter, such as leaves, grass, and dirt, as well as swimmer waste like sweat, body oils, and sunscreen, can consume available chlorine in the pool. When high levels of contaminants are present, the chlorine is used up more quickly as it works to oxidize and neutralize these substances. To resolve this issue, you may need to shock your pool more frequently or consider using a pool clarifier to help remove some of the contaminants.

  1. High pH levels

The effectiveness of chlorine is highly dependent on the pH level of the pool water. When the pH is too high (typically above 7.8), chlorine becomes less effective, and your pool may appear to have no chlorine. To address this issue, you’ll need to lower the pH level of your pool using a pH reducer, such as muriatic acid or sodium bisulfate. Aim for a pH level between 7.4 and 7.6 for optimal chlorine effectiveness.

  1. Chlorine lock or high stabilizer levels

Chlorine lock occurs when the pool’s stabilizer levels (cyanuric acid) are too high. Stabilizers help protect chlorine from being broken down by sunlight, but excessive amounts can reduce the chlorine’s effectiveness, making it unable to sanitize the water properly. To fix this issue, you may need to partially drain and refill your pool with fresh water to lower the stabilizer levels or use a chlorine product with a lower concentration of stabilizer.

  1. Low chlorine output

If you’re using a saltwater chlorinator or an automatic chlorinator, it’s possible that the device is not producing enough chlorine to maintain proper levels. Check the settings of your chlorinator to ensure it’s operating at the recommended levels, and inspect the device for any signs of wear or damage that could affect its performance. Clean the chlorinator’s cell or replace it if necessary.

  1. Insufficient circulation

Poor water circulation can lead to uneven distribution of chlorine in the pool. Ensure that your pool pump and filter system are functioning properly, and verify that the water is flowing through the system at the appropriate rate. If you find issues with your pool pump or filter, you may need to perform maintenance or replace parts to improve water circulation.

  1. Sunlight exposure

UV rays from sunlight can break down chlorine in your pool, causing it to dissipate quickly. This is particularly problematic for pools with prolonged direct sunlight exposure. To combat this issue, use a chlorine stabilizer to help protect the chlorine from sunlight and maintain proper chlorine levels.

Conclusion

Maintaining proper chlorine levels is essential for keeping your pool clean, safe, and enjoyable for swimmers. If you find that your pool has no chlorine, consider the possible causes listed in this article and take the necessary steps to resolve the issue. Regular testing of your pool water, along with routine maintenance of your pool equipment, will help ensure a balanced and healthy swimming environment all season long. If you’re still struggling with chlorine levels, it may be helpful to consult a pool professional for further guidance and assistance.

Identifying and Removing Pool Stains: A Comprehensive Guide

Keep Your Pool Surface Sparkling Clean with Effective Stain Identification and Removal Techniques

Introduction

Pool stains can be an eyesore and may affect the overall aesthetics of your swimming pool. They can be caused by various factors such as metals, organic materials, and improper water chemistry. To keep your pool looking its best, it’s essential to identify the type of stain and use the appropriate products and methods to remove it. In this article, we’ll discuss the common causes of pool stains, how to identify them, and the most effective solutions to eliminate them.

Common Causes of Pool Stains

  1. Metals: Metals like iron, copper, and manganese can cause unsightly stains on your pool surfaces. These metals can be introduced through source water, corroding pool equipment, or certain chemicals.
  2. Organic Materials: Organic stains result from materials like leaves, algae, and other plant debris that settle on the pool surface, causing discoloration.
  3. Calcium Deposits: High levels of calcium hardness in your pool water can lead to calcium deposits on your pool surface, also known as scaling.
  4. Improper Water Chemistry: Unbalanced pool water chemistry can cause various types of stains, including metal stains and calcium deposits.


Identifying Pool Stains

  1. Metal Stains: Metal stains are typically caused by iron, copper, or manganese. Iron stains tend to be reddish-brown, while copper stains are usually green, blue, or teal. Manganese stains may appear as dark brown or black spots.
  2. Organic Stains: Organic stains are usually brown, green, or dark in color and often have irregular shapes. They can be caused by leaves, algae, or other plant debris.
  3. Calcium Deposits: Calcium deposits appear as white, gray, or chalky areas on the pool surface, usually in areas with high water circulation.

Removing Pool Stains

  1. Metal Stains: To remove metal stains, use a metal sequestrant to bind and remove metals from the water. Follow the product’s instructions and ensure that your pool water chemistry is balanced. For stubborn stains, you may need to use a stain remover product specifically formulated for metal stains.
  2. Organic Stains: For organic stains, start by manually removing any visible debris and brushing the pool surface. Shock your pool with a high dose of chlorine to eliminate any organic material. For persistent stains, consider using an enzyme-based pool stain remover that can break down organic materials.
  3. Calcium Deposits: To remove calcium deposits, adjust your pool water chemistry, lowering the calcium hardness and pH levels. You can use a calcium deposit remover or a pumice stone to scrub away deposits gently. Be cautious not to damage the pool surface while scrubbing.


Preventing Pool Stains

  1. Maintain Balanced Water Chemistry: Regularly test and adjust your pool water chemistry to prevent staining caused by metals, calcium deposits, or imbalanced water conditions.
  2. Use a Metal Sequestrant: If you have metals in your source water, use a metal sequestrant to prevent staining.
  3. Clean Your Pool Regularly: Regularly skim, vacuum, and brush your pool to remove debris and organic materials that can cause staining.
  4. Cover Your Pool: Use a pool cover to minimize the introduction of debris and organic materials, which can cause stains.

Conclusion

Identifying and removing pool stains requires understanding the cause of the stain and using the appropriate products and methods for effective removal. By maintaining balanced pool water chemistry, using a metal sequestrant when necessary, and regularly cleaning your pool, you can keep your pool surface stain-free and looking its best.

Demystifying Pool Flocculant: Understanding Its Purpose, Benefits, and Drawbacks

A Comprehensive Guide to Pool Flocculant, Its Applications, and Factors to Consider Before Using It

Introduction

Pool flocculant is a chemical treatment that plays a vital role in maintaining crystal-clear swimming pool water. By promoting the clumping of suspended particles, it allows for easier removal of debris, organic matter, and other contaminants. In this article, we will discuss what pool flocculant is, its applications, and the pros and cons of using it in your swimming pool.

What is Pool Flocculant?

Pool flocculant, also known as a coagulant or floc, is a chemical agent that encourages the agglomeration of fine suspended particles in the pool water. These particles, which can include dirt, organic matter, and various contaminants, can cause water to appear cloudy or discolored. The flocculant works by neutralizing the electrical charge on these particles, causing them to clump together and form larger, heavier masses. This process makes it easier to remove the particles from the water through vacuuming or filtration.


What is Pool Flocculant Used For?

  1. Clarifying Cloudy Water: Flocculants are commonly used to treat cloudy pool water, which can result from an imbalance in water chemistry, excessive debris, or poor filtration. By clumping the suspended particles together, flocculants can help improve water clarity and restore a sparkling appearance.
  2. Algae Treatment: In some cases, pool flocculant can be used as a part of an algae treatment regimen. When combined with an algaecide, the flocculant can help remove dead algae cells from the water, improving the effectiveness of the treatment.
  3. Post-Storm Cleanup: After a storm or heavy rainfall, pool water can become contaminated with debris, dirt, and other pollutants. Flocculant can help expedite the cleanup process by clumping these contaminants together for easy removal.

Pros and Cons of Using Pool Flocculant

Pros:

  1. Rapid Water Clarity Improvement: Pool flocculant can quickly improve water clarity, making it an ideal solution for dealing with sudden cloudiness or discoloration.
  2. Enhanced Filtration Efficiency: By clumping particles together, flocculant can improve the efficiency of the pool’s filtration system, as larger particles are more easily trapped and removed by the filter.
  3. Versatility: Flocculants are compatible with various pool types and water chemistry levels, making them a versatile option for maintaining water clarity.


Cons:

  1. Additional Vacuuming Required: After using pool flocculant, it is necessary to vacuum the pool to remove the clumped particles. This can be a time-consuming and labor-intensive process.
  2. Temporary Fix: While pool flocculant can quickly improve water clarity, it does not address the underlying issues that caused the cloudiness in the first place. Pool owners must also address imbalances in water chemistry and ensure that their filtration system is functioning properly to maintain long-term water clarity.
  3. Potential Overuse: Excessive use of flocculant can lead to clogged filters and reduced filtration efficiency. It’s essential to follow the manufacturer’s guidelines for dosing and application to avoid potential issues.

Conclusion

Pool flocculant is a valuable tool for maintaining clear and inviting swimming pool water. By understanding its purpose, applications, and the pros and cons of its use, pool owners can make informed decisions about whether to incorporate flocculant into their pool maintenance routine. While flocculant can provide rapid improvements in water clarity, it’s essential to remember that it should be used in conjunction with proper water chemistry management and filtration maintenance to ensure long-lasting results.

Choosing the Perfect Fence for Your Above Ground Pool: A Comprehensive Guide

Enhancing Safety, Aesthetics, and Functionality with the Right Above Ground Pool Fence

Introduction

A fence around your above ground pool serves several essential functions, such as providing privacy, enhancing safety, and adding a touch of style to your backyard oasis. With numerous styles, materials, and installation options available, it’s crucial to choose the right fence that suits your needs and complements your pool area. In this article, we’ll discuss the uses of pool fences, the various styles, installation methods, and the pros and cons of each to help you make an informed decision.

Uses of Pool Fences

  1. Safety: A pool fence serves as a barrier, preventing unsupervised access by children, pets, and unauthorized persons, reducing the risk of accidents and drownings.
  2. Privacy: A fence can create a private haven, shielding your pool area from prying eyes and offering a more secluded and comfortable swimming environment.
  3. Aesthetics: A well-designed pool fence can enhance the visual appeal of your pool area, adding to the overall ambiance and value of your property.
  4. Compliance: In many areas, local regulations require pool owners to install a fence around their pool to ensure safety and prevent unauthorized access.

Different Styles of Pool Fences

  1. Removable Mesh Fences: Removable mesh fences are made of durable, lightweight materials and can be easily installed and removed as needed. They offer excellent visibility and are perfect for temporary or seasonal installations.
  2. Aluminum Fences: Aluminum fences are lightweight, rust-resistant, and low maintenance. They come in various styles, including traditional picket designs and more modern, sleek options.
  3. Vinyl Fences: Vinyl fences are known for their durability, low maintenance, and versatile design options. They can be customized to mimic the appearance of wood or other materials and come in various heights and styles.
  4. Wooden Fences: Wooden fences offer a natural, timeless look and can be customized to suit your design preferences. They require regular maintenance to prevent rot and deterioration but can provide a sturdy, long-lasting barrier.

How to Install Pool Fences

  1. Determine the Fence Location: Measure and mark the perimeter of the pool area, ensuring that the fence will be at least 3-4 feet away from the pool’s edge to comply with local regulations.
  2. Choose the Fence Material and Style: Select a fence material and style that suits your needs, preferences, and budget. Consider factors such as durability, maintenance, and aesthetics when making your decision.
  3. Obtain Necessary Permits: Consult your local building department to determine if a permit is required for your fence installation and familiarize yourself with any local regulations regarding pool fencing.
  4. Install the Fence: Follow the manufacturer’s instructions for proper installation, ensuring that the fence is securely anchored and level. You may choose to hire a professional installer or opt for a DIY installation, depending on your skills and experience.

Pros and Cons of Pool Fences

Pros:

  1. Enhanced Safety: A pool fence provides an additional layer of security, reducing the risk of accidents and unauthorized access to the pool area.
  2. Privacy: A fence can offer privacy, creating a more comfortable and secluded swimming environment.
  3. Aesthetic Appeal: A well-designed fence can enhance the visual appeal of your pool area, adding value and style to your property.
  4. Compliance with Regulations: Installing a fence around your pool helps ensure compliance with local safety regulations.

Cons:

  1. Installation Costs: Installing a pool fence can be an added expense, particularly for high-end materials or professional installation.
  2. Maintenance: Depending on the fence material chosen, regular maintenance may be required to keep your fence in good condition.
  3. Obstructed Views: Some fence styles and materials may obstruct the view of your pool area, potentially impacting the overall aesthetic appeal.
  4. Installation Challenges: Installing a fence around an above ground pool may present challenges, particularly for uneven or irregularly shaped pool areas.

Conclusion

Choosing the right fence for your above ground pool involves considering several factors, including safety, privacy, aesthetics, and local regulations. With various styles and materials available, it’s essential to select a fence that complements your pool area while meeting your specific needs and preferences. By understanding the pros and cons of each type of fence and following proper installation guidelines, you can create a safe, stylish, and functional barrier that enhances your backyard swimming oasis.

How to Calculate the Volume of a Swimming Pool: From Simple to Complex Shapes

Calculating the volume of your swimming pool is an essential task, whether you are a pool owner or a professional. Knowing the volume is crucial for determining the right amount of chemicals to use, heating or cooling requirements, and filtration needs. This article will guide you through the process of calculating the volume of swimming pools, starting with simple shapes and moving on to more complex ones. Grab your measuring tape, a pen, and some paper – let’s dive in!

I. Simple Shapes:

  1. Rectangular Pools

The most straightforward pool shape to calculate the volume for is a rectangular pool. Follow these steps:

a. Measure the length, width, and depth of the pool (in feet or meters). b. Multiply these measurements together to find the volume in cubic feet (or cubic meters): Volume = Length × Width × Depth

  1. Circular Pools

Circular pools are also relatively simple to calculate. Here are the steps:

a. Measure the diameter (across the widest part) and depth of the pool (in feet or meters). b. Calculate the radius by dividing the diameter by 2. c. Use the formula for the volume of a cylinder: Volume = π × Radius² × Depth, where π is a mathematical constant (approximately 3.14159).

II. Complex Shapes:

  1. Oval Pools


For an oval pool, follow these steps:

a. Measure the major axis (longest diameter) and minor axis (shortest diameter) of the pool, as well as the depth (in feet or meters). b. Calculate the volume using the following formula: Volume = π × (Major Axis / 2) × (Minor Axis / 2) × Depth

  1. Kidney-Shaped Pools

Calculating the volume of a kidney-shaped pool involves a few more steps:

a. Measure the lengths of the two axes (longest and shortest diameters) and the depth at the deepest and shallowest points of the pool. b. Calculate the average depth by adding the deepest and shallowest depths and dividing by 2: Average Depth = (Deepest Depth + Shallowest Depth) / 2 c. Use the formula for an oval pool (from above) with the average depth to calculate the volume.

  1. Free-Form Pools

For free-form pools, the best way to estimate the volume is by dividing the pool into smaller sections (such as rectangles, circles, or triangles) and calculating the volume of each section separately. Afterward, add the volumes together to find the total pool volume. Remember to use the appropriate formulas for each shape and to account for varying depths by using average depths when needed.

III. Considerations for Varying Depths

Many swimming pools have varying depths, such as a shallow end and a deep end. In these cases, it is essential to measure the depths at the shallowest and deepest points and use average depths in the volume calculations. For rectangular and oval pools, follow the steps mentioned earlier for calculating average depths. For more complex shapes, you might need to divide the pool into smaller sections and apply the same concept.

Conclusion:

Calculating the volume of a swimming pool is crucial for proper maintenance and operation. By following the steps and formulas outlined in this article, you can determine the volume of various pool shapes, from simple rectangles to more intricate free-form designs. Remember to consider the varying depths and always measure carefully to ensure accurate calculations. Happy swimming!

How to Raise pH in a Swimming Pool: A Comprehensive Guide for Pool Owners

Maintain the Perfect pH Balance for a Healthy and Enjoyable Swimming Experience

Introduction

Maintaining the ideal pH level in your swimming pool is crucial to ensuring a comfortable swimming experience, protecting your pool equipment, and promoting effective sanitization. The pH scale ranges from 0 to 14, with 7 being neutral. The optimal pH level for a swimming pool is typically between 7.2 and 7.8. If your pool’s pH is too low, it can lead to corrosion of pool equipment, skin and eye irritation, and reduced effectiveness of sanitizing chemicals. This article will provide you with a comprehensive guide on how to raise the pH level in your swimming pool to achieve a well-balanced and healthy swimming environment.

Step 1: Test Your Pool Water

Begin by testing your pool water to determine the current pH level. You can use a pool test kit or test strips, which are readily available at most pool supply stores. Follow the instructions provided with your testing method to obtain accurate results.

Step 2: Calculate the Required pH Increaser Amount

If your pH level is below 7.2, you will need to add a pH increaser (also known as a pH up or pH plus) to raise the pH. Sodium carbonate (soda ash) and sodium bicarbonate (baking soda) are two common chemicals used as pH increasers.

To calculate the amount of pH increaser required, consult the product label or use an online pool calculator. You will need to know your pool’s volume, the current pH level, and the target pH level.

Step 3: Pre-dissolve the pH Increaser

To ensure even distribution and prevent cloudiness or damage to your pool surfaces, pre-dissolve the pH increaser in a bucket of water before adding it to your pool. Fill a large plastic bucket with water, and gradually add the required amount of pH increaser, stirring continuously until it’s fully dissolved.

Step 4: Add the pH Increaser to Your Pool

Slowly pour the dissolved pH increaser solution into the pool, spreading it evenly around the perimeter. Avoid pouring the solution directly onto pool surfaces or fittings, as this may cause damage.

Step 5: Circulate the Pool Water

Turn on your pool pump and allow it to circulate the water for at least 2-4 hours. This will help to distribute the pH increaser evenly throughout the pool, ensuring the pH level is raised consistently.

Step 6: Retest and Adjust as Needed

After the pool water has circulated for a sufficient time, retest the pH level using your pool test kit or test strips. If the pH level is still below the ideal range, repeat Steps 2-5, adding more pH increaser as necessary. Keep in mind that it’s better to make gradual adjustments to avoid overshooting the target pH level.

Conclusion

Maintaining the optimal pH level in your swimming pool is essential for a healthy and enjoyable swimming environment. By following this comprehensive guide on how to raise the pH in your swimming pool, you can ensure the comfort of swimmers, protect your pool equipment, and maximize the effectiveness of your sanitizing chemicals. Regular testing and adjustments are key to maintaining a well-balanced and inviting pool for you and your family to enjoy.