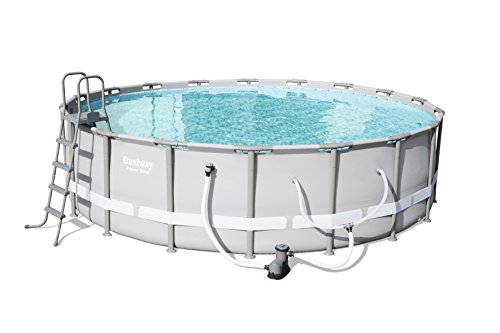
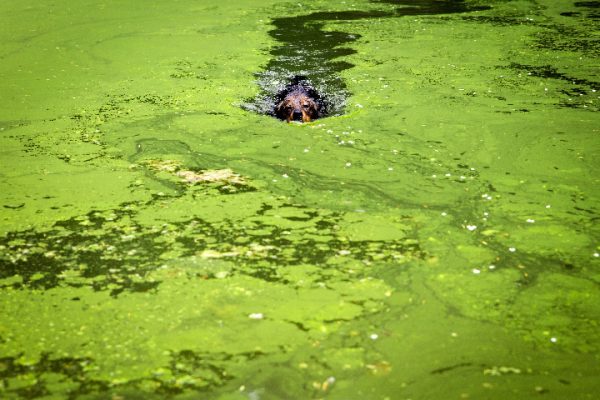
Crystal Clear Water Secrets: Demystifying Pool Clarifiers

There’s nothing quite as inviting as crystal clear pool water, especially on a hot summer day. However, keeping your pool water pristine can sometimes be a challenge. Enter pool clarifiers: these powerful products can help restore your pool’s clarity and sparkle in no time. In this article, we’ll dive deep into the world of pool clarifiers, explaining what they are, when to use them, and how they work to bring back that crystal clear water you love.

  1. What is a Pool Clarifier? Pool clarifiers are specialized chemical products designed to help restore the clarity of your swimming pool water. They work by binding together tiny particles that cause cloudiness, making them large enough to be removed by your pool’s filtration system. These particles can include dirt, algae, and other organic matter that naturally accumulate in pool water over time.
  2. When to Use a Pool Clarifier Pool clarifiers should be used whenever you notice a decline in water clarity. This can occur due to several factors, including:
  • A recent algae bloom
  • Insufficient filtration or circulation
  • Excess debris from storms or heavy winds
  • Imbalanced pool chemistry

Keep in mind that clarifiers should not be used as a substitute for regular pool maintenance. They are best used as a supplementary tool to help maintain water clarity in conjunction with regular cleaning, balancing of chemicals, and proper filtration.

  1. How Pool Clarifiers Work Pool clarifiers utilize a process called coagulation or flocculation to bind together the microscopic particles causing cloudiness in your pool water. These particles often carry a negative electrical charge, which causes them to repel one another and remain suspended in the water. Pool clarifiers contain positively charged polymers that neutralize the negative charge, allowing the particles to clump together and form larger groups, known as flocs.

Once these flocs have formed, they are more easily trapped and removed by your pool’s filtration system, resulting in clearer water. Depending on the specific product used and the severity of the cloudiness, you may see results in as little as a few hours, although it can sometimes take a day or two for the full effect.

  1. How to Use Pool Clarifiers Using a pool clarifier is generally a straightforward process. Simply follow the instructions on the product label to determine the correct dosage for your pool size. Pour the recommended amount of clarifier evenly around the pool’s perimeter, ensuring that your pool pump is running to aid in the distribution and filtration of the product.

For optimal results, it’s essential to maintain proper water balance and ensure your pool’s filtration system is functioning efficiently. After using a pool clarifier, you may need to clean or backwash your filter more frequently due to the increased particle load.

Conclusion: Pool clarifiers are a valuable tool in every pool owner’s arsenal, helping to restore and maintain crystal clear water when used correctly. By understanding when and how to use these powerful products, you’ll be well on your way to enjoying a sparkling, inviting pool all season long. So, the next time your pool water starts to look a bit murky, don’t fret – just reach for a pool clarifier and let it work its magic.


Recommended Products

As an Amazon Associate, we earn from qualifying purchases.

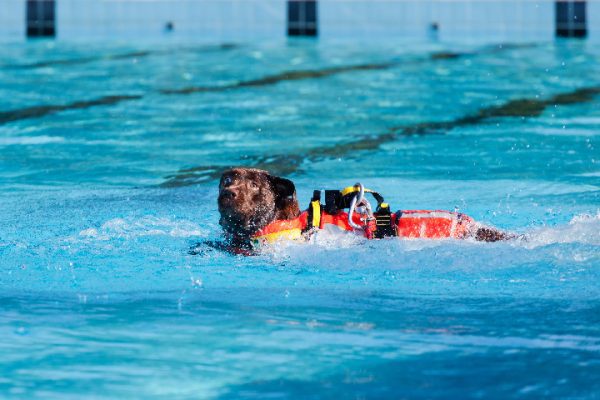
Pool Shock 101: A Homeowner’s Guide to Different Pool Shock Methods

Discover the various methods to shock your swimming pool, understand their benefits, and learn how to choose the right one for your pool maintenance needs.

Regularly shocking your swimming pool is an essential part of proper pool maintenance. Pool shock treatments help eliminate contaminants, restore water clarity, and maintain a safe and healthy swimming environment. As a homeowner, understanding the different pool shock methods available can help you choose the most suitable one for your pool’s unique needs. In this article, we will explore the various ways to shock your pool and provide guidance on selecting the best method for your pool maintenance routine.

Different Methods to Shock Your Swimming Pool

  1. Calcium Hypochlorite (Cal-Hypo) Shock

Calcium hypochlorite, also known as Cal-Hypo, is a popular and powerful pool shock method. Cal-Hypo contains high levels of chlorine, typically around 65-75%, making it effective at killing bacteria, algae, and other organic contaminants.

Pros:

  • Strong oxidizing properties
  • Effective against a wide range of contaminants
  • Available in various strengths


Cons:

  • Can increase water hardness and calcium levels
  • Requires pre-dissolving in water before application
  • Must be added at night to prevent sunlight from breaking down the active chlorine
  1. Dichloro-S-Triazinetrione (Dichlor) Shock

Dichlor shock is a stabilized form of chlorine that contains cyanuric acid, which protects the chlorine from being broken down by sunlight. This makes it an excellent choice for outdoor pools that receive a lot of sun exposure.

Pros:

  • Stabilized chlorine resists UV degradation
  • Fast-dissolving and easy to apply
  • Compatible with most pool types

Cons:

  • May increase cyanuric acid levels with repeated use
  • Lower chlorine content compared to Cal-Hypo
  • More expensive than other shock methods
  1. Potassium Monopersulfate (Non-Chlorine) Shock

Potassium monopersulfate, also known as non-chlorine shock or MPS, is an oxygen-based shock treatment that does not contain chlorine. This type of shock is ideal for those who want to avoid using chlorine or need a shock treatment compatible with alternative sanitizers like bromine or biguanide.

Pros:

  • No chlorine odor
  • Compatible with alternative sanitizers
  • Can be used during the day, as it is not affected by sunlight

Cons:

  • Less effective against algae and bacteria than chlorine-based shocks
  • May be less compatible with certain pool surfaces or equipment
  • More expensive than chlorine-based shock options
  1. Liquid Chlorine Shock

Liquid chlorine, or sodium hypochlorite, is another option for shocking your pool. This method is easy to apply, as it can be poured directly into the pool without the need for pre-dissolving.

Pros:

  • Easy to apply, no pre-dissolving required
  • Works quickly and effectively
  • Less likely to increase calcium hardness

Cons:

  • Lower concentration of chlorine compared to Cal-Hypo
  • Can degrade quickly if not stored properly
  • Can be more expensive than other shock methods

How to Choose the Right Shock Method for Your Pool

To determine the best pool shock method for your needs, consider the following factors:

  1. Pool Type: Consider your pool’s surface material, as some shock treatments may be less compatible with certain surfaces or equipment.
  2. Sanitizing System: If you use an alternative sanitizer, like bromine or biguanide, choose a shock method compatible with your system, such as potassium monopersulfate.
  3. Sun Exposure: For outdoor pools with significant sun exposure, consider a stabilized shock treatment like Dichlor or a non-chlorine shock that is not affected by sunlight.
  1. Existing Water Chemistry: Analyze your pool’s current water chemistry, such as calcium hardness and cyanuric acid levels, and choose a shock treatment that will not exacerbate existing imbalances.
  2. Budget: Consider your budget and the cost of the shock treatments available, as some methods may be more expensive than others.
  3. Frequency of Use: If you use your pool frequently or host large gatherings, a stronger shock treatment like Cal-Hypo may be more appropriate to ensure proper sanitization.

Understanding the various pool shock methods available is crucial for any homeowner looking to maintain a clean and safe swimming environment. By considering your pool type, sanitizing system, sun exposure, existing water chemistry, budget, and usage, you can make an informed decision about which pool shock method best suits your needs. Regularly shocking your pool with the appropriate method will help you eliminate contaminants, maintain water clarity, and enjoy a healthy and enjoyable swimming experience.


Recommended Products

As an Amazon Associate, we earn from qualifying purchases.

Mastering Pool Alkalinity: How to Test, Raise, and Lower Levels for Optimal Swimming Conditions

Learn how to test, raise, and lower your swimming pool’s alkalinity to maintain the ideal water chemistry for a safe, comfortable, and enjoyable swimming experience.

Introduction

Maintaining proper alkalinity levels in your swimming pool is essential for ensuring a balanced, healthy, and comfortable swimming environment. Alkalinity acts as a buffer to prevent rapid pH fluctuations, which can cause damage to pool equipment, irritate swimmers’ skin and eyes, and reduce the effectiveness of sanitizing chemicals. In this article, we will guide you through the process of testing, raising, and lowering your pool’s alkalinity levels to maintain optimal water chemistry.

Testing Pool Alkalinity

Regular testing is crucial to monitoring your pool’s alkalinity levels and making necessary adjustments. Alkalinity levels should be maintained between 80 and 120 parts per million (ppm) for most pools, although some pool manufacturers may have slightly different recommendations.

  1. Choose a testing method: To test your pool’s alkalinity, you can use either a liquid test kit or test strips. Both methods are readily available at pool supply stores and online.
  2. Collect a water sample: Using a clean container or the provided vial, collect a water sample from at least 12 inches below the surface and away from return jets.
  3. Follow the testing instructions: Carefully follow the instructions provided with your chosen test kit or test strips. This will typically involve adding a specific number of drops of testing solution to the water sample or dipping a test strip into the sample for a specified time.
  4. Read the results: Compare the color of the water sample or test strip to the provided color chart to determine your pool’s current alkalinity level.


Raising Pool Alkalinity

If your pool’s alkalinity level is below the recommended range, you will need to raise it using an alkalinity increaser, typically a sodium bicarbonate-based product.

  1. Determine the required amount: Refer to the instructions on your chosen alkalinity increaser to calculate the amount needed based on your pool’s current alkalinity level and volume.
  2. Pre-dissolve the product: To avoid cloudiness and promote even distribution, dissolve the alkalinity increaser in a bucket of warm water before adding it to the pool.
  3. Add the increaser: Slowly pour the dissolved alkalinity increaser into the pool, distributing it evenly around the perimeter.
  4. Circulate the water: Run your pool’s circulation system for at least 4 hours to ensure thorough mixing and distribution.
  5. Re-test and adjust: Wait 24 hours before re-testing your pool’s alkalinity level and making any further adjustments as necessary.

Lowering Pool Alkalinity

If your pool’s alkalinity level is too high, you can lower it using a pH reducer or muriatic acid.

  1. Determine the required amount: Follow the instructions on your chosen pH reducer or muriatic acid product to calculate the amount needed based on your pool’s current alkalinity level and volume.
  2. Pre-dilute the product: For safety and even distribution, dilute the pH reducer or muriatic acid in a bucket of water according to the manufacturer’s guidelines.
  3. Add the reducer: Slowly pour the diluted pH reducer or muriatic acid into the pool, distributing it evenly around the perimeter.
  4. Circulate the water: Run your pool’s circulation system for at least 4 hours to ensure thorough mixing and distribution.
  5. Re-test and adjust: Wait 24 hours before re-testing your pool’s alkalinity level and making any further adjustments as necessary.

Conclusion

Maintaining proper alkalinity levels in your swimming pool is crucial


Recommended Products

As an Amazon Associate, we earn from qualifying purchases.

???? Calculate Perfect Pool Chemistry Instantly

Stop guessing — use our free Pool Chemical Calculator to get exact dosing for your pool size.

▶ Google Play
???? App Store
???? Web Calculator


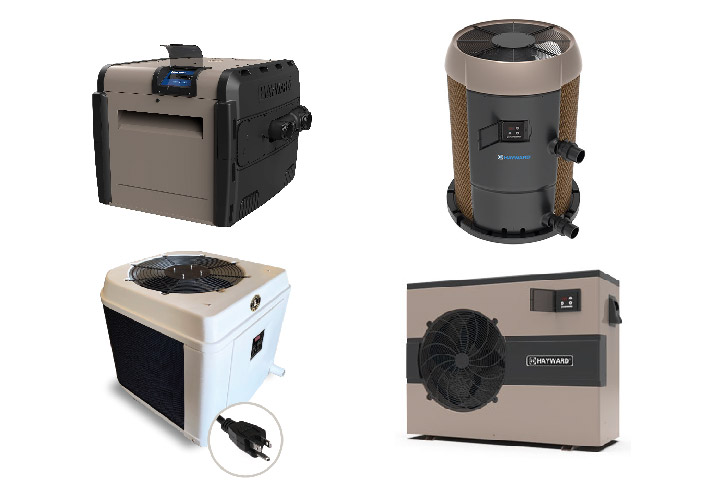
Extend Your Swimming Season: A Guide to Above Ground Pool Heating Options

Above ground pools are a fantastic addition to any backyard, offering endless fun and relaxation during the hot summer months. But when the temperature starts to drop, many pool owners are left longing for more swim time. Thankfully, there are several heating options available that can extend your swimming season well into the cooler months. In this article, we will explore the most popular heating solutions for above ground pools and help you determine which option is best suited for your needs.

  1. Solar Heating Systems: Solar heating systems are an eco-friendly and cost-effective way to heat your above ground pool. These systems utilize solar panels to absorb the sun’s energy and transfer it to your pool water. The panels are typically mounted on a nearby roof or a freestanding structure, and the pool water is circulated through the solar collectors, where it is heated before returning to the pool. While the initial cost of a solar heating system can be higher than other options, the long-term savings on energy bills make it a worthwhile investment.

Pros:

  • Environmentally friendly
  • Low operating costs
  • Can extend your swimming season by several months

Cons:

  • Higher upfront cost
  • Requires sunlight for optimal performance
  • May take longer to heat the pool compared to other methods
  1. Gas Pool Heaters: Gas pool heaters are a popular choice for above ground pool owners due to their fast heating capabilities and ability to maintain a consistent temperature. These heaters use natural gas or propane to heat the pool water and can quickly raise the temperature, making them ideal for occasional use or when rapid heating is desired. However, the ongoing cost of fuel can make gas heaters more expensive to operate over time.


Pros:

  • Fast and efficient heating
  • Can maintain a consistent temperature
  • Suitable for pools of varying sizes

Cons:

  • Higher operating costs due to fuel consumption
  • May require professional installation
  • Can produce greenhouse gas emissions
  1. Electric Heat Pumps: Electric heat pumps are an energy-efficient option for heating your above ground pool. These units work by extracting heat from the surrounding air and transferring it to your pool water. While electric heat pumps can be more expensive upfront than gas heaters, they have lower operating costs, making them an economical choice in the long run.

Pros:

  • Energy-efficient
  • Lower operating costs compared to gas heaters
  • Can maintain a consistent temperature

Cons:

  • Higher upfront cost
  • May require professional installation
  • Heating efficiency can be affected by air temperature
  1. Pool Heat Exchangers: A pool heat exchanger is a device that can be connected to an existing home heating system, such as a boiler or furnace, to transfer heat to your pool water. This option can be cost-effective for those who already have a compatible heating system in place. However, it may not be suitable for all homes, and professional installation is typically required.

Pros:

  • Utilizes existing home heating system
  • Can be cost-effective if compatible with current heating setup
  • Can maintain a consistent temperature

Cons:

  • May require professional installation
  • Not suitable for all homes or heating systems
  • May put additional strain on your home heating system

Conclusion: When it comes to heating your above ground pool, several options can help extend your swimming season. The best choice for you will depend on factors such as your budget, desired heating efficiency, and environmental considerations. By carefully considering the pros and cons of each option, you can make an informed decision that will keep your pool warm and inviting for many months to come.


Recommended Products

As an Amazon Associate, we earn from qualifying purchases.

Understanding Pool Chemistry: How Long to Wait Between Adding Chemicals to Your Pool

Maintaining a clean and healthy pool requires balancing the water’s chemistry, which involves adding various chemicals to adjust the pH, alkalinity, and sanitizer levels. However, it’s crucial to know how long to wait between adding chemicals to avoid unwanted chemical reactions, ineffective treatment, or damage to pool equipment. In this article, we’ll explore the appropriate waiting times between adding chemicals to your pool to ensure safe and effective pool maintenance.

Balancing Your Pool’s Chemistry: Key Chemicals

  1. Chlorine or other sanitizers: Used to kill bacteria, algae, and other microorganisms, ensuring a healthy swimming environment.
  2. pH increaser (sodium carbonate) and pH decreaser (sodium bisulfate or muriatic acid): Used to adjust the pool’s pH levels, which affect the efficiency of sanitizers and prevent damage to pool surfaces and equipment.
  3. Alkalinity increaser (sodium bicarbonate): Used to adjust the pool’s total alkalinity, which stabilizes the pH levels and prevents fluctuations.
  4. Calcium hardness increaser (calcium chloride): Used to adjust the water’s hardness, preventing scaling or corrosion of pool surfaces and equipment.

Waiting Times Between Adding Chemicals

  1. Chlorine and pH/Alkalinity Adjusters

When adjusting your pool’s pH or alkalinity, it’s essential to wait for the chemicals to circulate fully before testing the water and adding chlorine or other sanitizers. Generally, it would be best if you allowed at least 2 hours for the water to circulate after adding a pH or alkalinity increaser/decreaser before adding sanitizers. This waiting period ensures that the chemicals are thoroughly mixed and that your pool’s pH and alkalinity levels have stabilized.

  1. Chlorine and Calcium Hardness Increaser


Calcium hardness increasers, such as calcium chloride, can react with chlorine and other sanitizers, producing a cloudy or precipitate-filled pool. It’s important to wait at least 24 hours after adding a calcium hardness increaser before adding chlorine or other sanitizers.

  1. Shock Treatment

Shock treatments, which involve adding large amounts of chlorine or other sanitizers to the pool to kill algae and other contaminants, require a waiting period before swimmers can re-enter the pool. Depending on the strength of the shock treatment, this waiting period can range from 8 to 24 hours. It’s also essential to wait for the chlorine levels to drop below 5 ppm (parts per million) before adding other chemicals, such as pH or alkalinity adjusters.

Tips for Safe and Effective Pool Chemical Management

  1. Test your pool water regularly: Use a reliable test kit or test strips to monitor your pool’s chemistry, including chlorine or sanitizer levels, pH, alkalinity, and calcium hardness. Regular testing ensures that you can make adjustments as needed to maintain a balanced pool environment.
  2. Add chemicals separately: Never mix chemicals before adding them to the pool, as this can cause dangerous chemical reactions. Instead, pre-dissolve each chemical in a bucket of pool water and add it to the pool separately.
  3. Use a pool circulation system: Ensuring proper water circulation by running your pool pump and filtration system helps distribute chemicals evenly throughout the pool, promoting effective treatment and balanced water chemistry.
  4. Follow manufacturer guidelines: Always read and follow the instructions on the chemical packaging to ensure safe and effective pool treatment.

Maintaining your pool’s chemistry involves carefully managing the addition of chemicals, ensuring adequate waiting periods between treatments. By understanding the appropriate waiting times and following safe pool chemical management practices, you can maintain a clean, healthy, and well-balanced swimming environment for you and your family to enjoy.


Recommended Products

As an Amazon Associate, we earn from qualifying purchases.

???? Calculate Perfect Pool Chemistry Instantly

Stop guessing — use our free Pool Chemical Calculator to get exact dosing for your pool size.

▶ Google Play
???? App Store
???? Web Calculator


Make a Splash This Spring Break: Your Ultimate Guide to Getting Your Pool Party Ready

Spring break is just around the corner, and there’s no better way to celebrate the warmer weather than by hosting the ultimate pool party for your friends and family. But after a long winter, your pool may need some TLC to get it ready for your guests to dive in. Don’t worry! We’ve got you covered with this easy-to-follow guide that will transform your backyard into the perfect spring break oasis.

  1. Start by Opening Your Pool: It’s time to peel back the pool cover and bring your pool back to life! Be sure to follow the manufacturer’s instructions when removing the cover, and make sure you properly clean and store it for the next winter season. Check the water level and top it off if needed. Don’t forget to turn on your pool equipment and make sure everything is running smoothly.
  2. Clean and Vacuum the Pool: Grab your pool skimmer and remove any debris that may have fallen in over the winter months. Then, give your pool a thorough vacuuming to get rid of any dirt or algae buildup. Be sure to brush the walls, steps, and other surfaces to keep your pool sparkling clean.
  3. Test and Balance the Water Chemistry: Before your guests dive in, you’ll want to ensure the water chemistry is perfectly balanced. Test the pH, alkalinity, and sanitizer levels in your pool using a reliable test kit. Adjust the levels accordingly to keep your pool water safe and inviting.
  4. Inspect Pool Equipment and Accessories: Now is the perfect time to inspect your pool equipment and accessories for any signs of wear and tear. Check for leaks, cracks, or other damage to your pump, filter, and heater. Make sure your pool ladder, diving board, and any other poolside features are safe and secure.
  5. Add Some Fun Pool Floats and Games: Nothing says “spring break” quite like a collection of colorful pool floats and exciting pool games. Invest in some fun inflatables and pool toys to entertain your guests and create a lively atmosphere.
  6. Set the Scene with Outdoor Decor and Lighting: Transform your backyard into a tropical paradise by adding some festive outdoor decor and lighting. String lights, tiki torches, and lanterns can create a warm and inviting ambiance, while colorful cushions and outdoor rugs add comfort and style to your poolside lounge area.
  7. Prep the Grill and Plan Your Poolside Menu: No pool party is complete without some tasty snacks and refreshing beverages. Fire up the grill and plan a delicious poolside menu that your guests will love. Don’t forget to stock up on ice-cold drinks to keep everyone hydrated and happy!


Conclusion: With these simple steps, your swimming pool will be ready for the ultimate spring break celebration. So, slip on your sunglasses, crank up your favorite tunes, and get ready to make a splash with your friends and family! Happy spring break!


Recommended Products

As an Amazon Associate, we earn from qualifying purchases.

Chlorine vs. Sunlight: Understanding the Battle and Protecting Your Swimming Pool with Cyanuric Acid

Chlorine plays a crucial role in maintaining the cleanliness and safety of your swimming pool. It acts as a disinfectant, killing bacteria, algae, and other harmful microorganisms. However, sunlight poses a significant challenge to maintaining proper chlorine levels in your pool. In this article, we’ll explore how the sun breaks down chlorine in swimming pools and provide tips on how to use cyanuric acid or stabilizer prevent this process and to maintain a healthy pool environment.

How Sunlight Breaks Down Chlorine:

Chlorine reacts with sunlight through a process known as photolysis. Ultraviolet (UV) rays in sunlight break down chlorine molecules (specifically, hypochlorous acid and hypochlorite ions) into their constituent elements, including chloride ions and oxygen. As a result, the chlorine in your pool becomes less effective at sanitizing the water.

This breakdown can occur rapidly, with as much as 90% of the free chlorine in a pool being lost within just a couple of hours of direct sunlight exposure. This decrease in chlorine levels can leave your pool vulnerable to bacteria, algae, and other contaminants.

How to Prevent Chlorine Breakdown by Sunlight:

  1. Use Stabilized Chlorine:


One way to protect your pool’s chlorine from the sun’s UV rays is to use stabilized chlorine, such as dichlor or trichlor. These products contain cyanuric acid, which acts as a stabilizer, protecting the chlorine molecules from photolysis. Cyanuric acid forms a temporary bond with chlorine, shielding it from the sun’s UV rays while still allowing it to sanitize the pool water.

  1. Add Cyanuric Acid to Your Pool:

If you’re using unstabilized chlorine, such as liquid bleach or calcium hypochlorite, you can still protect it from sunlight by adding cyanuric acid separately. The ideal cyanuric acid level in your pool should be between 30 and 50 ppm. Be cautious when adding cyanuric acid, as too high levels can cause chlorine to become less effective at killing bacteria and algae.

  1. Partially Shade Your Pool:

Installing shade structures around your pool, such as umbrellas, shade sails, or pergolas, can help reduce the impact of sunlight on your pool’s chlorine levels. While it may not be feasible to completely shade your pool, even partial shade can provide some protection and help maintain more consistent chlorine levels.

  1. Optimize Chlorine Application Timing:

Adding chlorine to your pool during the early morning or late afternoon, when the sun’s rays are less intense, can help reduce the amount of chlorine lost to photolysis. By doing this, you’ll give the chlorine a chance to sanitize the water before the sun has an opportunity to break it down.

  1. Regularly Test and Adjust Chlorine Levels:

Regularly testing your pool water and adjusting the chlorine levels is essential for maintaining a clean and safe swimming environment. This becomes even more critical when sunlight is breaking down chlorine in your pool. Test your pool’s chlorine levels at least once a week, and more frequently during periods of heavy use or after storms.

Conclusion:

Sunlight can be a formidable enemy in the battle to maintain proper chlorine levels in your swimming pool. By understanding how the sun breaks down chlorine and taking steps to prevent this process, you can ensure that your pool remains clean, safe, and enjoyable for swimmers. Using stabilized chlorine, adding cyanuric acid, partially shading your pool, optimizing chlorine application timing, and regularly testing and adjusting chlorine levels are all effective ways to protect your pool’s chlorine from the sun and maintain a healthy pool environment.


Recommended Products

As an Amazon Associate, we earn from qualifying purchases.

6 Reasons Your Swimming Pool Turns Cloudy After Shocking

Understanding the Factors Behind Cloudy Pool Water and How to Address Them

Shocking your swimming pool is a necessary step in maintaining water quality and preventing the growth of algae, bacteria, and other harmful contaminants. However, some pool owners may experience cloudy water after performing this essential maintenance task. In this article, we’ll explore six reasons why your pool water may turn cloudy after shocking and provide tips on how to address these issues and maintain crystal-clear water.

  1. Insufficient Filtration

After shocking the pool, the filter works overtime to remove the dead algae, bacteria, and other contaminants from the water. If your pool filter is not functioning correctly, it may not be able to adequately remove these particles, resulting in cloudy water. Check your filter system for any issues, such as clogs or worn-out components, and clean or replace as needed. Running the filter for an extended period may also help clear the water faster.

  1. High Calcium Hardness Levels

High calcium hardness levels can cause calcium to precipitate out of the water, creating a cloudy appearance. Shocking the pool can exacerbate this issue, as the process increases the pH and alkalinity of the water, making calcium more likely to precipitate. Test your water for calcium hardness and take appropriate steps to lower the levels if necessary, such as adding a sequestrant or diluting the pool water with fresh water.

  1. Over-Shocking the Pool


Adding too much shock to your pool can lead to an excessive level of combined chlorine (chloramines), which can cause cloudy water. To prevent this issue, be sure to follow the manufacturer’s instructions for the proper amount of shock to add based on your pool’s size and the specific product you’re using. If you’ve accidentally over-shocked your pool, running the filter continuously and adding a non-chlorine shock may help clear the water.

  1. Unbalanced Pool Chemistry

Unbalanced pool chemistry can contribute to cloudy water after shocking. Ensure that your pool’s pH, alkalinity, and sanitizer levels are within the appropriate ranges before and after shocking. If any of these levels are off, adjust them accordingly to help maintain clear water.

  1. Dead Algae and Bacteria

When you shock your pool, the chlorine kills algae and bacteria, causing them to clump together and form larger particles. These particles can make your pool water appear cloudy. Run your pool filter continuously and use a clarifier or flocculant to help your filter remove these particles more effectively. Vacuuming the pool floor can also help remove dead algae and other debris.

  1. Suspended Particles

Dirt, dust, pollen, and other fine particles can enter your pool and cause cloudiness. Shocking the pool may cause these particles to become more visible temporarily. Using a clarifier can help your filter remove these particles more effectively, resulting in clearer water.

Conclusion

While shocking your pool is a critical maintenance step, it can sometimes lead to cloudy water. Understanding the potential causes of this issue, such as insufficient filtration, high calcium hardness levels, or unbalanced pool chemistry, can help you address the problem and maintain crystal-clear water. By regularly testing your pool water, properly maintaining your filtration system, and following the correct shocking procedures, you can enjoy a clean and inviting swimming environment all season long.


Recommended Products

As an Amazon Associate, we earn from qualifying purchases.

???? Calculate Perfect Pool Chemistry Instantly

Stop guessing — use our free Pool Chemical Calculator to get exact dosing for your pool size.

▶ Google Play
???? App Store
???? Web Calculator


SLAM – Shock Level and Maintain: A Comprehensive Guide to Pool Sanitation

Maintaining the cleanliness and safety of your swimming pool is crucial for both the health of swimmers and the longevity of your pool. One popular and effective sanitation method is SLAM, which stands for Shock Level and Maintain. In this article, we will explore the SLAM process, explain its importance, and provide a step-by-step guide to implementing this method to achieve a sparkling, sanitized pool.

What is SLAM?

SLAM (Shock Level and Maintain) is a pool sanitation method that involves raising the free chlorine level in your swimming pool to a high enough level to effectively kill off algae, bacteria, and other contaminants. This process, known as shocking, is then followed by maintaining the elevated chlorine levels until the pool water is clear and free of contaminants. SLAM is a proactive approach to pool sanitation and is particularly useful in addressing algae blooms, cloudy water, or visible pool contaminants.

The Importance of SLAM

Implementing the SLAM method in your pool sanitation routine has several benefits:

  1. Eliminates algae and bacteria: SLAM effectively kills off algae, bacteria, and other harmful microorganisms that can compromise water quality and pose health risks to swimmers.
  2. Restores water clarity: By targeting and eliminating contaminants, the SLAM method helps restore the water’s clarity, ensuring a more enjoyable swimming experience.
  3. Prevents damage to pool surfaces and equipment: Algae and bacteria can cause staining, discoloration, and even damage to pool surfaces and equipment if left unaddressed. SLAM helps prevent these issues, prolonging the life of your pool and its components.
  4. Efficient and cost-effective: The SLAM method is an efficient and cost-effective way to sanitize your pool compared to alternative methods or products that may require ongoing use or expense.

Step-by-Step Guide to SLAM

Before implementing the SLAM process, consult your pool’s operating manual and seek professional advice to ensure the method is compatible with your specific pool type, equipment, and chemical requirements.

Step 1: Test and balance your pool water

Before starting the SLAM process, test your pool water’s pH, alkalinity, and cyanuric acid levels using a reliable pool testing kit. Adjust these levels as necessary to achieve the recommended balance for your pool. A properly balanced pool will allow the SLAM process to be more effective.

Step 2: Determine the shock level of chlorine

Consult a chlorine-to-cyanuric acid chart to determine the appropriate shock level of free chlorine for your pool based on the current cyanuric acid level. The shock level is the minimum free chlorine concentration required to effectively kill off algae and bacteria.

Step 3: Add the appropriate amount of chlorine

Using a liquid or granular chlorine product, carefully add the required amount of chlorine to your pool to reach the determined shock level. Always follow the manufacturer’s instructions for dosing and application.

Step 4: Circulate the water

Run your pool’s circulation system for at least 30 minutes to help distribute the chlorine evenly throughout the pool.

Step 5: Maintain the shock level

Frequently test the free chlorine levels in your pool, aiming to maintain the shock level for as long as it takes for the water to clear up and become free of contaminants. This may require adding more chlorine as needed to maintain the shock level.

Step 6: Monitor the progress

Keep a close eye on the pool’s water clarity and appearance. The SLAM process is complete when the water is clear, the free chlorine level remains stable overnight, and the combined chlorine (chloramines) level is 0.5 ppm or lower.

Step 7: Return to normal operation

Once the SLAM process is complete, adjust the chlorine levels back to the normal operating range for your pool, typically between 1-3 ppm for a residential pool. Continue to monitor and adjust the pool water chemistry as needed, following your regular pool maintenance routine.

Step 8: Clean and maintain the pool filter

Throughout the SLAM process, your pool filter will be working hard to remove dead algae, bacteria, and other debris from the water. Once the SLAM is complete, clean and maintain your pool filter according to the manufacturer’s instructions. This may involve backwashing a sand filter, rinsing a cartridge filter, or performing a deep clean of a diatomaceous earth (DE) filter.

Tips for a Successful SLAM

  1. Use a high-quality pool testing kit: Accurate water testing is crucial to the success of the SLAM process. Invest in a high-quality pool testing kit, and ensure it is not expired or damaged.
  2. Be patient: The SLAM process can take anywhere from a few days to a few weeks, depending on the severity of the contamination and the pool’s size. Be patient and persistent, maintaining the shock level until the water is clear and free of contaminants.
  3. Keep the pool’s circulation system running: Run your pool’s circulation system continuously throughout the SLAM process to ensure proper distribution of the chlorine and removal of contaminants.
  4. Brush and vacuum the pool: Regularly brush and vacuum the pool to help dislodge and remove algae and debris from surfaces and assist the filter in clearing the water.

Conclusion

The SLAM (Shock Level and Maintain) method is an effective, proactive approach to pool sanitation that can help restore water clarity, eliminate algae and bacteria, and prevent damage to pool surfaces and equipment. By following this step-by-step guide and maintaining a consistent pool maintenance routine, you can enjoy a clean, healthy, and inviting swimming environment for you and your loved ones. Always consult with a pool professional if you have any concerns or questions about the SLAM process or your specific pool type and requirements.


Recommended Products

As an Amazon Associate, we earn from qualifying purchases.

???? Calculate Perfect Pool Chemistry Instantly

Stop guessing — use our free Pool Chemical Calculator to get exact dosing for your pool size.

▶ Google Play
???? App Store
???? Web Calculator


Pool Ozone Systems: A New Pool Owner’s Guide to Ozone Sanitation

Understanding the Basics, Benefits, and Maintenance of Ozone Pool Systems

Introduction

As a new pool owner, you may be considering various methods to maintain clean and safe pool water. One of the more advanced options is the use of ozone pool systems. This article will provide an overview of ozone pool systems, explain their benefits, and offer guidance on maintenance, helping you decide if this technology is the right fit for your pool.

  1. Basics of Ozone Pool Systems

Ozone pool systems use ozone gas (O3) to sanitize pool water by oxidizing and destroying contaminants such as bacteria, viruses, and algae. These systems work by generating ozone gas, typically through ultraviolet (UV) light or corona discharge methods, and then injecting the ozone into the pool’s circulation system. The ozone reacts with contaminants in the water, neutralizing them and leaving only oxygen and harmless byproducts behind.


It’s important to note that ozone systems should be used in conjunction with a residual sanitizer, such as chlorine or bromine, since ozone does not leave any residual protection in the water.

  1. Benefits of Ozone Pool Systems

Ozone pool systems offer several advantages to pool owners, including:

a) Improved Water Quality: Ozone effectively oxidizes and eliminates harmful contaminants, resulting in clearer, cleaner, and safer pool water.

b) Reduced Chemical Use: Ozone systems can reduce the amount of chlorine or other sanitizers needed, leading to fewer chemical-related irritations and odors.

c) Enhanced Safety: Ozone is a powerful oxidizer that can neutralize chlorine-resistant microorganisms, reducing the risk of waterborne illnesses.

d) Eco-Friendly: Ozone systems are environmentally friendly, as they do not produce harmful byproducts or require the disposal of hazardous chemicals.

e) Low Maintenance: Ozone systems require minimal maintenance, making them an attractive option for busy pool owners.

  1. Maintenance of Ozone Pool Systems

While ozone pool systems are relatively low-maintenance, there are a few key tasks to ensure optimal performance:

a) Lamp Replacement (UV Ozone Systems): UV lamps have a limited lifespan, typically around 12,000 to 14,000 hours of operation. It’s essential to replace the lamp as per the manufacturer’s recommendations to maintain effective ozone production.

b) Check Electrodes (Corona Discharge Ozone Systems): Corona discharge systems use electrodes to generate ozone. Over time, the electrodes may require cleaning or replacement. Consult the manufacturer’s guidelines for specific maintenance requirements.


c) Inspect and Clean Components: Regularly inspect and clean other components, such as injectors, tubing, and check valves, to ensure proper functioning and prevent leaks.

d) Monitor System Performance: Regularly check the ozone system’s performance indicators, such as the ozone output or system diagnostics, to ensure the system is operating effectively.

Conclusion

For new pool owners seeking an advanced, supplementary sanitation method that improves water quality, reduces chemical usage, and offers environmental benefits, an ozone pool system is worth considering. With minimal maintenance requirements, ozone systems are a convenient and effective option to enhance the safety and enjoyment of your swimming pool. By understanding the basics, benefits, and maintenance of ozone pool systems, you can make an informed decision and invest in a technology that aligns with your pool care preferences.