Mastering Pool Alkalinity: How to Test, Raise, and Lower Levels for Optimal Swimming Conditions

Learn how to test, raise, and lower your swimming pool’s alkalinity to maintain the ideal water chemistry for a safe, comfortable, and enjoyable swimming experience.

Introduction

Maintaining proper alkalinity levels in your swimming pool is essential for ensuring a balanced, healthy, and comfortable swimming environment. Alkalinity acts as a buffer to prevent rapid pH fluctuations, which can cause damage to pool equipment, irritate swimmers’ skin and eyes, and reduce the effectiveness of sanitizing chemicals. In this article, we will guide you through the process of testing, raising, and lowering your pool’s alkalinity levels to maintain optimal water chemistry.

Testing Pool Alkalinity

Regular testing is crucial to monitoring your pool’s alkalinity levels and making necessary adjustments. Alkalinity levels should be maintained between 80 and 120 parts per million (ppm) for most pools, although some pool manufacturers may have slightly different recommendations.

  1. Choose a testing method: To test your pool’s alkalinity, you can use either a liquid test kit or test strips. Both methods are readily available at pool supply stores and online.
  2. Collect a water sample: Using a clean container or the provided vial, collect a water sample from at least 12 inches below the surface and away from return jets.
  3. Follow the testing instructions: Carefully follow the instructions provided with your chosen test kit or test strips. This will typically involve adding a specific number of drops of testing solution to the water sample or dipping a test strip into the sample for a specified time.
  4. Read the results: Compare the color of the water sample or test strip to the provided color chart to determine your pool’s current alkalinity level.


Raising Pool Alkalinity

If your pool’s alkalinity level is below the recommended range, you will need to raise it using an alkalinity increaser, typically a sodium bicarbonate-based product.

  1. Determine the required amount: Refer to the instructions on your chosen alkalinity increaser to calculate the amount needed based on your pool’s current alkalinity level and volume.
  2. Pre-dissolve the product: To avoid cloudiness and promote even distribution, dissolve the alkalinity increaser in a bucket of warm water before adding it to the pool.
  3. Add the increaser: Slowly pour the dissolved alkalinity increaser into the pool, distributing it evenly around the perimeter.
  4. Circulate the water: Run your pool’s circulation system for at least 4 hours to ensure thorough mixing and distribution.
  5. Re-test and adjust: Wait 24 hours before re-testing your pool’s alkalinity level and making any further adjustments as necessary.

Lowering Pool Alkalinity

If your pool’s alkalinity level is too high, you can lower it using a pH reducer or muriatic acid.

  1. Determine the required amount: Follow the instructions on your chosen pH reducer or muriatic acid product to calculate the amount needed based on your pool’s current alkalinity level and volume.
  2. Pre-dilute the product: For safety and even distribution, dilute the pH reducer or muriatic acid in a bucket of water according to the manufacturer’s guidelines.
  3. Add the reducer: Slowly pour the diluted pH reducer or muriatic acid into the pool, distributing it evenly around the perimeter.
  4. Circulate the water: Run your pool’s circulation system for at least 4 hours to ensure thorough mixing and distribution.
  5. Re-test and adjust: Wait 24 hours before re-testing your pool’s alkalinity level and making any further adjustments as necessary.

Conclusion

Maintaining proper alkalinity levels in your swimming pool is crucial

Understanding Pool Chemistry: How Long to Wait Between Adding Chemicals to Your Pool

Maintaining a clean and healthy pool requires balancing the water’s chemistry, which involves adding various chemicals to adjust the pH, alkalinity, and sanitizer levels. However, it’s crucial to know how long to wait between adding chemicals to avoid unwanted chemical reactions, ineffective treatment, or damage to pool equipment. In this article, we’ll explore the appropriate waiting times between adding chemicals to your pool to ensure safe and effective pool maintenance.

Balancing Your Pool’s Chemistry: Key Chemicals

  1. Chlorine or other sanitizers: Used to kill bacteria, algae, and other microorganisms, ensuring a healthy swimming environment.
  2. pH increaser (sodium carbonate) and pH decreaser (sodium bisulfate or muriatic acid): Used to adjust the pool’s pH levels, which affect the efficiency of sanitizers and prevent damage to pool surfaces and equipment.
  3. Alkalinity increaser (sodium bicarbonate): Used to adjust the pool’s total alkalinity, which stabilizes the pH levels and prevents fluctuations.
  4. Calcium hardness increaser (calcium chloride): Used to adjust the water’s hardness, preventing scaling or corrosion of pool surfaces and equipment.

Waiting Times Between Adding Chemicals

  1. Chlorine and pH/Alkalinity Adjusters

When adjusting your pool’s pH or alkalinity, it’s essential to wait for the chemicals to circulate fully before testing the water and adding chlorine or other sanitizers. Generally, it would be best if you allowed at least 2 hours for the water to circulate after adding a pH or alkalinity increaser/decreaser before adding sanitizers. This waiting period ensures that the chemicals are thoroughly mixed and that your pool’s pH and alkalinity levels have stabilized.

  1. Chlorine and Calcium Hardness Increaser


Calcium hardness increasers, such as calcium chloride, can react with chlorine and other sanitizers, producing a cloudy or precipitate-filled pool. It’s important to wait at least 24 hours after adding a calcium hardness increaser before adding chlorine or other sanitizers.

  1. Shock Treatment

Shock treatments, which involve adding large amounts of chlorine or other sanitizers to the pool to kill algae and other contaminants, require a waiting period before swimmers can re-enter the pool. Depending on the strength of the shock treatment, this waiting period can range from 8 to 24 hours. It’s also essential to wait for the chlorine levels to drop below 5 ppm (parts per million) before adding other chemicals, such as pH or alkalinity adjusters.

Tips for Safe and Effective Pool Chemical Management

  1. Test your pool water regularly: Use a reliable test kit or test strips to monitor your pool’s chemistry, including chlorine or sanitizer levels, pH, alkalinity, and calcium hardness. Regular testing ensures that you can make adjustments as needed to maintain a balanced pool environment.
  2. Add chemicals separately: Never mix chemicals before adding them to the pool, as this can cause dangerous chemical reactions. Instead, pre-dissolve each chemical in a bucket of pool water and add it to the pool separately.
  3. Use a pool circulation system: Ensuring proper water circulation by running your pool pump and filtration system helps distribute chemicals evenly throughout the pool, promoting effective treatment and balanced water chemistry.
  4. Follow manufacturer guidelines: Always read and follow the instructions on the chemical packaging to ensure safe and effective pool treatment.

Maintaining your pool’s chemistry involves carefully managing the addition of chemicals, ensuring adequate waiting periods between treatments. By understanding the appropriate waiting times and following safe pool chemical management practices, you can maintain a clean, healthy, and well-balanced swimming environment for you and your family to enjoy.

Dive Into the Georgia Sun: A Guide to Opening Your Swimming Pool for the Season

Get ready, Georgia! It’s time to bust out the pool floats, crank up the BBQ, and make a splash with our ultimate guide to opening your swimming pool for the season.

Hello, Georgia pool owners! The birds are chirping, the azaleas are blooming, and the sweet scent of peach blossoms fills the air – all signs that the warm Georgia sun is finally here to stay. But wait, there’s something missing… Aha! It’s time to throw off the winter pool cover and dive into the blissful oasis that is your very own swimming pool.

Whether you’re a seasoned pool pro or a first-time owner, opening your pool for the season can be a hilarious, heartwarming, and occasionally hair-raising experience. So let’s grab our pool nets and chlorine tablets, and embark on this adventure together.

Step 1: Assess the (Pool) Situation

Before you jump headfirst into the pool opening process, take a moment to assess your pool’s current state. Is your pool cover still intact, or did that notorious Georgia raccoon party a little too hard on it during the winter? If you notice any damage, make a note to repair or replace your cover after the pool opening process is complete.

Step 2: The Great Unveiling

It’s time for the big reveal! Slowly and carefully remove your pool cover, making sure to avoid dumping any accumulated debris into the pool. While it’s tempting to simply drag the cover off and be done with it, you’ll thank yourself later for being cautious. Trust us; nobody wants to spend hours fishing out leaves, twigs, and mysterious raccoon leftovers.

Step 3: Get Your Pool Pump Pumpin’

Now that your pool is uncovered, it’s time to get your pool pump and filter system up and running. But first, a quick tip: give your equipment a thorough inspection and cleaning before turning everything on. Ensure all connections are secure and that the pump and filter are debris-free. Remember, a happy pump means a happy pool!

Step 4: Spring Cleaning – Pool Edition

It’s time to tackle the aftermath of winter in your pool. Use a pool skimmer to remove any floating debris, and then break out the pool vacuum to eliminate dirt and sediment from the bottom. No judgment if you hum the Jaws theme while vacuuming – we’ve all been there.

Step 5: Test, Balance, and Shock Your Pool Water

Now comes the real magic: transforming your pool water from a questionable-looking soup into a crystal-clear wonderland. First, test your pool water for pH, chlorine, and alkalinity levels. You’ll want to aim for a pH between 7.4 and 7.6, alkalinity between 80 and 120 ppm, and a free chlorine level between 1 and 3 ppm. Once everything is balanced, give your pool a good shock treatment to eliminate any lingering bacteria and algae.

Step 6: Get Ready to Make a Splash

Congratulations! You’ve successfully opened your swimming pool for the season. But what’s a pool without a little fun? Stock up on pool floats, noodles, and other accessories that scream “Georgia summer.” And don’t forget to fire up that BBQ for the ultimate poolside feast.

It’s time to gather your friends and family, slather on some sunscreen, and dive into the Georgia sun. We hope this hilarious and heartwarming guide to opening your pool has brought a smile to your face and a sense of excitement for the season ahead. Be sure to share your pool opening adventures with the hashtag #GeorgiaPoolParty and let’s make this summer the most epic one yet!

Step 7: Celebrate Your Pool Opening Success

You’ve made it! Your pool is ready for action, and there’s only one thing left to do: celebrate. Invite your neighbors, friends, and family over for the ultimate Georgia pool party. Set the mood with a playlist of summer tunes, fire up the grill for some delicious Southern BBQ, and mix up a batch of peachy cocktails or ice-cold sweet tea.

Step 8: Share Your Pool Opening Adventures

Now that you’ve mastered the art of pool opening, why not share your journey with fellow Georgia pool enthusiasts? Snap some photos of your sparkling pool, your fabulous poolside setup, and the smiling faces of your guests. Post your pictures on social media with the hashtag #GeorgiaPoolParty, and let’s inspire others to create their own summer paradise in the Peach State.

Step 9: Keep the Fun Going All Summer Long

Opening your pool is just the beginning. The real fun begins when you and your loved ones make lasting memories in and around the water. Whether it’s hosting weekly poolside cookouts, teaching your kids to swim, or simply enjoying a serene sunset float, there’s no shortage of ways to make the most of your pool this summer.

In conclusion, opening your swimming pool for the season in Georgia is a fun and engaging experience that brings people together and sets the stage for countless unforgettable moments. With our ultimate guide and a little bit of humor, you’re well on your way to making a splash and enjoying the very best of what a Georgia summer has to offer. Here’s to warm days, cool dips, and a season filled with laughter, love, and poolside relaxation.

A Comprehensive Guide to Leveling an Above Ground Pool: Steps, Tips, and Tools

An above ground pool is an excellent addition to any backyard, providing a fun and refreshing way to cool off during the hot summer months. However, proper installation is crucial to ensure the pool’s stability, longevity, and safety. One of the essential aspects of pool installation is ensuring the pool is level. In this article, we’ll provide a detailed guide on how to level an above ground pool, including the steps, tips, tools, and materials you’ll need.

Tools and Materials

  1. Long wooden stake or metal rebar
  2. String
  3. Line level
  4. Shovel
  5. Tamper or plate compactor (can be rented)
  6. Carpenter’s level
  7. Builder’s sand (optional)
  8. Landscape fabric (optional)

Step-by-Step Guide to Leveling an Above Ground Pool

Step 1: Choose the pool site

Select a flat, open area for your pool, free of rocks, roots, or other obstructions. Consider factors such as sunlight exposure, proximity to electrical outlets, and distance from your house for easy access.


Step 2: Mark the pool’s perimeter

Using the wooden stake or metal rebar, mark the center of your pool area. Attach a string to the stake, and measure out half the pool’s diameter. Walk around the stake, marking the pool’s perimeter with spray paint or by driving small stakes into the ground.


Step 3: Remove sod and level the ground

Using a shovel, remove the sod within the marked pool area. Begin leveling the ground by removing soil from the high areas and adding it to the low areas. It’s essential to level the entire pool area, not just the perimeter.

Step 4: Check the level

Attach a line level to the string and walk around the pool perimeter, making sure the string remains level. If you notice any low or high areas, adjust the soil accordingly. Use a carpenter’s level to verify the ground is level in both the X and Y axes.

Step 5: Compact the ground

Use a tamper or rent a plate compactor to compact the soil firmly. This step is crucial to prevent the ground from settling unevenly once the pool is filled with water.

Step 6: Add a layer of sand (optional)

Although not necessary, some pool owners prefer to add a 1-2 inch layer of builder’s sand to provide a smoother and more forgiving surface for the pool liner. Spread the sand evenly and compact it with the tamper or plate compactor.

Step 7: Install landscape fabric (optional)

To prevent weeds or grass from growing beneath the pool, you may choose to install landscape fabric on the leveled ground. Secure the fabric with landscape staples to prevent shifting.

Step 8: Assemble the pool

Follow the manufacturer’s instructions to assemble your above ground pool on the leveled site.

Step 9: Final level check

Before filling your pool with water, perform a final check to ensure the pool is level. Place a carpenter’s level on the top rail of the pool in multiple locations to verify that it is level.

Tips for Leveling an Above Ground Pool

  1. Take your time: Leveling the ground can be a time-consuming process. Be patient, and make sure you’re thorough in your efforts to ensure a level and stable pool foundation.
  2. Do not build up low areas with sand: Adding sand to low areas can lead to an unstable foundation as the sand shifts over time. Instead, remove soil from high areas to create a level surface.
  3. Consult your pool’s installation manual: Be sure to follow any specific leveling instructions provided by your pool’s manufacturer.

Leveling an above ground pool is a crucial step in the installation process. A level pool ensures a stable foundation, prolongs the pool’s lifespan, and promotes safety. By following this comprehensive guide, you can successfully level your pool site and enjoy a fun and refreshing backyard oasis. Remember, it’s essential to be patient and thorough during the leveling process, as this will pay off in the long run, ensuring many enjoyable seasons with your above ground pool.

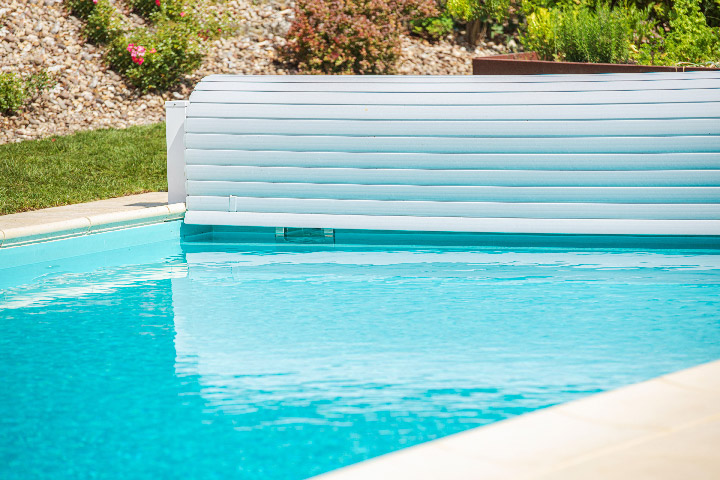
Pool Safety Covers: A Must-Have Accessory for New Pool Owners

Understanding the Importance, Types, and Benefits of Pool Safety Covers

As a new pool owner, ensuring the safety of your family and guests should be a top priority. One of the best ways to add a layer of protection to your swimming pool is by investing in a pool safety cover. In this article, we will discuss the importance of pool safety covers, the different types available, and the benefits they provide, helping you make an informed decision for your pool.

  1. Importance of Pool Safety Covers


Pool safety covers are essential for several reasons:

a) Safety: They act as a barrier to prevent children and pets from accidentally falling into the pool when unsupervised.

b) Maintenance: Pool safety covers help keep out leaves, debris, and dirt, reducing the time and effort required for cleaning and maintenance.

c) Water conservation: By limiting evaporation, pool safety covers help conserve water, saving both resources and money on your water bill.

d) Energy savings: Safety covers can also provide some insulation, reducing heat loss and potentially lowering energy costs associated with heating your pool.

  1. Types of Pool Safety Covers

There are two main types of pool safety covers:

a) Mesh Safety Covers: Made from a woven mesh material, these covers allow water to pass through while keeping out debris. Mesh covers are lightweight, making them easy to install and remove. However, they do not provide as much insulation as solid covers.

b) Solid Safety Covers: These covers are made from a durable, waterproof material that prevents water and debris from entering the pool. Solid covers provide better insulation and prevent algae growth but may require a cover pump to remove standing water after rainfall.

Both mesh and solid safety covers are typically secured to the pool deck using anchors and tensioned straps, ensuring a tight, secure fit.

  1. Benefits of Pool Safety Covers


Investing in a pool safety cover can provide several benefits for new pool owners, including:

a) Enhanced Safety: The primary purpose of a pool safety cover is to protect children, pets, and wildlife from accidental drownings.

b) Reduced Maintenance: By keeping debris out of the pool, safety covers reduce the time and effort required for cleaning and maintenance.

c) Water and Energy Savings: Pool safety covers help conserve water by limiting evaporation and can provide some insulation, reducing energy costs associated with heating your pool.

d) Algae Prevention: Solid safety covers block sunlight, preventing algae growth and reducing the need for algaecide and other chemicals.

e) Aesthetic Appeal: Safety covers provide a clean, uncluttered appearance when the pool is not in use.

Conclusion

For new pool owners, investing in a pool safety cover is a wise decision that not only enhances safety but also provides numerous other benefits. By understanding the importance and types of pool safety covers, you can choose the best option for your pool and enjoy peace of mind knowing your family and guests are protected. With a pool safety cover in place, you can spend less time worrying about pool safety and maintenance and more time enjoying your new swimming pool.

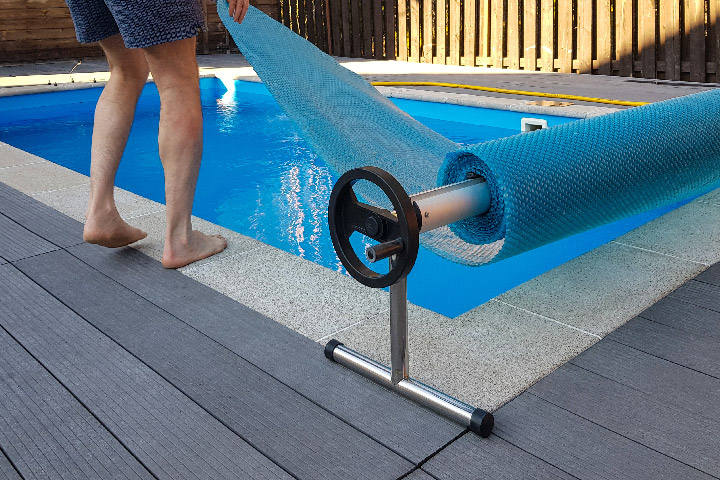
Solar Pool Covers: A Comprehensive Guide for New Pool Owners

Understanding the Different Types, Pros, Cons, and Benefits of Solar Pool Covers

Introduction

As a new pool owner, you may be looking for ways to improve your pool’s energy efficiency and maintain its cleanliness. One of the most effective and environmentally friendly solutions is a solar pool cover. In this article, we will discuss the different types of solar pool covers, their pros and cons, and the overall benefits they provide to help you make an informed decision.

  1. Types of Solar Pool Covers


There are three main types of solar pool covers, each with its own unique characteristics:

a) Bubble Covers: Also known as solar blankets, bubble covers are made from a lightweight, UV-resistant polyethylene material with small air bubbles that provide insulation and heat retention. They are the most affordable and widely used type of solar pool cover.

b) Vinyl Covers: These covers are made from a heavier and more durable vinyl material, offering better insulation and heat retention than bubble covers. Vinyl covers are available in various thicknesses, with thicker covers providing better insulation and durability.

c) Insulated Covers: Made from multiple layers of material, including foam and vinyl, insulated covers provide the best insulation and heat retention capabilities. They are also the most expensive type of solar pool cover.

  1. Pros and Cons of Solar Pool Covers

Pros:

  • Reduces heat loss and water evaporation, helping maintain pool temperature
  • Reduces energy consumption and costs associated with heating your pool
  • Helps keep debris out of the pool, reducing maintenance efforts
  • Extends swimming season by maintaining warmer water temperatures
  • Environmentally friendly option

Cons:

  • May not be as effective in colder climates or during cloudy days
  • Requires manual placement and removal, which can be labor-intensive
  • Can pose a safety hazard if not properly secured or if children and pets are unsupervised
  • May not be suitable for all pool shapes and sizes


  1. Overall Benefits of Solar Pool Covers

Investing in a solar pool cover can provide numerous benefits for new pool owners, including:

a) Energy Savings: Solar pool covers help retain heat in the pool, reducing the need for additional heating methods and lowering energy consumption.

b) Water Conservation: By reducing evaporation, solar pool covers help conserve water, saving both resources and money on your water bill.

c) Reduced Chemical Usage: Solar pool covers help maintain balanced water chemistry by reducing the loss of chemicals due to evaporation, requiring less frequent addition of chemicals.

d) Extended Swimming Season: By maintaining warmer water temperatures, solar pool covers can extend your swimming season, allowing you to enjoy your pool for longer periods.

e) Lower Maintenance: Solar pool covers keep debris out of the pool, reducing the time and effort required for cleaning and maintenance.

Conclusion

Solar pool covers are an excellent investment for new pool owners, offering energy efficiency, water conservation, and other benefits. By understanding the different types of solar pool covers and their pros and cons, you can make an informed decision on the best cover for your pool. Remember to consider your specific pool shape, size, and climate when choosing a solar pool cover to ensure optimal performance and satisfaction. With the right solar pool cover in place, you can enjoy a cleaner, warmer, and more cost-effective swimming experience.

Comparing Pool Sanitation Options: Pros and Cons of Saltwater, Chlorine, UV, Ozone and Other Alternatives

A Comprehensive Guide to the Pros and Cons of Different Pool Sanitation Options

Introduction

Maintaining a clean and safe swimming environment is a top priority for every pool owner. With various pool sanitation options available, choosing the best one for your needs can be challenging. In this article, we will discuss the pros and cons of different pool sanitation options, including chlorine, saltwater systems, Baquacil, ozone, and UV systems, to help you make an informed decision.

  1. Chlorine

Chlorine is the most commonly used pool sanitizer, acting as both a disinfectant and an oxidizer to remove bacteria, algae, and organic contaminants from the pool water.

Pros:

  • Widely available and affordable
  • Proven and effective sanitation method
  • Easy to use and control

Cons:

  • Can cause eye and skin irritation for some swimmers
  • Strong chemical odor
  • Requires regular testing and maintenance
  • Can damage pool equipment and surfaces if not properly balanced
  1. Saltwater Systems

Saltwater systems use a chlorine generator to convert salt into chlorine, providing continuous sanitization without the need for manual chlorine addition.

Pros:

  • Less chemical odor and reduced eye and skin irritation compared to traditional chlorine
  • Lower long-term maintenance costs
  • More environmentally friendly

Cons:

  • Initial installation cost can be high
  • Requires occasional replacement of the salt cell
  • Still relies on chlorine as the primary sanitizer
  1. Baquacil

Baquacil is a non-chlorine sanitizer that uses hydrogen peroxide and polyhexamethylene biguanide (PHMB) to sanitize pool water.

Pros:

  • Gentle on eyes and skin
  • No strong chemical odor
  • Does not bleach or fade swimsuits

Cons:

  • More expensive than chlorine
  • Requires regular testing and maintenance
  • Can be less effective against algae and certain bacteria
  1. Ozone Systems

Ozone systems use an ozone generator to produce ozone gas, which is then injected into the pool water to oxidize and destroy contaminants.

Pros:

  • Reduces the amount of chlorine needed for pool sanitation
  • Highly effective against bacteria, viruses, and other contaminants
  • Reduces chemical odor and irritation

Cons:

  • Initial installation cost can be high
  • Requires regular maintenance and replacement of the ozone generator
  • Ozone gas can be harmful if inhaled in high concentrations
  1. UV Systems


UV systems use ultraviolet light to inactivate bacteria, viruses, and other microorganisms in pool water.

Pros:

  • Environmentally friendly and non-toxic
  • Reduces the need for chlorine and other chemicals
  • Effective against chlorine-resistant microorganisms

Cons:

  • Initial installation cost can be high
  • Requires electricity to operate, which can increase energy costs
  • Does not provide residual sanitation, so additional sanitizers may still be necessary

Conclusion

Choosing the best pool sanitation option for your needs depends on various factors, such as budget, maintenance requirements, and personal preferences. By understanding the pros and cons of different pool sanitation methods, you can make an informed decision that suits your unique situation. Keep in mind that no single sanitation method is perfect, and many pool owners opt for a combination of systems to achieve optimal water quality and safety. With proper research and consideration, you can select the right sanitation system for your pool and enjoy a clean, safe, and enjoyable swimming experience.

The Link Between Swimming Pool pH and Alkalinity: A Guide for New Pool Owners

Understanding the Importance of pH and Alkalinity Balance in Your Swimming Pool

Introduction

As a new pool owner, it is essential to understand the importance of maintaining proper water chemistry to ensure a clean, safe, and enjoyable swimming environment. Two critical aspects of pool water chemistry are pH and alkalinity. In this article, we will explore the link between swimming pool pH and alkalinity and provide guidelines on how to maintain an ideal balance.

pH and Alkalinity Explained

  1. pH: The pH level of your pool water measures how acidic or alkaline it is on a scale of 0 to 14, with 7 being neutral. A pH level below 7 indicates acidic water, while a pH level above 7 indicates alkaline water. The ideal pH range for swimming pool water is between 7.2 and 7.6.
  2. Alkalinity: Alkalinity, also known as total alkalinity, refers to the concentration of alkaline substances in your pool water, primarily bicarbonates, carbonates, and hydroxides. These substances act as a buffer, helping to stabilize the pH level and resist sudden fluctuations. The recommended alkalinity range for swimming pool water is between 80 and 120 parts per million (ppm).

The Link Between pH and Alkalinity

pH and alkalinity are closely linked, as alkalinity acts as a buffer to stabilize the pH level in your pool. When the alkalinity level is within the recommended range, it helps prevent significant pH fluctuations caused by factors such as rain, swimmers, or pool chemicals. On the other hand, if the alkalinity is too low, the pH level becomes unstable and prone to drastic changes, which can lead to various problems, including:

  • Corrosion of pool equipment
  • Staining of pool surfaces
  • Eye and skin irritation for swimmers
  • Reduced effectiveness of sanitizers


Similarly, if the alkalinity is too high, it can cause:

  • Cloudy water
  • Scaling and staining of pool surfaces
  • Reduced sanitizer effectiveness

Maintaining a Balanced pH and Alkalinity

To maintain a balanced pH and alkalinity in your swimming pool, follow these guidelines:

  1. Test Regularly: Regularly test your pool water, at least once a week, using a reliable test kit or test strips. Check both the pH and alkalinity levels to ensure they are within the recommended ranges.
  2. Adjust Alkalinity First: If your alkalinity is outside the recommended range, address it before adjusting the pH. To increase alkalinity, add a product like sodium bicarbonate (baking soda). To decrease alkalinity, add an acid like muriatic acid or sodium bisulfate.
  3. Adjust pH: Once the alkalinity is balanced, you can adjust the pH level if necessary. To raise the pH, use a pH increaser like soda ash or borax. To lower the pH, use a pH decreaser like muriatic acid or sodium bisulfate.
  4. Re-test and Repeat: After adjusting the alkalinity and pH, allow the pool water to circulate for several hours, then re-test the water. If needed, repeat the adjustment process until both levels are within the recommended ranges.

Conclusion

Understanding the link between swimming pool pH and alkalinity is crucial for maintaining a clean, safe, and enjoyable swimming environment. By regularly testing and adjusting your pool water’s pH and alkalinity levels, you can prevent common pool problems and protect both your pool equipment and swimmers’ health. With a little knowledge and regular maintenance, you can keep your pool in optimal condition and enjoy a refreshing swim all season long.

A New Pool Owner’s Guide to Swimming Pool Chlorine Types

Understanding the Pros and Cons of Different Chlorine Products for Pool Sanitation

As a new pool owner, choosing the right type of chlorine for your swimming pool can be a daunting task. Chlorine is a popular pool sanitizer due to its effectiveness, affordability, and ease of use. This article will help you understand the different kinds of swimming pool chlorine and their pros and cons so you can make an informed decision for your pool sanitation needs.

  1. Types of Swimming Pool Chlorine

There are three main types of swimming pool chlorine: liquid chlorine, granular chlorine, and chlorine tablets.

a) Liquid Chlorine: Also known as sodium hypochlorite, liquid chlorine is similar to household bleach but with a higher concentration of chlorine. It is easy to use, as it can be poured directly into the pool or added through an automatic chlorinator.

Pros:

  • Fast-acting and highly effective.
  • Easy to apply.
  • Low cost.

Cons:

  • Short shelf life.
  • Can be corrosive to pool equipment.
  • Requires frequent monitoring and application.

b) Granular Chlorine: This type of chlorine is available in various formulations, such as calcium hypochlorite (Cal-Hypo) and di-chlor. Granular chlorine is typically dissolved in a bucket of water and then poured into the pool.

Pros:

  • Easy to measure and control the dosage.
  • Can be used as a shock treatment or for regular sanitization.
  • Longer shelf life compared to liquid chlorine.


Cons:

  • Can cause cloudiness if not dissolved properly.
  • May require more frequent application than other forms of chlorine.
  • Can be hazardous if not stored and handled correctly.

c) Chlorine Tablets: Chlorine tablets are made from trichloro-s-triazinetrione (Trichlor) and are designed to dissolve slowly in a floating dispenser, skimmer, or automatic chlorinator.

Pros:

  • Slow-release formula provides consistent chlorination.
  • Long shelf life.
  • Easy to handle and store.

Cons:

  • More expensive than liquid and granular chlorine.
  • Can cause damage to pool equipment if not used correctly.
  • May not be suitable for all pool types or situations.
  1. Choosing the Right Chlorine for Your Pool

When selecting a type of chlorine for your pool, consider the following factors:

a) Pool Type: Some chlorine types may be more suitable for specific pool types. For instance, liquid chlorine is often preferred for vinyl liner pools, as it is less likely to cause damage compared to granular chlorine.

b) Maintenance Schedule: Your pool maintenance routine may dictate the type of chlorine you choose. If you are unable to monitor and adjust your pool’s chlorine levels frequently, chlorine tablets may be a better option due to their slow-release formula.

c) Cost: If cost is a significant concern, liquid chlorine and granular chlorine are typically more affordable than chlorine tablets.

d) Storage and Handling: Consider your ability to safely store and handle chlorine products. Chlorine tablets have a longer shelf life and are easier to store, while liquid chlorine can be more hazardous due to its corrosive nature.

Understanding the different types of swimming pool chlorine and their pros and cons is essential for new pool owners. Each chlorine type has its advantages and disadvantages, so consider your specific pool type, maintenance schedule, and personal preferences when making your decision. By selecting the right chlorine product for your needs, you can maintain a clean, safe, and enjoyable swimming environment for you and your family.