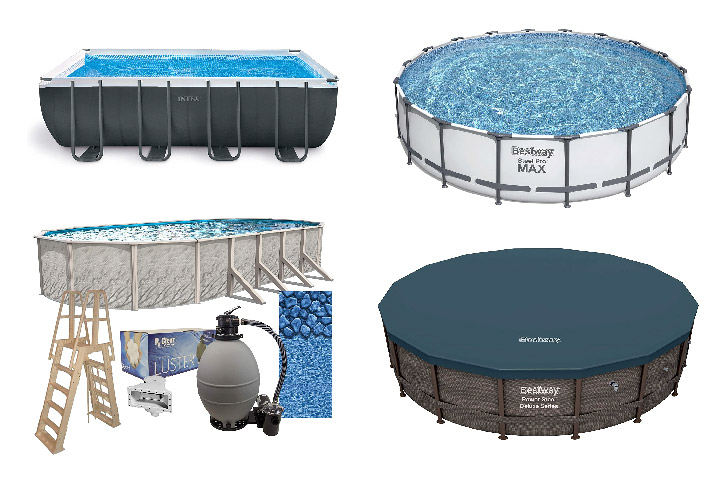
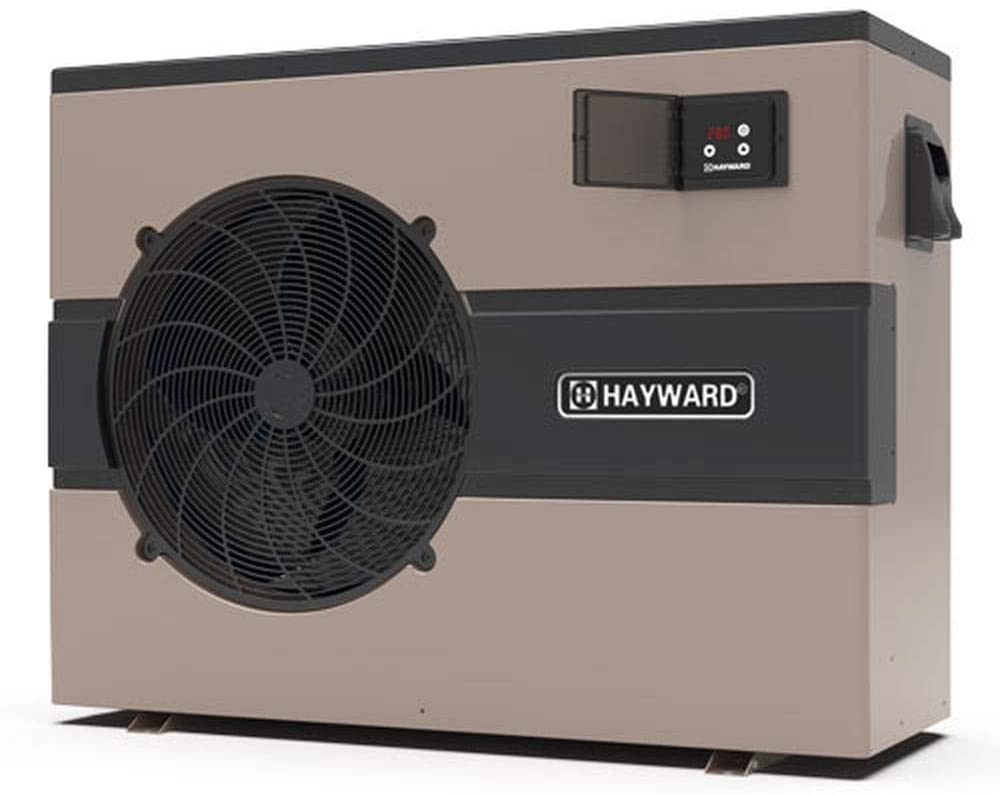
Troubleshooting Your Swimming Pool Heat Pump: A Step-by-Step Guide to Diagnosing and Repairing Common Issues

Keep Your Pool Warm and Comfortable by Properly Maintaining Your Heat Pump

Introduction

A swimming pool heat pump is an energy-efficient and cost-effective way to maintain a comfortable water temperature in your pool. However, like any other equipment, heat pumps can experience issues that may affect their performance. This article will guide you through the process of troubleshooting, diagnosing, and repairing common swimming pool heat pump problems.

Step 1: Understand How Your Heat Pump Works

Before troubleshooting your heat pump, it’s essential to understand how it operates. A pool heat pump works by transferring heat from the surrounding air to the pool water. The heat pump’s key components include the compressor, evaporator, condenser, and expansion valve. Understanding these components and their functions will help you identify and fix any issues that may arise.

Step 2: Identify Common Heat Pump Problems

Several common issues can affect a swimming pool heat pump’s performance. Some of these problems include:

  • No power or insufficient power supply
  • Low or high refrigerant levels
  • Dirty or clogged components
  • Faulty sensors or controls
  • Insufficient airflow

Step 3: Troubleshooting and Diagnosing Issues

Once you’ve identified the possible issues affecting your heat pump, follow these steps to diagnose and repair the problem:

  1. Check the power supply: Ensure that the heat pump is connected to a reliable power source and that the circuit breaker is not tripped. If the breaker has tripped, reset it and monitor the heat pump to see if the issue recurs.
  2. Inspect for refrigerant leaks: Low refrigerant levels can cause the heat pump to work inefficiently or not at all. Check for any visible leaks or ice buildup around the unit. If you suspect a refrigerant leak, contact a professional technician to repair the leak and recharge the system.
  3. Clean the evaporator and condenser coils: Dirty or clogged coils can reduce the heat pump’s efficiency and cause it to overheat. Regularly clean the coils with a soft brush or gentle stream of water to remove dirt and debris. Be careful not to damage the fins while cleaning.
  4. Check the airflow: Ensure that the area around the heat pump is clear of debris and that there is sufficient airflow around the unit. Insufficient airflow can cause the heat pump to overheat and shut down. Trim any overgrown vegetation and remove any obstructions around the heat pump to improve airflow.
  5. Test the sensors and controls: Faulty sensors or controls can prevent the heat pump from operating correctly. Use a multimeter to test the sensors and controls for proper function. Replace any faulty components as needed.

Step 4: Consult a Professional Technician

If you’re unable to diagnose or repair the issue yourself, or if the problem persists, consult a professional pool technician. They will have the expertise and tools necessary to identify and fix any issues with your heat pump efficiently and safely.

Conclusion

By understanding the basics of how your swimming pool heat pump works and being familiar with common issues, you can effectively troubleshoot and diagnose problems that may arise. Regular maintenance and proper care of your heat pump will ensure its longevity and optimal performance, keeping your pool warm and inviting for years to come.

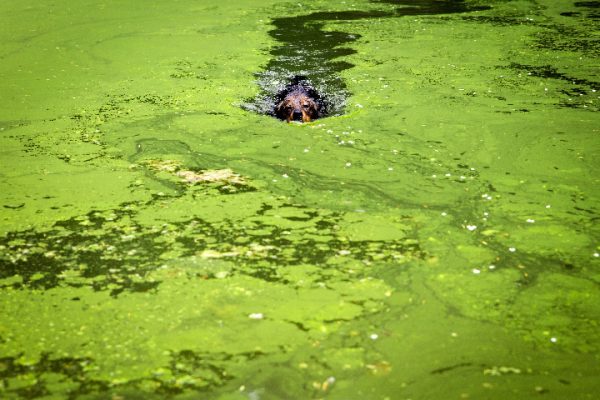
Pool Algaecides and Algae Control Methods: The Facts You Need to Know

Discover the facts about pool algaecides and explore various algae control methods to maintain a clean, clear, and algae-free swimming pool.

Algae infestations in swimming pools can be both unsightly and unhealthy, causing water discoloration, unpleasant odors, and potentially creating a slippery and hazardous surface. Proper algae control is crucial for maintaining a clean and safe swimming environment. In this article, we will discuss the facts about pool algaecides and explore different algae control methods to help you keep your swimming pool clear and algae-free.

Understanding Pool Algaecides

Pool algaecides are chemicals specifically formulated to kill or prevent the growth of algae in swimming pools. These products work by disrupting the algae’s cellular structure or inhibiting their reproduction. There are several types of algaecides available, each with its unique characteristics and applications:

  1. Quaternary Ammonium Compounds (Quats): Quats are cationic surfactants that work by penetrating and disrupting the cell walls of algae. These algaecides are widely available, affordable, and effective against a broad range of algae species. However, they may cause foaming in the pool if used in excessive amounts.
  2. Polymeric Quaternary Ammonium Compounds (Polyquats): Polyquats are an advanced version of quats, offering the same algae-fighting properties without the risk of foaming. They are also effective against various algae species, though they may be slightly more expensive than quats.
  3. Copper-Based Algaecides: Copper-based algaecides, such as copper sulfate or chelated copper compounds, are effective in controlling and preventing algae growth, particularly against stubborn black and mustard algae. However, excessive use of copper-based algaecides can cause water discoloration and staining of pool surfaces.
  4. Silver-Based Algaecides: Silver-based algaecides, such as silver nitrate or silver sulfate, are less common but can be effective against specific types of algae. However, like copper-based algaecides, they can also cause staining and water discoloration if used improperly.

Algae Control Methods for Swimming Pools

  1. Maintain Proper Water Chemistry: Regularly testing and adjusting your pool’s water chemistry is essential for preventing algae growth. Ensure that your pool’s pH, alkalinity, and sanitizer levels are within the recommended ranges to maintain a clean and balanced swimming environment.
  2. Use an Algaecide: Apply a pool algaecide according to the manufacturer’s instructions as a preventive measure or to treat an existing algae infestation. Consider the type of algae present in your pool and choose an algaecide formulated to target that specific species.
  3. Shock Your Pool: Regularly shocking your pool with a chlorine or non-chlorine shock treatment helps eliminate any existing algae and restore water clarity. Follow the manufacturer’s guidelines for proper dosage and application.
  4. Regularly Clean and Brush Your Pool: Regularly cleaning your pool, including brushing the walls, floors, and any other surfaces, helps remove algae spores and prevents their growth. Ensure that you are using the appropriate brush type for your pool’s surface material.
  5. Improve Water Circulation: Proper water circulation in your pool helps distribute sanitizing chemicals and discourages algae growth. Ensure that your pool’s circulation system is functioning properly, and clean the skimmer and pump baskets regularly to prevent clogs.
  6. Utilize a Pool Cover: Using a pool cover when your pool is not in use helps prevent debris from entering the pool, reducing the chances of algae growth. Pool covers also help maintain water chemistry and reduce evaporation, which can contribute to algae growth
  1. Remove Phosphates: Phosphates are nutrients that can promote algae growth in your pool. Use a phosphate remover to eliminate this potential food source for algae and help prevent their growth.
  2. Install UV or Ozone Sanitation Systems: Installing a UV or ozone sanitation system in your pool can provide an additional layer of protection against algae growth. These systems use ultraviolet light or ozone gas to kill algae and other microorganisms in the water, reducing the need for chemical sanitizers.
  3. Regularly Inspect and Clean Pool Equipment: Algae can cling to pool equipment, such as ladders, pool toys, and cleaning tools. Regularly inspect and clean these items to prevent algae from re-entering the pool.

Understanding the facts about pool algaecides and employing effective algae control methods are crucial for maintaining a clean, clear, and algae-free swimming pool. By focusing on proper water chemistry, regular pool maintenance, and using appropriate algaecides and treatments, you can successfully prevent and eliminate algae infestations in your pool. Ultimately, a proactive approach to algae control will help you enjoy a safe and pleasant swimming environment all season long.

Crystal Clear Water Secrets: Demystifying Pool Clarifiers

There’s nothing quite as inviting as crystal clear pool water, especially on a hot summer day. However, keeping your pool water pristine can sometimes be a challenge. Enter pool clarifiers: these powerful products can help restore your pool’s clarity and sparkle in no time. In this article, we’ll dive deep into the world of pool clarifiers, explaining what they are, when to use them, and how they work to bring back that crystal clear water you love.

  1. What is a Pool Clarifier? Pool clarifiers are specialized chemical products designed to help restore the clarity of your swimming pool water. They work by binding together tiny particles that cause cloudiness, making them large enough to be removed by your pool’s filtration system. These particles can include dirt, algae, and other organic matter that naturally accumulate in pool water over time.
  2. When to Use a Pool Clarifier Pool clarifiers should be used whenever you notice a decline in water clarity. This can occur due to several factors, including:
  • A recent algae bloom
  • Insufficient filtration or circulation
  • Excess debris from storms or heavy winds
  • Imbalanced pool chemistry

Keep in mind that clarifiers should not be used as a substitute for regular pool maintenance. They are best used as a supplementary tool to help maintain water clarity in conjunction with regular cleaning, balancing of chemicals, and proper filtration.

  1. How Pool Clarifiers Work Pool clarifiers utilize a process called coagulation or flocculation to bind together the microscopic particles causing cloudiness in your pool water. These particles often carry a negative electrical charge, which causes them to repel one another and remain suspended in the water. Pool clarifiers contain positively charged polymers that neutralize the negative charge, allowing the particles to clump together and form larger groups, known as flocs.

Once these flocs have formed, they are more easily trapped and removed by your pool’s filtration system, resulting in clearer water. Depending on the specific product used and the severity of the cloudiness, you may see results in as little as a few hours, although it can sometimes take a day or two for the full effect.

  1. How to Use Pool Clarifiers Using a pool clarifier is generally a straightforward process. Simply follow the instructions on the product label to determine the correct dosage for your pool size. Pour the recommended amount of clarifier evenly around the pool’s perimeter, ensuring that your pool pump is running to aid in the distribution and filtration of the product.

For optimal results, it’s essential to maintain proper water balance and ensure your pool’s filtration system is functioning efficiently. After using a pool clarifier, you may need to clean or backwash your filter more frequently due to the increased particle load.

Conclusion: Pool clarifiers are a valuable tool in every pool owner’s arsenal, helping to restore and maintain crystal clear water when used correctly. By understanding when and how to use these powerful products, you’ll be well on your way to enjoying a sparkling, inviting pool all season long. So, the next time your pool water starts to look a bit murky, don’t fret – just reach for a pool clarifier and let it work its magic.

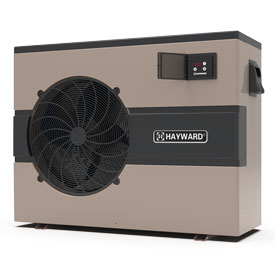
Troubleshooting Gas Pool Heaters: Diagnosing and Repairing Common Issues

A Comprehensive Guide for Homeowners to Troubleshoot, Diagnose, and Repair Gas Pool Heaters

Introduction

Gas pool heaters are a popular option for homeowners looking to extend their swimming season or maintain a comfortable pool temperature. However, like any mechanical system, gas pool heaters can experience issues that may affect their performance or cause them to malfunction. In this article, we will discuss the common problems that can arise with gas pool heaters, how to troubleshoot these issues, and the steps to diagnose and repair them.

Common Gas Pool Heater Issues

  1. Heater Fails to Ignite: If your gas pool heater doesn’t ignite, it may be due to a lack of fuel, a faulty ignition system, or a problem with the control module.
  2. Insufficient Heating: If your pool heater is running but not providing enough heat, it could be due to an improperly sized heater, poor water flow, or a malfunctioning component.
  3. Heater Cycles On and Off: If your heater is constantly cycling on and off, it may be caused by poor water flow, a dirty filter, or a faulty pressure switch.
  4. Unusual Noises: Strange noises coming from your heater can indicate issues with the fan, burners, or heat exchanger.
  5. Leaking Water: Leaking water from your pool heater may be caused by a damaged heat exchanger, loose connections, or cracked pipes.


Troubleshooting Gas Pool Heater Issues

  1. Check the Power and Fuel Supply: Ensure that the heater is properly connected to power, the gas valve is open, and there is an adequate supply of fuel.
  2. Inspect the Ignition System: Examine the pilot light or electronic ignition system for signs of damage or malfunction. Clean any debris or dirt that may be affecting the ignition system.
  3. Examine the Control Module: Check the control module for any error codes or signs of damage. Reset the module if necessary, following the manufacturer’s instructions.
  4. Verify Proper Water Flow: Ensure that your pool pump is functioning correctly and that the water flow through the heater is sufficient. Clean or backwash your pool filter if needed.
  5. Inspect Components: Examine the heater’s components, such as the burners, heat exchanger, and pressure switch, for any signs of damage or wear.

Diagnosing and Repairing Gas Pool Heater Issues

  1. Ignition Problems: If your heater fails to ignite, replace any damaged or malfunctioning components, such as the ignition system or control module.
  2. Insufficient Heating: If your heater is not providing enough heat, consider upgrading to a properly sized heater or improving water flow by cleaning your filter or addressing any issues with your pool pump.
  3. Heater Cycling On and Off: If your heater is cycling on and off, clean your filter or address any issues with water flow. Replace a faulty pressure switch if necessary.
  4. Unusual Noises: If your heater is making strange noises, inspect the fan, burners, and heat exchanger for any signs of damage or wear. Replace any damaged components as needed.
  5. Leaking Water: If your heater is leaking water, tighten any loose connections or replace any cracked pipes. If the heat exchanger is damaged, it may need to be replaced.


Conclusion

Troubleshooting, diagnosing, and repairing gas pool heater issues can help you maintain a comfortable pool temperature and extend the life of your heater. By regularly inspecting and maintaining your gas pool heater, you can prevent many common issues and ensure that your pool remains inviting and comfortable for you and your family. Keep in mind that some repairs may require the expertise of a qualified professional, especially when dealing with gas lines or electrical systems. In such cases, it’s important to consult with a licensed pool technician or heating professional to ensure the safe and proper repair of your gas pool heater.

Safety Precautions

Before attempting any repairs or maintenance on your gas pool heater, make sure to follow these safety precautions:

  1. Turn off the power and gas supply: Always shut off the electricity and gas supply to the heater before working on it. This will help prevent accidents and ensure your safety.
  2. Allow the heater to cool down: Give your heater enough time to cool down before working on it. Touching hot components can result in burns or other injuries.
  3. Wear protective gear: Wear gloves and eye protection when working on your gas pool heater to protect yourself from any debris or sharp objects.
  4. Ventilate the area: If you’re working with gas, make sure to properly ventilate the area to avoid the buildup of potentially dangerous fumes.
  5. Consult the owner’s manual: Always refer to the manufacturer’s instructions and guidelines for your specific gas pool heater model to ensure that you’re following the proper procedures for troubleshooting, diagnosing, and repairing issues.

In conclusion, understanding the common issues that can arise with gas pool heaters, as well as knowing how to troubleshoot, diagnose, and repair them, can help homeowners maintain an efficiently functioning heater and ensure a comfortable swimming environment. By following safety precautions and seeking professional help when needed, you can keep your gas pool heater in top shape and extend its lifespan.

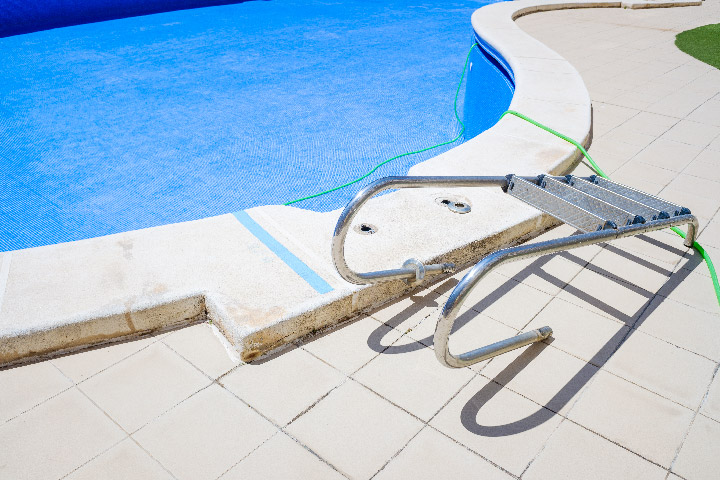
Caring for Your Pool Ladders: A Comprehensive Guide for Homeowners

Learn about Different Types of Pool Ladders, Safety Tips, Identifying Issues, and Repair or Replacement Techniques

Introduction

Pool ladders are an essential component of any swimming pool, providing safe and easy access for swimmers. As a homeowner, it’s important to know how to properly care for and maintain your pool ladders to ensure their longevity and safety. In this article, we will discuss the various types of pool ladders, safety tips for proper use, how to identify issues, and when and how to repair or replace your pool ladders.

Types of Pool Ladders

  1. Standard Stainless Steel Ladders: These ladders are made from durable stainless steel and are designed for inground pools. They typically have two or three steps and are anchored into the pool deck.
  2. A-Frame Ladders: A-Frame ladders are popular for above-ground pools. These ladders feature two sides, one for entering the pool and one for exiting, with a platform at the top for added safety.
  3. In-Pool Ladders: These ladders are designed to be partially submerged in the water, providing an additional set of steps for swimmers to use while in the pool.
  4. Deck-Mounted Ladders: Deck-mounted ladders attach directly to the pool deck and are commonly used for inground pools with limited space or unique configurations.


Safety Tips for Pool Ladder Use

  1. Regularly inspect the ladder for signs of wear, rust, or damage. Make repairs or replace the ladder as needed to ensure safe use.
  2. Ensure that the ladder is properly secured to the pool deck or wall to prevent it from moving or coming loose during use.
  3. Teach children and guests how to properly use the ladder, emphasizing the importance of using the handrails and not jumping or diving from the ladder.
  4. Keep the ladder clean and free of algae or other slippery substances to prevent slips and falls.

Identifying Issues with Your Pool Ladder

  1. Loose or Wobbly Ladder: If the ladder moves or wobbles when used, it may not be properly secured, or the anchor points may be damaged.
  2. Rust or Corrosion: Inspect the ladder for signs of rust or corrosion, which can weaken the metal and pose a safety risk.
  3. Cracked or Damaged Steps: Check the steps for any cracks or damage that could cause them to break under pressure.
  4. Bent or Warped Rails: Examine the rails for any signs of bending or warping, which could indicate structural damage.


Repairing or Replacing Your Pool Ladder

  1. Tighten or Replace Anchors: If the ladder is loose or wobbly, try tightening the anchor bolts or replacing them if they are damaged.
  2. Remove Rust and Repaint: For minor rust or corrosion, use a wire brush to remove the rust and then repaint the ladder with a rust-resistant paint.
  3. Replace Damaged Steps: If the steps are cracked or damaged, replace them with new ones that are compatible with your ladder model.
  4. Replace the Entire Ladder: If the ladder has significant structural damage or is beyond repair, it is best to replace the entire ladder for safety reasons. When selecting a new ladder, ensure it is compatible with your pool type and meets all safety standards.

Conclusion

Proper care and maintenance of your pool ladders are essential for ensuring the safety and enjoyment of your swimming pool. By understanding the different types of pool ladders, following safety tips, regularly inspecting for issues, and knowing how to repair or replace your ladder when needed, you can provide a secure and reliable means of access for your family and guests. Regular ladder maintenance

Removing Wrinkles from a Pool Liner: Causes and Solutions for Homeowners

Maintain a Smooth and Inviting Pool Surface by Understanding the Reasons Behind Liner Wrinkles and How to Address Them

Introduction

Wrinkles in a pool liner can be an eyesore and detract from the enjoyment of your swimming pool. They can also potentially cause the liner to wear unevenly or become damaged. To keep your pool in top shape, it’s essential to understand the causes of pool liner wrinkles and the best methods to remove them. In this article, we’ll discuss the reasons behind pool liner wrinkles and provide practical solutions for homeowners to tackle this issue.

Causes of Pool Liner Wrinkles

Improper Installation: Wrinkles can form in a pool liner if it’s not installed correctly. A poorly stretched liner or one that is not properly aligned may develop wrinkles over time.

Groundwater Pressure: Excess groundwater behind the pool liner can cause it to float and develop wrinkles. This can occur due to heavy rainfall, a high water table, or inadequate drainage.

Chemical Imbalance: An improper balance of pool chemicals can cause the liner to stretch, contract, or lose elasticity, which may lead to wrinkles.

Temperature Fluctuations: Sudden or extreme temperature changes can cause the pool liner to expand and contract, leading to the formation of wrinkles.

Solutions for Removing Pool Liner Wrinkles

Manual Adjustment: For minor wrinkles, try gently pushing the wrinkles toward the edge of the pool using a soft brush or pool broom. This method is most effective when the pool water is warm, as the liner will be more pliable.

Partially Drain the Pool: If the wrinkles are more severe, consider partially draining the pool to allow for easier access and manipulation of the liner. Once the water level is lowered, carefully work the wrinkles toward the edge of the pool. Refill the pool slowly to avoid causing new wrinkles.

Use a Plunger: For smaller wrinkles, a toilet plunger can be used to create suction and help move the wrinkle. Place the plunger on the wrinkle and gently push and pull to shift the liner and smooth out the wrinkle.

Install a Pool Liner Lock: A pool liner lock can help secure the liner in place and prevent future wrinkles. This device is installed along the pool’s edge and holds the liner in position.

Professional Assistance: If the wrinkles are severe or the liner is damaged, it’s best to consult a pool professional. They can assess the situation and provide guidance on whether the liner needs to be replaced or can be repaired.

Preventing Pool Liner Wrinkles

Proper Installation: Ensure your pool liner is installed correctly and professionally to avoid wrinkles from the beginning.

Maintain Balanced Chemical Levels: Regularly test your pool water and adjust the chemical levels as needed to prevent liner damage.

Monitor Groundwater and Drainage: Ensure proper drainage around your pool to prevent groundwater pressure from causing liner issues.

Avoid Drastic Temperature Changes: Gradually adjust the pool’s temperature to minimize the effects of temperature fluctuations on the liner.

Conclusion

Pool liner wrinkles can be unsightly and, in some cases, cause damage to the liner itself. Understanding the causes of these wrinkles is essential for prevention and effective removal. Homeowners can take steps to address wrinkles in their pool liners through manual adjustment, partial water drainage, or professional assistance. By taking proper care of your pool liner and maintaining balanced water chemistry, you can enjoy a smooth and inviting swimming pool for years to come.

Pool Ozone Systems: A New Pool Owner’s Guide to Ozone Sanitation

Understanding the Basics, Benefits, and Maintenance of Ozone Pool Systems

Introduction

As a new pool owner, you may be considering various methods to maintain clean and safe pool water. One of the more advanced options is the use of ozone pool systems. This article will provide an overview of ozone pool systems, explain their benefits, and offer guidance on maintenance, helping you decide if this technology is the right fit for your pool.

  1. Basics of Ozone Pool Systems

Ozone pool systems use ozone gas (O3) to sanitize pool water by oxidizing and destroying contaminants such as bacteria, viruses, and algae. These systems work by generating ozone gas, typically through ultraviolet (UV) light or corona discharge methods, and then injecting the ozone into the pool’s circulation system. The ozone reacts with contaminants in the water, neutralizing them and leaving only oxygen and harmless byproducts behind.


It’s important to note that ozone systems should be used in conjunction with a residual sanitizer, such as chlorine or bromine, since ozone does not leave any residual protection in the water.

  1. Benefits of Ozone Pool Systems

Ozone pool systems offer several advantages to pool owners, including:

a) Improved Water Quality: Ozone effectively oxidizes and eliminates harmful contaminants, resulting in clearer, cleaner, and safer pool water.

b) Reduced Chemical Use: Ozone systems can reduce the amount of chlorine or other sanitizers needed, leading to fewer chemical-related irritations and odors.

c) Enhanced Safety: Ozone is a powerful oxidizer that can neutralize chlorine-resistant microorganisms, reducing the risk of waterborne illnesses.

d) Eco-Friendly: Ozone systems are environmentally friendly, as they do not produce harmful byproducts or require the disposal of hazardous chemicals.

e) Low Maintenance: Ozone systems require minimal maintenance, making them an attractive option for busy pool owners.

  1. Maintenance of Ozone Pool Systems

While ozone pool systems are relatively low-maintenance, there are a few key tasks to ensure optimal performance:

a) Lamp Replacement (UV Ozone Systems): UV lamps have a limited lifespan, typically around 12,000 to 14,000 hours of operation. It’s essential to replace the lamp as per the manufacturer’s recommendations to maintain effective ozone production.

b) Check Electrodes (Corona Discharge Ozone Systems): Corona discharge systems use electrodes to generate ozone. Over time, the electrodes may require cleaning or replacement. Consult the manufacturer’s guidelines for specific maintenance requirements.


c) Inspect and Clean Components: Regularly inspect and clean other components, such as injectors, tubing, and check valves, to ensure proper functioning and prevent leaks.

d) Monitor System Performance: Regularly check the ozone system’s performance indicators, such as the ozone output or system diagnostics, to ensure the system is operating effectively.

Conclusion

For new pool owners seeking an advanced, supplementary sanitation method that improves water quality, reduces chemical usage, and offers environmental benefits, an ozone pool system is worth considering. With minimal maintenance requirements, ozone systems are a convenient and effective option to enhance the safety and enjoyment of your swimming pool. By understanding the basics, benefits, and maintenance of ozone pool systems, you can make an informed decision and invest in a technology that aligns with your pool care preferences.

The Top 5 Pool Water Test Kits: Pros and Cons for Informed Decision-Making


Meta Description: Discover the top 5 pool water test kits on the market, along with their pros and cons, to help you make an informed decision when choosing the best option for your pool maintenance needs.

Maintaining optimal water chemistry is crucial for a safe and enjoyable swimming pool experience. Pool water test kits are essential tools for monitoring water quality and ensuring the right balance of chemicals. With various options available, it can be challenging to choose the perfect test kit for your needs. In this article, we explore the top 5 pool water test kits, outlining their pros and cons to help you make an informed decision.

  1. Taylor Technologies K-2006 Complete Test Kit

Pros:

  • Highly accurate and reliable results.
  • Tests for chlorine, bromine, pH, total alkalinity, calcium hardness, and cyanuric acid.
  • Fas-DPD titration method allows for easy-to-read results.
  • Comes with a comprehensive instruction booklet.

Cons:

  • Higher price point compared to other kits.
  • May require more time to conduct tests due to the titration method.
  1. LaMotte ColorQ Pro 7 Digital Pool Water Test Kit

Pros:

  • Digital photometer provides accurate and easy-to-read results.
  • Eliminates the need for color matching, making it user-friendly.
  • Tests for chlorine, bromine, pH, total alkalinity, calcium hardness, and cyanuric acid.
  • Waterproof housing and carrying case for convenience and durability.

Cons:

  • Expensive compared to other test kits.
  • Replacement reagents can be costly.
  • Requires batteries, which may need frequent replacement.
  1. AquaChek Select 7-in-1 Pool and Spa Test Strips

Pros:

  • Quick and straightforward testing process.
  • Tests for chlorine, bromine, pH, total alkalinity, calcium hardness, cyanuric acid, and total hardness.
  • Affordable and easy to use.
  • Comes with 50 test strips for multiple uses.

Cons:

  • May be less accurate compared to liquid test kits.
  • Requires proper storage to prevent damage to test strips.
  1. HTH 6-Way Test Kit

Pros:

  • Affordable and easy-to-use option.
  • Tests for chlorine, bromine, pH, total alkalinity, calcium hardness, and cyanuric acid.
  • Comes with a color comparator for simple results interpretation.

Cons:

  • May provide less accurate results compared to more advanced kits.
  • Requires careful color matching, which may be difficult for some users.
  1. Blue Devil 5-Way OTO Test Kit

Pros:

  • Budget-friendly option for basic testing needs.
  • Tests for chlorine, bromine, pH, total alkalinity, and acid demand.
  • Simple to use with a color comparator.

Cons:

  • Does not test for calcium hardness or cyanuric acid.
  • OTO method for chlorine testing may be less accurate than DPD or FAS-DPD methods.

Choosing the right pool water test kit is vital for maintaining a safe and enjoyable swimming environment. By considering the pros and cons of the top 5 pool water test kits, you can select the option that best suits your needs and budget. Remember that accuracy, ease of use, and the range of tests provided are essential factors in making an informed decision. Regularly testing your pool water will ensure optimal water chemistry and a healthy, crystal-clear pool.

Pool UV Systems: A New Pool Owner’s Guide to Ultraviolet Sanitation

Understanding the Basics, Benefits, and Maintenance of UV Pool Systems

As a new pool owner, you may be exploring various options for maintaining clean and safe pool water. One increasingly popular method is the use of ultraviolet (UV) pool systems. This article will provide an overview of UV pool systems, explain their benefits, and offer guidance on maintenance, helping you decide if this technology is the right fit for your pool.

  1. Basics of UV Pool Systems

UV pool systems use ultraviolet light to sanitize pool water by destroying microorganisms, such as bacteria, viruses, and algae. These systems work by circulating water through a chamber containing a UV lamp. As the water passes by the UV light, microorganisms are exposed to the ultraviolet radiation, which damages their DNA and renders them harmless.

It’s important to note that UV systems should be used in conjunction with a primary sanitizer, such as chlorine or bromine. The UV system acts as a supplemental sanitizer, improving water quality and reducing the amount of chemicals required.

  1. Benefits of UV Pool Systems

UV pool systems offer several advantages to pool owners, including:

a) Improved Water Quality: UV systems effectively eliminate harmful microorganisms, resulting in cleaner and safer pool water.

b) Reduced Chemical Use: By destroying microorganisms that would typically require higher levels of chemicals to control, UV systems can reduce the amount of chlorine or other sanitizers needed, leading to fewer chemical-related irritations and odors.

c) Enhanced Safety: UV systems can eliminate chlorine-resistant microorganisms, such as Cryptosporidium, reducing the risk of waterborne illnesses.

d) Eco-Friendly: UV systems are environmentally friendly, as they do not produce harmful byproducts or require the disposal of hazardous chemicals.

e) Low Maintenance: UV systems require minimal maintenance, making them an attractive option for busy pool owners.

  1. Maintenance of UV Pool Systems

While UV pool systems are relatively low-maintenance, there are a few key tasks to ensure optimal performance:

a) Lamp Replacement: UV lamps have a limited lifespan, typically around 12,000 to 14,000 hours of operation. It’s essential to replace the lamp as per the manufacturer’s recommendations to maintain effective sanitation.

b) Cleaning the Quartz Sleeve: The UV lamp is housed within a quartz sleeve, which can become dirty or coated with mineral deposits. Regular cleaning of the quartz sleeve, as recommended by the manufacturer, will ensure optimal UV transmission and effectiveness.

c) Inspect and Clean Components: Regularly inspect and clean other components, such as O-rings and seals, to prevent leaks and maintain proper functioning.

d) Monitor System Performance: Regularly check the UV system’s performance indicators, such as the UV intensity meter or lamp life indicator, to ensure the system is operating effectively.

Conclusion

For new pool owners seeking a supplementary sanitation method that improves water quality, reduces chemical usage, and offers environmental benefits, a UV pool system is worth considering. With minimal maintenance requirements, UV systems are a convenient and effective option to enhance the safety and enjoyment of your swimming pool. By understanding the basics, benefits, and maintenance of UV pool systems, you can make an informed decision and invest in a technology that aligns with your pool care preferences.

How to Lower pH in a Swimming Pool: A Comprehensive Guide for Pool Owners

Achieve the Ideal pH Balance for a Healthy and Comfortable Swimming Experience

Introduction

Maintaining the correct pH level in your swimming pool is essential for ensuring a comfortable swimming experience, protecting pool equipment, and promoting effective sanitization. The pH scale ranges from 0 to 14, with 7 being neutral. The optimal pH level for a swimming pool is generally between 7.2 and 7.8. If your pool’s pH is too high, it can lead to issues such as scaling, cloudy water, and reduced effectiveness of sanitizing chemicals. This article will provide you with a comprehensive guide on how to lower the pH level in your swimming pool to achieve a well-balanced and healthy swimming environment.

Step 1: Test Your Pool Water

Begin by testing your pool water to determine the current pH level. You can use a pool test kit or test strips, which are readily available at most pool supply stores. Follow the instructions provided with your testing method to obtain accurate results.

Step 2: Calculate the Required pH Reducer Amount

If your pH level is above 7.8, you will need to add a pH reducer (also known as a pH down or pH minus) to lower the pH. Muriatic acid (hydrochloric acid) and sodium bisulfate are two common chemicals used as pH reducers.

To calculate the amount of pH reducer required, consult the product label or use an online pool calculator. You will need to know your pool’s volume, the current pH level, and the target pH level.

Step 3: Pre-dilute the pH Reducer

To ensure even distribution and prevent damage to your pool surfaces, pre-dilute the pH reducer in a bucket of water before adding it to your pool. Fill a large plastic bucket with water, and gradually add the required amount of pH reducer, stirring continuously.

Step 4: Add the pH Reducer to Your Pool

Slowly pour the diluted pH reducer solution into the pool, spreading it evenly around the perimeter. Avoid pouring the solution directly onto pool surfaces or fittings, as this may cause damage.

Step 5: Circulate the Pool Water

Turn on your pool pump and allow it to circulate the water for at least 2-4 hours. This will help to distribute the pH reducer evenly throughout the pool, ensuring the pH level is lowered consistently.

Step 6: Retest and Adjust as Needed

After the pool water has circulated for a sufficient time, retest the pH level using your pool test kit or test strips. If the pH level is still above the ideal range, repeat Steps 2-5, adding more pH reducer as necessary. Keep in mind that it’s better to make gradual adjustments to avoid undershooting the target pH level.

Conclusion

Maintaining the optimal pH level in your swimming pool is vital for a healthy and enjoyable swimming environment. By following this comprehensive guide on how to lower the pH in your swimming pool, you can ensure the comfort of swimmers, protect your pool equipment, and maximize the effectiveness of your sanitizing chemicals. Regular testing and adjustments are key to maintaining a well-balanced and inviting pool for you and your family to enjoy.