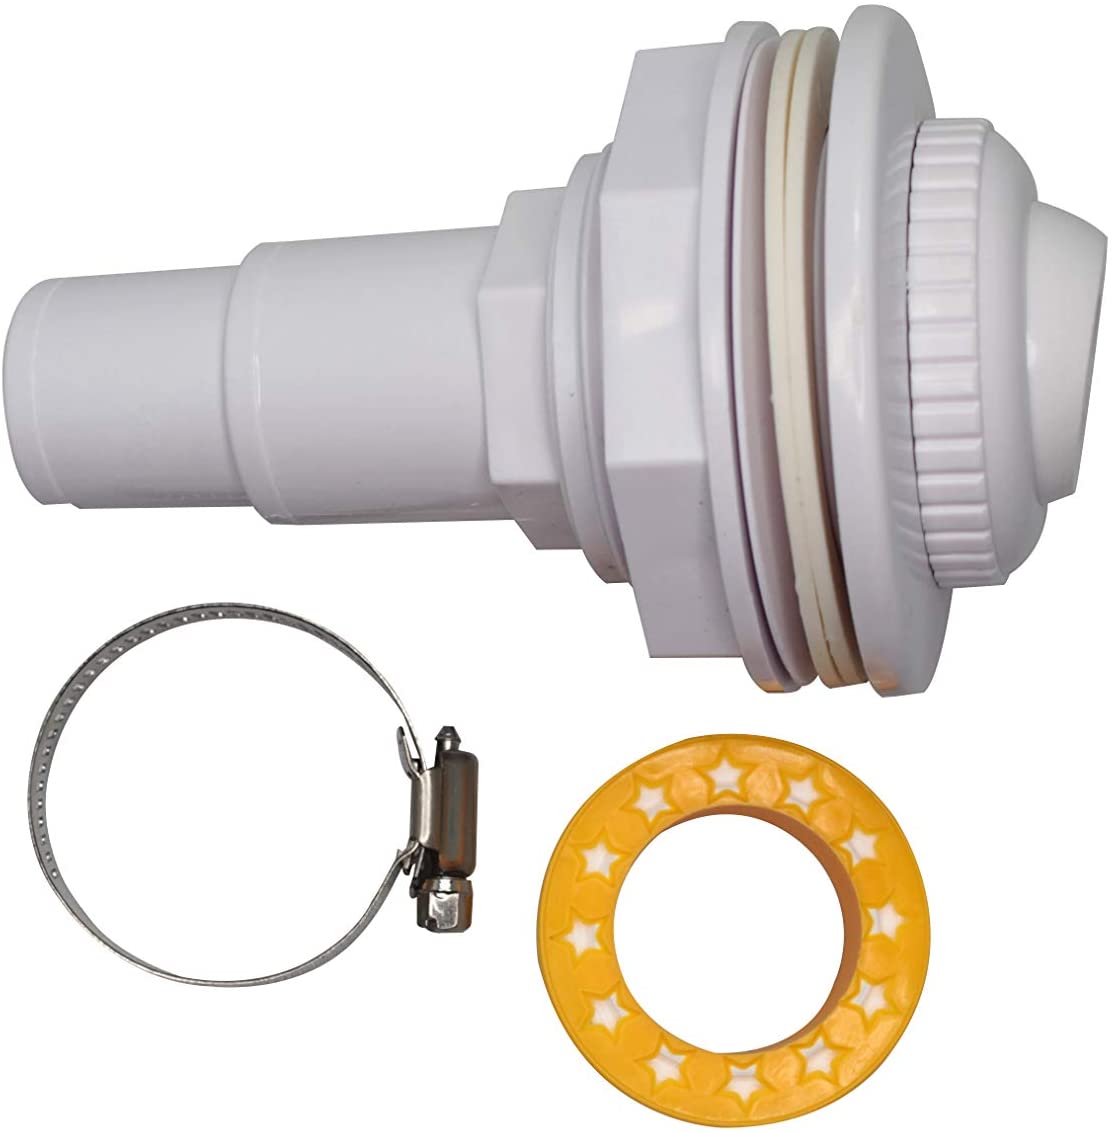
A Guide to Swimming Pool Return Jets for New Pool Owners

Understanding the Importance of Pool Return Jets, Maintenance, and Troubleshooting

Introduction

As a new pool owner, you may be curious about the various components that make your pool function effectively. One such element is the swimming pool return jet. Return jets play a critical role in circulating the water and maintaining a clean and healthy pool environment. This article will explain the purpose of pool return jets, how to care for them, and potential issues you may encounter along with their solutions.

The Role of Swimming Pool Return Jets

Swimming pool return jets are the small, circular openings located along the sides of your pool, responsible for returning filtered and treated water back into the pool. These jets ensure proper circulation of water, preventing stagnation and promoting even distribution of chemicals, which is crucial for maintaining a balanced and clean pool.

Caring for Your Pool Return Jets


To keep your pool return jets functioning optimally, regular maintenance is necessary. Follow these steps to care for your return jets:

  1. Clean the jets: Periodically check for debris, such as leaves or dirt, that may have become lodged in the jet openings. Remove any blockages to ensure proper water flow.
  2. Adjust the jets: For optimal water circulation, aim the return jets at a downward angle to create a circular water movement in your pool. This will help distribute chemicals evenly and prevent debris from settling at the bottom.
  3. Inspect for leaks: Regularly check the area around the return jets for signs of water leaks. If you notice any water loss, consult a pool professional to diagnose and fix the issue.

Common Issues and Solutions

  1. Reduced water flow: If you notice a significant decrease in water flow from your return jets, there may be a blockage in your pool’s circulation system. Check the skimmer and pump baskets for debris and clean them as needed. If the problem persists, consult a pool professional to inspect your pool’s plumbing and equipment.
  2. Air in the system: If you notice air bubbles coming from the return jets, there may be a suction-side leak in your pool’s plumbing. Inspect the pump, filter, and plumbing connections for any visible leaks and tighten or replace any faulty components.
  3. Uneven flow between jets: If you observe uneven water flow among your return jets, it may be due to clogged or improperly adjusted jets. Clean and adjust the jets as needed to ensure even water distribution.

Conclusion

Swimming pool return jets are essential components for maintaining a clean and well-balanced pool. By understanding their function and performing regular maintenance, you can ensure that your pool remains in optimal condition for years to come. Keep an eye out for potential issues, and don’t hesitate to consult a pool professional if you encounter problems beyond your expertise. With proper care and attention, your pool’s return jets will continue to provide efficient water circulation and a healthy swimming environment.

Understanding Pool Liners: Types, Pros, and Cons

Choose the Best Liner for Your Swimming Pool by Comparing Different Materials and Styles

Introduction

A swimming pool liner serves as the waterproof barrier between the pool’s structure and the water, ensuring that your pool remains leak-free and maintains its visual appeal. Pool liners come in various materials and styles, each with their advantages and disadvantages. This article will explore the different types of pool liners, their pros and cons, and help you make an informed decision when selecting the perfect liner for your swimming pool.

Types of Pool Liners

  1. Vinyl Liners

Vinyl liners are popular for both in-ground and above-ground pools due to their affordability and ease of installation. They are available in various thicknesses, styles, and patterns, allowing for customization to suit your pool and personal preferences.

Pros:

  • Affordable
  • Easy to install
  • Customizable in terms of pattern and color
  • Comfortable underfoot


Cons:

  • May require replacement every 5-10 years
  • Vulnerable to punctures and tears
  • Can fade over time due to UV exposure and chemicals
  1. Fiberglass Liners

Fiberglass liners are pre-manufactured shells that are installed into an excavated hole for in-ground pools. They are known for their durability and low maintenance requirements.

Pros:

  • Long-lasting (up to 20 years)
  • Low maintenance
  • Smooth surface reduces algae growth
  • Quick installation

Cons:

  • Limited customization options
  • Higher upfront cost
  • Potential for cracking or fading over time
  1. Concrete and Plaster Liners

Concrete and plaster liners are used in in-ground pools and involve applying a plaster or aggregate finish directly onto the concrete pool shell. This type of liner offers various customization options, including color, texture, and aggregate materials.

Pros:

  • Highly customizable
  • Durable, lasting up to 15 years with proper maintenance
  • Can be refinished or updated without complete replacement

Cons:

  • Requires regular maintenance (acid washing, re-plastering)
  • Rough surface can be uncomfortable underfoot
  • Longer installation time
  1. Pebble and Aggregate Liners

Pebble and aggregate liners are a popular option for concrete pools, offering a more natural look and feel. They are created by mixing pebbles or aggregates into the plaster finish, providing a unique and durable surface.

Pros:

  • Natural appearance
  • Long-lasting (up to 20 years)
  • More comfortable underfoot than traditional plaster

Cons:

  • Higher upfront cost
  • Requires regular maintenance (acid washing, resealing)
  • Longer installation time

Conclusion

Selecting the right pool liner for your swimming pool is a crucial decision that will impact the longevity, maintenance requirements, and overall appearance of your pool. By understanding the pros and cons of each type of liner, you can make an informed decision that best suits your budget, preferences, and lifestyle. Consider factors such as durability, maintenance, customization, and cost when choosing the best pool liner for your swimming pool, and enjoy a beautiful, functional pool for years to come.

A Comprehensive Guide to Swimming Pool Tiles

Exploring the Various Tile Options, Pros and Cons, Maintenance Considerations, and More

Introduction

Swimming pool tiles are an essential aspect of pool design and functionality, contributing to both the aesthetics and durability of your pool. With numerous options available in the market, selecting the right pool tile can be overwhelming. This article aims to provide a comprehensive guide to various pool tile options, their pros and cons, maintenance considerations, and other relevant information to help you make an informed decision.

Types of Swimming Pool Tiles

  1. Ceramic Tiles: Ceramic tiles are a popular choice for swimming pools due to their affordability and versatility. They come in various colors, designs, and finishes, allowing for endless customization.

Pros:

  • Affordable
  • Wide variety of designs and colors
  • Easy to install

Cons:

  • Less durable than other tile options
  • Can be slippery if not properly finished


  1. Porcelain Tiles: Porcelain tiles are similar to ceramic tiles but denser and more durable. They are ideal for pools with high foot traffic and require low maintenance.

Pros:

  • Durable and long-lasting
  • Low maintenance
  • Resistant to staining and fading

Cons:

  • More expensive than ceramic tiles
  • Can be slippery if not properly finished
  1. Glass Tiles: Glass tiles are a luxurious and modern option for swimming pools. They come in various colors and styles, reflecting light to create a stunning visual effect.


Pros:

  • Visually appealing and versatile
  • Highly durable and resistant to staining, fading, and chemical damage
  • Non-slip surface

Cons:

  • Expensive
  • More challenging to install than other tile options
  1. Stone Tiles: Stone tiles, such as travertine, slate, or granite, offer a natural and timeless appearance. These tiles are ideal for creating a cohesive look between your pool and surrounding landscape.

Pros:

  • Natural and aesthetically pleasing
  • Durable and long-lasting
  • Slip-resistant

Cons:

  • Expensive
  • Require regular sealing to maintain appearance and prevent staining
  1. Mosaic Tiles: Mosaic tiles consist of small pieces of glass, ceramic, porcelain, or stone arranged in a decorative pattern. They are perfect for adding a unique and artistic touch to your pool.


Pros:

  • Customizable and visually striking
  • Available in various materials, including glass, ceramic, and stone
  • Can create intricate designs and patterns

Cons:

  • Expensive, especially for custom designs
  • Can be challenging to install and maintain

Maintenance Considerations

  1. Cleaning: Regularly clean your pool tiles to prevent the buildup of algae, calcium, and other deposits. Use a pool tile cleaner and a soft-bristle brush to gently scrub the surface. Avoid using abrasive or harsh chemicals that may damage the tile finish.
  2. Sealing: For porous tiles, such as stone or unglazed ceramic, apply a sealant periodically to protect the tiles from staining and water damage.
  3. Repair and Replacement: Inspect your pool tiles regularly for cracks, chips, or loose pieces. Promptly repair or replace damaged tiles to prevent further deterioration and maintain the pool’s appearance.

Conclusion

Selecting the right swimming pool tile involves considering factors such as durability, aesthetics, cost, and maintenance. By understanding the various tile options and their pros and cons, you can make an informed decision that best suits your needs and preferences. Proper maintenance and care will ensure your pool tiles remain in excellent condition, providing a beautiful and functional swimming environment for years to come.

A Comprehensive Guide to Cleaning Your Home Swimming Pool DE Filter

Maintain Your DE Filter’s Efficiency and Keep Your Pool Crystal Clear

Diatomaceous Earth (DE) filters are known for their superior filtration capabilities, making them a popular choice for many swimming pool owners. However, regular cleaning is essential to ensure optimal performance and maintain water clarity. This article will guide you through the process of cleaning your home swimming pool DE filter and offer essential tips for optimal performance.

Understanding DE Filters

DE filters utilize a fine, powdery substance called diatomaceous earth to capture microscopic particles and impurities as water passes through the filter grid. Over time, the accumulated debris can reduce water flow and impact the filter’s efficiency. Regular cleaning and maintenance are necessary to maintain the filter’s performance and prolong its lifespan.

How to Clean Your Swimming Pool DE Filter

Step 1: Turn Off the Pool Pump Before starting the cleaning process, ensure the pool pump is turned off. This is crucial for your safety and to prevent damage to the pump.

Step 2: Backwash the DE Filter To remove the majority of debris and spent DE, perform a backwash of the filter. Consult your filter’s manual for specific instructions on the backwash procedure.

Step 3: Open the Filter Housing After backwashing, open the filter housing to access the filter grids. This typically involves removing a clamp or band that holds the two halves of the filter housing together. Be prepared for some water to spill out when opening the filter housing.

Step 4: Remove the Filter Grid Assembly Carefully lift the filter grid assembly out of the filter housing. Inspect the grids for any signs of damage, such as tears or excessive wear. If you notice any issues, it’s time to replace the grids.


Step 5: Clean the Filter Grids Using a garden hose with a high-pressure nozzle, thoroughly rinse the filter grids from top to bottom, ensuring all spent DE and debris are removed. For stubborn dirt or algae, use a soft-bristle brush to gently scrub the grids.

Step 6: Inspect the Filter Housing With the filter grid assembly removed, inspect the filter housing for any debris or damage. Clean the housing with a sponge or cloth, if necessary.

Step 7: Reinstall the Filter Grid Assembly Place the clean filter grid assembly back into the filter housing, ensuring it is properly seated. Double-check that the assembly is correctly positioned before proceeding.

Step 8: Close the Filter Housing Reassemble the filter housing by securing the clamp or band that holds the two halves together. Make sure the housing is properly sealed to prevent water leaks.

Step 9: Recharge the DE Filter With the filter reassembled, it’s time to recharge the DE filter with fresh diatomaceous earth. Consult your filter’s manual for the correct amount of DE to use. Slowly add the DE to the pool skimmer while the pump is running to ensure proper distribution.

Step 10: Turn On the Pool Pump With the DE filter reassembled and recharged, turn the pool pump back on and check for any leaks around the filter housing. The filter is now clean and ready to function at peak efficiency.

Tips for DE Filter Maintenance

  1. Cleaning Frequency: Clean your DE filter every 4-6 weeks or when the pressure gauge reads 8-10 psi above the normal operating pressure.
  2. Replace the Filter Grids: Depending on usage and maintenance, filter grids typically last between 3-5 years. Inspect the grids during cleaning and replace them if you notice any damage or excessive wear.
  3. Maintain Proper Pool Chemistry: Balanced pool water chemistry will help prolong the life of your DE filter and keep your pool water clear and safe.

A Step-by-Step Guide to Cleaning Your Home Swimming Pool Cartridge Filter

Maximize Your Cartridge Filter’s Efficiency and Keep Your Pool Crystal Clear

Introduction

Cartridge filters are a popular choice for home swimming pool owners due to their ease of use and low maintenance requirements. However, proper cleaning is essential to ensure the filter performs at its best, maintaining water clarity and preventing potential issues. This article will guide you through the process of cleaning your home swimming pool cartridge filter and offer essential tips for optimal performance.

Understanding Cartridge Filters

A cartridge filter works by using a pleated polyester or paper filter element to capture debris and impurities as water passes through it. Over time, the accumulated debris can reduce water flow and impact the filter’s efficiency. Regular cleaning is necessary to maintain the filter’s performance and prolong its lifespan.

How to Clean Your Swimming Pool Cartridge Filter

Step 1: Turn Off the Pool Pump Before starting the cleaning process, ensure the pool pump is turned off. This is crucial for your safety and to prevent damage to the pump.

Step 2: Open the Filter Housing Consult your filter’s manual for specific instructions on opening the filter housing. Typically, this involves removing a clamp or band that holds the two halves of the filter housing together. Be prepared for some water to spill out when opening the filter housing.

Step 3: Remove the Cartridge Carefully lift the cartridge out of the filter housing. Inspect the cartridge for any signs of damage, such as tears or excessive wear. If you notice any issues, it’s time to replace the cartridge.


Step 4: Clean the Cartridge Using a garden hose with a high-pressure nozzle, thoroughly rinse the cartridge from top to bottom, working from the inside out. Be sure to clean between the pleats to remove any trapped debris. For stubborn dirt or algae, use a soft-bristle brush to gently scrub the pleats.

Step 5: Inspect the Filter Housing With the cartridge removed, inspect the filter housing for any debris or damage. Clean the housing with a sponge or cloth, if necessary.

Step 6: Reinstall the Cartridge Place the clean cartridge back into the filter housing, ensuring it is properly seated. Double-check that the cartridge is correctly positioned before proceeding.

Step 7: Close the Filter Housing Reassemble the filter housing by securing the clamp or band that holds the two halves together. Make sure the housing is properly sealed to prevent water leaks.

Step 8: Turn On the Pool Pump With the cartridge filter reassembled, turn the pool pump back on and check for any leaks around the filter housing. The filter is now clean and ready to function at peak efficiency.

Tips for Cartridge Filter Maintenance

  1. Cleaning Frequency: Clean your cartridge filter every 4-6 weeks or when the pressure gauge reads 8-10 psi above the normal operating pressure.
  2. Replace the Cartridge: Depending on usage and maintenance, cartridge filters typically last between 1-3 years. Inspect the cartridge during cleaning and replace it if you notice any damage or excessive wear.
  3. Maintain Proper Pool Chemistry: Balanced pool water chemistry will help prolong the life of your cartridge filter and keep your pool water clear and safe.

Conclusion

Cleaning your swimming pool cartridge filter is an essential part of maintaining a healthy and clear pool. By following the steps outlined in this guide, you can ensure your cartridge filter performs at its best, providing clean and safe water for you and your family to enjoy. Regular maintenance, along with proper pool chemistry, will prolong the life of your pool equipment and help you avoid costly repairs or replacements in the future. Keep your pool sparkling clean and ready for fun by taking care of your cartridge filter and staying on top of your

A Comprehensive Guide to Cleaning Your Home Swimming Pool Sand Filter

Keep Your Pool Crystal Clear with Proper Sand Filter Maintenance

A sand filter is a popular choice for home swimming pool owners due to its durability and low maintenance requirements. However, regular cleaning is essential to ensure the filter performs at its best, maintaining water clarity and preventing potential issues. This article will guide you through the process of cleaning your home swimming pool sand filter and offer essential tips for optimal performance.

Understanding Sand Filters

A sand filter works by using a bed of specially graded sand to trap debris and impurities as water passes through it. Over time, the accumulated debris can cause reduced water flow and impact the filter’s efficiency. Cleaning the sand filter, also known as backwashing, is a necessary part of regular pool maintenance.

How to Clean Your Swimming Pool Sand Filter

Step 1: Turn Off the Pool Pump Before starting the cleaning process, ensure the pool pump is turned off. This is crucial for your safety and to prevent damage to the pump.

Step 2: Set the Filter Valve to “Backwash” Locate the filter’s multiport valve, usually located on top of the filter, and set it to the “backwash” position. This setting will reverse the flow of water through the filter, dislodging debris trapped in the sand.


Step 3: Turn On the Pool Pump With the valve set to “backwash,” turn on the pool pump. Water will flow in reverse through the filter, flushing out debris and impurities. Keep an eye on the sight glass or backwash hose (if applicable) to monitor the clarity of the water being discharged.

Step 4: Backwash Until the Water Runs Clear Continue backwashing until the water being discharged appears clear. This typically takes 2-5 minutes, depending on the amount of debris in the filter.

Step 5: Turn Off the Pump and Set the Valve to “Rinse” After backwashing is complete, turn off the pool pump and set the valve to the “rinse” position. This setting will help resettle the sand and remove any remaining debris.

Step 6: Turn On the Pump and Rinse the Filter Turn the pool pump back on and let it run for about 30 seconds to 1 minute, allowing the water to rinse through the filter. This step ensures that any loosened debris is flushed out and that the sand bed is properly resettled.

Step 7: Turn Off the Pump and Reset the Valve to “Filter” After rinsing is complete, turn off the pool pump and set the valve back to the “filter” position. This setting will return the filter to normal operation.

Step 8: Turn On the Pool Pump and Resume Normal Operation With the valve set to “filter,” turn the pool pump back on and resume normal operation. Your sand filter is now clean and ready to function at peak efficiency.

Tips for Sand Filter Maintenance

  1. Backwash Frequency: As a general rule, backwash your sand filter every 4-6 weeks or when the pressure gauge reads 8-10 psi above the normal operating pressure.
  2. Replace the Sand: Over time, the sand in your filter will become less effective at trapping debris. It is recommended to replace the sand every 5-7 years, depending on the filter’s usage and maintenance.
  3. Inspect the Multiport Valve: Regularly inspect the multiport valve for leaks or damage, and replace any worn or damaged parts as needed.
  4. Monitor Filter Pressure: Keep an eye on the filter pressure gauge to ensure optimal performance. If the pressure is consistently high or low, it may indicate a problem with the filter or circulation system.

Conclusion

Cleaning your swimming pool sand filter is a crucial part of maintaining a healthy and clear pool. By following the steps outlined in this guide, you can ensure your sand filter performs at its best, providing clean and safe water for you and your family to enjoy. Regular maintenance, along with proper pool chemistry, will prolong the life of your pool equipment and help you avoid costly repairs or replacements in the future. Keep your pool sparkling clean and ready for fun by taking care of your sand filter and staying on top of your pool maintenance routine. Happy swimming!

Understanding Pool Skimmers: Their Importance, Care, and Troubleshooting

A Comprehensive Guide to Pool Skimmers for Optimal Pool Maintenance

Introduction

Pool skimmers are essential components of any swimming pool, playing a crucial role in maintaining water quality and cleanliness. Skimmers are designed to remove floating debris from the pool’s surface before it sinks, which keeps your pool looking clean and inviting. This article will cover the purpose of pool skimmers, why they are needed, how to care for them, and common problems and solutions to ensure optimal pool maintenance.

What is a Pool Skimmer?

A pool skimmer is a device installed on the pool’s edge, designed to catch and remove debris such as leaves, twigs, and insects from the pool’s surface. Skimmers work in conjunction with the pool’s circulation system, drawing water through the skimmer and passing it through a filter before returning it to the pool. Skimmers typically consist of a skimmer basket, weir door, and a connection point to the pool’s circulation system.

Why Pool Skimmers are Important

  1. Maintain Water Clarity: Pool skimmers help maintain water clarity by removing debris from the surface before it sinks and decomposes, which can lead to cloudy water and algae growth.
  2. Reduce Strain on the Pool Filter: By capturing debris before it reaches the filter, skimmers reduce the strain on the pool filter, prolonging its lifespan and improving efficiency.
  3. Improve Circulation: Skimmers help improve water circulation by continually drawing water from the pool’s surface, ensuring even distribution of chemicals and maintaining balanced water chemistry.


Caring for Your Pool Skimmer

  1. Regularly Empty the Skimmer Basket: To ensure optimal performance, empty the skimmer basket regularly, especially during heavy debris seasons. Removing debris from the basket ensures proper water flow and prevents the skimmer from becoming clogged.
  2. Check the Weir Door: The weir door is a flap that helps regulate water flow into the skimmer. Ensure it is functioning correctly and is not damaged or obstructed.
  3. Clean the Skimmer Line: Periodically check the skimmer line for blockages and clean it if necessary. A clogged skimmer line can lead to poor water circulation and reduced skimmer efficiency.
  4. Inspect and Maintain the Skimmer Lid: Ensure the skimmer lid is secure and free from cracks or damage. A damaged lid can allow debris to enter the skimmer system and potentially cause blockages.

Common Skimmer Problems and Solutions

  1. Clogged Skimmer Basket: A clogged skimmer basket can reduce water flow and hinder skimmer performance. Regularly empty and clean the basket to ensure optimal operation.
  2. Damaged Weir Door: A damaged weir door can lead to poor water circulation and reduced skimmer efficiency. Inspect the weir door regularly and replace it if damaged.
  3. Cracked or Damaged Skimmer Housing: Inspect the skimmer housing for cracks or damage. Damaged housing can cause water leaks and reduced skimmer performance. Repair or replace the housing as needed.
  4. Air Leaks: Air leaks in the skimmer system can lead to poor water circulation and reduced skimmer performance. Check all connections and seals for leaks, tightening or replacing components as necessary.

Conclusion

Pool skimmers are essential for maintaining a clean and healthy swimming pool. Understanding the importance of skimmers, how to care for them, and how to troubleshoot common problems ensures optimal pool maintenance and water quality. By regularly inspecting and maintaining your pool skimmer, you can enjoy a crystal-clear pool with minimal effort.

How to Choose the Best Robotic Pool Cleaner: A Comprehensive Guide

Tips for Selecting the Perfect Robotic Pool Cleaner for Your Swimming Pool

Introduction

Robotic pool cleaners have become increasingly popular due to their efficiency, convenience, and advanced features. These innovative devices can save you time and effort by automating the pool cleaning process, allowing you to enjoy a sparkling clean pool with minimal effort. With numerous models and features available in the market, choosing the best robotic pool cleaner can be overwhelming. This article will guide you through the factors to consider when selecting the perfect robotic pool cleaner for your swimming pool.


Factors to Consider When Choosing a Robotic Pool Cleaner

  1. Pool Size and Shape: Consider the size and shape of your pool when selecting a robotic pool cleaner. Some cleaners are designed for specific pool sizes, so ensure the cleaner you choose can efficiently navigate and clean your pool.
  2. Pool Surface: Different robotic pool cleaners are designed for various pool surfaces, such as concrete, vinyl, fiberglass, or tile. Make sure the cleaner you choose is suitable for your pool’s surface to prevent potential damage.
  3. Cleaning Features: Robotic pool cleaners offer a range of cleaning features, such as floor, wall, and waterline cleaning. Consider your pool’s specific cleaning needs and choose a cleaner that offers the necessary features.
  4. Filtration System: Robotic pool cleaners use different types of filtration systems, such as fine or ultra-fine filters, to capture debris and contaminants. Choose a cleaner with a suitable filtration system for your pool’s needs to ensure optimal cleaning performance.
  5. Cord Length: The cord length of a robotic pool cleaner is crucial for maneuverability and coverage. Ensure the cleaner’s cord is long enough to reach all areas of your pool without difficulty.
  6. Energy Efficiency: Robotic pool cleaners consume electricity during their operation. Consider energy-efficient models that consume less power without compromising performance, reducing your energy costs.
  7. Warranty and Customer Support: Choose a cleaner with a reliable warranty and responsive customer support to ensure a hassle-free ownership experience.
  8. Budget: Robotic pool cleaners are available at various price points. Determine your budget and choose a cleaner that offers the best combination of features, performance, and value for your investment.


Popular Features of Robotic Pool Cleaners

  1. Smart Navigation: Advanced robotic pool cleaners use smart navigation technology to efficiently map and navigate your pool, ensuring thorough cleaning without missing any spots.
  2. Programmable Timer: Some cleaners offer programmable timers that allow you to schedule cleaning cycles at convenient times, ensuring your pool remains clean with minimal effort.
  3. Remote Control: Some models come with a remote control that enables you to manually guide the cleaner or adjust settings from a distance.
  4. Swivel Cord: A swivel cord helps prevent the cleaner’s cord from tangling during operation, ensuring smooth and uninterrupted cleaning.
  5. Easy-to-Clean Filter: Choose a cleaner with an easy-to-clean filter to minimize maintenance and keep your cleaner functioning at optimal performance.

Conclusion

Selecting the best robotic pool cleaner involves considering factors such as pool size and shape, pool surface, cleaning features, filtration system, cord length, energy efficiency, warranty, and budget. By understanding your pool’s specific needs and the popular features of robotic pool cleaners, you can make an informed decision and invest in a cleaner that keeps your pool sparkling clean with minimal effort. With the right robotic pool cleaner, you can spend more time enjoying your pool and less time maintaining it.

Bonding and Grounding: A New Pool Owner’s Guide to Pool Safety

Congratulations on becoming a new pool owner! As you embark on this exciting journey, it’s crucial to understand the importance of pool safety, and one of the key aspects is bonding and grounding your swimming pool. These electrical safety measures are essential in protecting you, your family, and your pool equipment from potential hazards. In this article, we’ll explain what bonding and grounding mean, their benefits, and how to ensure your pool is properly protected.

Understanding Bonding and Grounding

Bonding and grounding are electrical safety practices that help reduce the risk of electrocution, electrical shock, and damage to your pool equipment. Let’s take a closer look at what each term means:

  1. Bonding: Pool bonding is the process of connecting all metal components and electrical equipment around your pool, such as ladders, handrails, light fixtures, and pumps, with a continuous copper wire. This creates a “bonded” connection, equalizing the voltage potential across all connected components. By doing so, it prevents voltage differences that could lead to electric shocks.
  2. Grounding: Grounding, on the other hand, is the process of connecting electrical equipment to the earth through a grounding wire. This provides a safe path for electrical currents to flow in case of a fault, such as a short circuit or lightning strike. Grounding helps protect swimmers from electrical hazards and prevents damage to your pool equipment.

The Benefits of Bonding and Grounding Your Pool


Proper bonding and grounding offer several benefits:

  1. Enhanced Safety: Bonding and grounding protect swimmers and pool users from the risk of electrical shock, ensuring a safer swimming environment.
  2. Equipment Protection: These safety measures help protect your pool equipment, such as pumps and heaters, from damage caused by electrical faults or surges.
  3. Compliance with Regulations: Local building codes and the National Electric Code (NEC) require that pools be bonded and grounded. Ensuring your pool is compliant not only guarantees safety but also helps avoid potential fines or penalties.

Ensuring Proper Bonding and Grounding for Your Pool

Here are some steps to ensure your pool is correctly bonded and grounded:

  1. Hire a Professional: Bonding and grounding should be performed by a licensed electrician or pool professional. They have the necessary knowledge, skills, and tools to ensure the job is done correctly and safely, adhering to local building codes and NEC requirements.
  2. Use the Right Materials: Your pool professional will use proper materials, such as copper wire and bonding clamps, to establish a secure and efficient bond between all metal components and electrical equipment.
  3. Regular Inspections: It’s essential to periodically inspect your pool’s bonding and grounding system for signs of wear, corrosion, or damage. A pool professional can help you identify and resolve any issues, ensuring your pool remains safe and compliant.
  4. Ground Fault Circuit Interrupter (GFCI): Install a GFCI breaker for your pool’s electrical system. GFCI breakers continuously monitor the flow of electricity and will quickly shut off the power in case of a fault, further enhancing the safety of your pool.

Conclusion

As a new pool owner, it’s vital to understand the importance of bonding and grounding your swimming pool. These electrical safety measures protect swimmers, pool equipment, and ensure compliance with local regulations. By working with a licensed professional, you can enjoy the peace of mind that comes from knowing your pool is secure and hazard-free. So dive in and enjoy your new pool with confidence, knowing you’ve taken the necessary steps to ensure safety for all.

How to Choose the Best Above Ground Pool: Factors to Consider, Types, Shapes, and Installation Options

A Comprehensive Guide to Finding the Perfect Above Ground Pool for Your Backyard

Introduction

Above ground pools have become increasingly popular among homeowners due to their affordability, ease of installation, and lower maintenance requirements compared to inground pools. With various types, shapes, and installation options available, choosing the best above ground pool for your backyard can be a daunting task. This article will guide you through the factors to consider when selecting the perfect above ground pool and provide an overview of different pool types, shapes, and installation options.

Factors to Consider When Choosing an Above Ground Pool

  1. Budget: Above ground pools are available at various price points, so it’s essential to determine your budget before making a decision. Consider not only the initial cost of the pool but also the ongoing maintenance expenses and potential upgrades.
  2. Size and Shape: Measure your available backyard space to determine the appropriate pool size and shape. Consider the amount of space needed for pool equipment, as well as areas for lounging and other activities.
  3. Material: Above ground pools are typically made from steel, aluminum, or resin. Steel is the most affordable option but may be prone to rust. Aluminum is lightweight and rust-resistant but may be more susceptible to dents. Resin is a durable and low-maintenance material but may be more expensive.
  4. Pool Depth: Consider the depth of the pool based on your family’s needs. Deeper pools may be more suitable for older children and adults, while shallower pools are better for younger children and families who prefer wading.
  5. Safety Features: Ensure the pool you choose has adequate safety features, such as secure ladders or fencing to prevent unauthorized access.


Types and Shapes of Above Ground Pools

  1. Round: Round pools are the most common and affordable shape, offering a larger swimming area for the same perimeter compared to other shapes.
  2. Oval: Oval pools provide a more extended swimming area, allowing for lap swimming and other water activities. They may require additional support structures, which can increase the cost and installation complexity.
  3. Rectangular: Rectangular pools offer a modern and sleek design, providing ample space for swimming laps and water games. These pools may also require additional support structures.
  4. Semi-Inground: Semi-inground pools are partially buried, offering a more aesthetically pleasing appearance and allowing for easier entry and exit. These pools may be more expensive due to the additional excavation and landscaping work required.

Installation Options

  1. DIY Installation: Some above ground pool models come with detailed installation instructions and can be assembled by handy homeowners. This option can save money on labor costs but may be time-consuming and require a moderate level of skill.
  2. Professional Installation: Hiring a professional pool installer ensures that your pool is correctly and safely installed. This option can be more expensive but may be worth the investment for a hassle-free and efficient installation.


Conclusion

Choosing the perfect above ground pool for your backyard involves considering factors such as budget, size, shape, material, and safety features. By understanding the different types, shapes, and installation options available, you can make an informed decision that best suits your needs and preferences. With careful planning and consideration, you can create a backyard oasis that provides endless enjoyment for you and your family.