Pool Skimmer Basket Replacement: How to Choose and Install the Right Basket
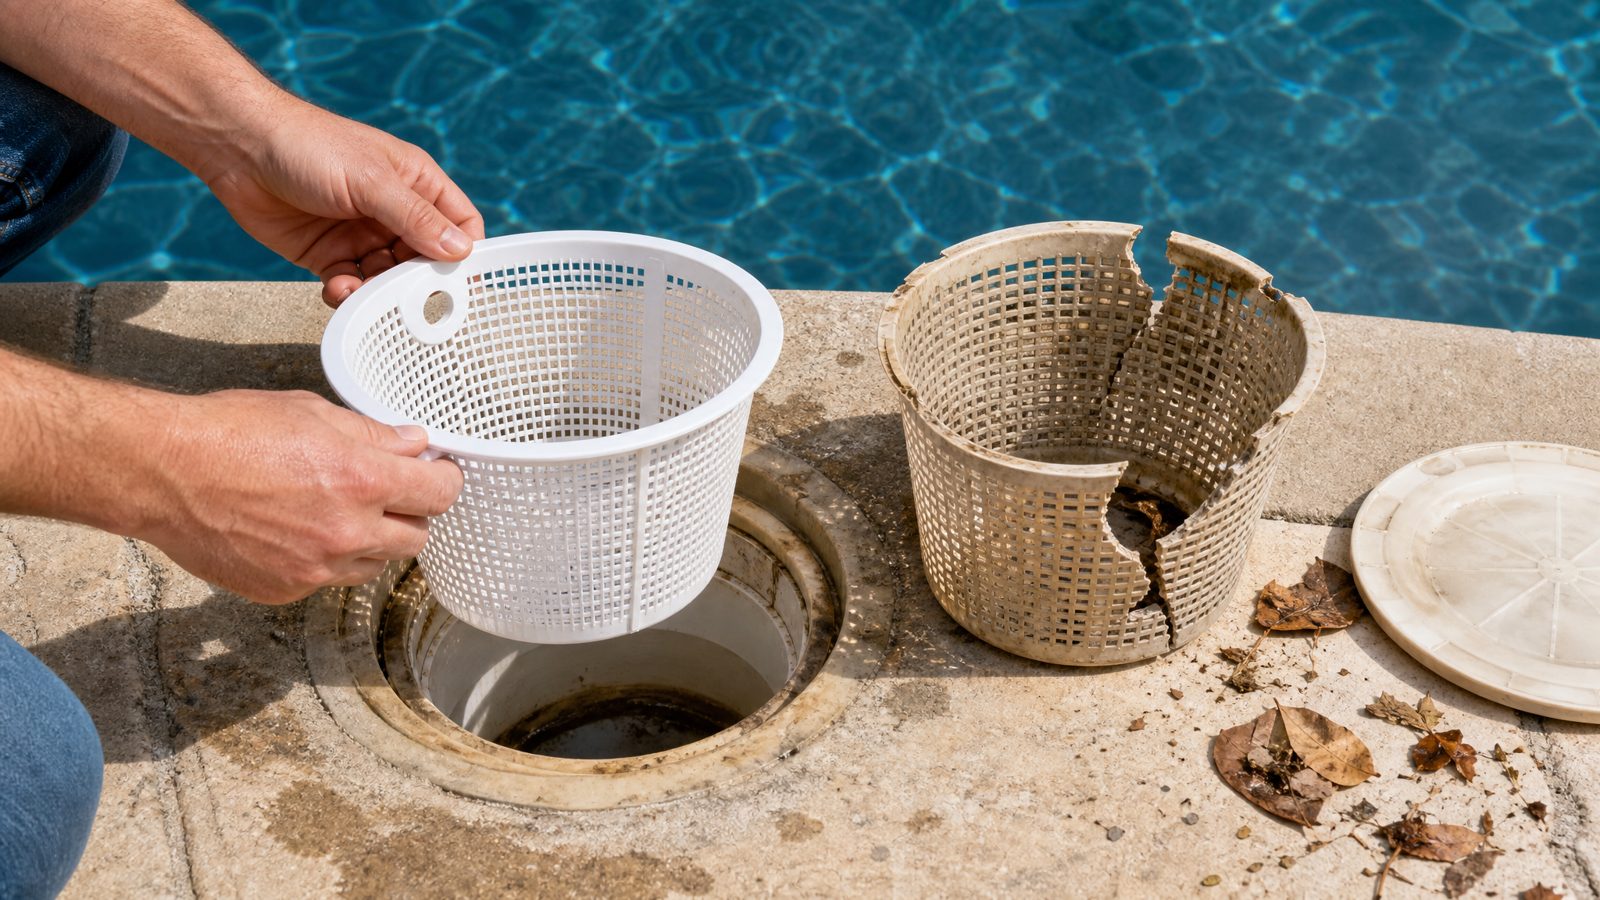
That cracked, warped, or broken skimmer basket sitting in your pool deck isn’t just an eyesore — it’s actively sabotaging your filtration system. Every leaf, bug, and debris chunk that slips through a damaged pool skimmer basket ends up clogging your pump, straining your filter, and costing you money in repairs and chemicals. The good news? Replacing a skimmer basket takes about 10 minutes and costs between $8 and $25 for most pools. You don’t need a pool technician. You don’t need special tools. And once you’ve done it once, you’ll wonder why you waited so long.
Quick answer
Pool Skimmer Basket Replacement: How to Choose and Install the Right Basket: That cracked, warped, or broken skimmer basket sitting in your pool deck isn’t just an eyesore — it’s actively sabotaging your filtration system. Every leaf, bug, and debris chunk that slips through a damaged pool.
I’ve replaced dozens of skimmer baskets over the years — on my own pool, for neighbors, and for family members who called in a panic because “something’s wrong with the filter.” Nine times out of ten, a worn-out skimmer basket was the culprit. Let me walk you through exactly how to handle this simple repair.
Why Your Skimmer Basket Matters More Than You Think
Your skimmer basket is the first line of defense in your pool’s circulation system. Think of it like a kitchen sink strainer — it catches the big stuff before it can cause problems downstream. Without a functioning basket, debris travels directly into your skimmer throat, through the plumbing, and into your pump’s impeller.
Here’s what happens when debris bypasses a damaged basket:
- Pump strain: Leaves and twigs can jam the impeller, causing the motor to overheat
- Reduced flow: Clogged impellers cut circulation by 30-50%, making your chemicals work harder
- Premature equipment failure: A pump replacement runs $400-$1,200, while a basket costs $15
- Poor water quality: Reduced circulation means dead spots where algae thrives
A single acorn or twig in the wrong place can burn out a pump motor. I’ve seen it happen. Twice to the same neighbor, actually — he kept ignoring that cracked basket.
Signs Your Skimmer Basket Needs Replacement
Before you order a replacement, confirm your basket actually needs swapping. Some issues are fixable, while others mean it’s time for a new one.
Definite Replacement Signs
Cracks or holes: Even a hairline crack will widen over time. Once plastic fatigues, it’s done. If you can see daylight through any part of the basket walls, replace it.
Warping or deformation: Heat and chemical exposure cause baskets to warp. If your basket no longer sits flat in the skimmer housing, debris will slip underneath. A warped basket also won’t seal properly, letting water bypass the collection area entirely.
Broken handle: You might think this is cosmetic, but a broken handle makes removal difficult. You’ll end up fishing around in murky water, potentially dropping debris back into the skimmer throat. And if you can’t easily remove the basket, you won’t clean it as often.
Brittle plastic: Press on the basket rim. If the plastic feels crunchy or pieces flake off, UV damage has compromised the structural integrity. It’s about to crack — probably at the worst possible time.
When You Can Skip Replacement
Minor staining: Brown or green discoloration doesn’t affect function. Ugly? Yes. Problem? No.
Loose fit (sometimes): If your basket moves around slightly but still catches debris effectively, you might just need a basket weight or a different size. Measure before assuming replacement is necessary.
Debris stuck in mesh: A clogged basket just needs cleaning. Hose it off, scrub with a brush, and inspect for actual damage underneath the gunk.
How to Measure Your Skimmer Basket Correctly
This step trips up more pool owners than any other. Buy the wrong size and you’ll either have a basket that won’t fit at all, or one that’s so loose debris slides right past it. Skimmer baskets aren’t universal — they come in dozens of sizes and shapes depending on your skimmer manufacturer.
What You’ll Need
- Tape measure or ruler
- Your old basket (if intact enough to measure)
- Smartphone for photos
Measuring Steps
Step 1: Remove the existing basket. Turn off your pump first. Pull the basket straight up and out of the skimmer.
Step 2: Measure the top opening diameter. Most residential skimmer baskets range from 4.5 inches to 8 inches across. Measure at the widest point of the rim. Round baskets need one measurement; oval baskets need both length and width.
Step 3: Measure the bottom diameter. Many baskets taper, so the bottom is smaller than the top. Get this measurement too — it helps confirm you’re ordering the right shape.
Step 4: Measure the height. From the bottom of the basket to the top of the rim. Standard heights range from 4 inches to 7 inches. Too short and debris will overflow. Too tall and the basket won’t seat properly.
Step 5: Note the handle style. Some baskets have a single center handle. Others have a twin handle that folds flat. Some premium baskets have a floating weir attachment built in. Match your existing style unless you’re deliberately upgrading.
Step 6: Photograph everything. Snap a pic of your old basket, the inside of your skimmer housing, and any manufacturer labels you can find on the skimmer itself. This helps if you need to troubleshoot a sizing issue later.
Identifying Your Skimmer Brand
Your skimmer brand determines which baskets will fit. Common residential brands include:
- Hayward — Most common in North America, SP1070 and SP1082 series
- Pentair — Look for “Pentair” or “American Products” stamps
- Waterway — Popular with above-ground pools and spas
- Custom Molded Products (CMP) — Often found in newer construction
- Jacuzzi — Yes, they make pool skimmers too
Check for stamps or stickers inside your skimmer housing, on the underside of your skimmer lid, or on the skimmer face plate. If you can’t find a brand name, measurements become even more critical.
Choosing the Right Replacement Basket
Now that you have your measurements, you’ve got options. Here’s how to choose wisely.
Standard OEM Replacement
The safest choice is ordering the exact basket designed for your skimmer. If you have a Hayward SP1082 skimmer, the Hayward SP1082CA basket fits perfectly. No guesswork.
For Hayward skimmers (the most common brand), the Hayward SPX1082CA Basket fits the SP1082/SP1083/SP1084 series and costs around $12. It’s the basket I use in my own pool.
Universal Replacement Baskets
If you can’t identify your skimmer brand, universal baskets work with multiple skimmer types. They’re designed with slightly flexible dimensions and multiple handle configurations.
The U.S. Pool Supply Universal Skimmer Basket fits most standard skimmers with top openings between 6.5 and 8 inches. It’s a solid backup option, though OEM is always preferable when possible.
Upgraded Heavy-Duty Options
Standard baskets last 2-4 seasons in most climates. If you’re tired of replacing yours, consider a heavy-duty version with UV-stabilized plastic and reinforced mesh. They cost $5-$10 more but often last twice as long.
Tower Baskets vs. Standard Baskets
Some replacement baskets are “tower” style — taller and narrower than standard. These work well for pools with heavy debris loads because they hold more before needing cleaning. But they only fit skimmers designed for tower baskets. Don’t try to force a tower basket into a standard skimmer housing.
Step-by-Step Basket Replacement
Alright, you’ve got your new basket in hand. Let’s install it.
Tools and Materials
- New skimmer basket (correct size)
- Garden hose (optional, for cleaning)
- Towel (optional, for cleaning hands)
- Silicone lubricant (optional, for sticky lids)
That’s it. Seriously. This is a no-tool job.
Installation Instructions
Step 1: Turn off the pool pump.
Never work on your skimmer with the pump running. The suction creates a hazard, and debris can get pulled into the system while you’re mid-swap. Walk over to your equipment pad and flip the switch. Wait 10 seconds for the suction to release.
Step 2: Remove the skimmer lid.
Most skimmer lids lift straight off. Some twist-lock into place — turn counterclockwise about a quarter turn, then lift. If your lid is stuck, don’t pry with a screwdriver (you’ll crack it). Instead, spray around the edges with silicone lubricant and tap gently with your palm.
Step 3: Pull out the old basket.
Grab the handle and lift straight up. If the basket is cracked or the handle is broken, reach down and grip the rim instead. Pull slowly to avoid dumping the debris back into the skimmer.
Step 4: Inspect the skimmer housing.
With the basket out, look inside the skimmer. You’ll see the skimmer throat at the bottom — that’s the pipe leading to your pump. Clear any debris that settled below the basket. Check for cracks in the skimmer walls while you’re at it.
Step 5: Clean the new basket (optional).
New baskets sometimes have manufacturing residue. A quick rinse with the garden hose removes any plastic shavings or chemical film.
Step 6: Insert the new basket.
Lower the basket straight down into the skimmer housing. It should seat flat at the bottom with the rim level and stable. If it wobbles or tilts, pull it back out and check for debris underneath or a sizing mismatch.
Step 7: Verify proper seating.
Press down gently on the basket. It shouldn’t shift, rock, or pop up. The rim should sit below the skimmer opening level so the weir door (the flapper) can operate freely.
Step 8: Replace the skimmer lid.
Set the lid back in place. If it’s a twist-lock design, turn clockwise until it seats. The lid should sit flush with your pool deck.
Step 9: Turn the pump back on.
Head to your equipment and restart the pump. Listen for normal operation — steady hum, no grinding or surging. Walk back to the skimmer and watch water flow through. The basket should remain stable with good suction.
Step 10: Test debris collection.
Toss a couple leaves on the water surface near the skimmer. They should pull toward the skimmer opening within 30 seconds and land in your new basket. Congratulations — you’re done.
Maintaining Your New Skimmer Basket
A little maintenance extends basket life significantly. Here’s how to keep your new basket working for years instead of months.
Weekly Cleaning Schedule
Empty your skimmer basket at least twice per week during swimming season. More often if you have trees overhanging your pool. Heavy debris loads accelerate wear because the basket stays wet and loaded constantly.
When you empty it, give the basket a quick inspection. Look for new cracks, warping, or loose mesh. Catching damage early prevents debris bypass.
Monthly Deep Cleaning
Once a month, remove the basket and scrub it with a stiff brush and fresh water. Remove any algae growth, stuck-on bugs, or sediment buildup. This maintains good water flow through the mesh openings.
Don’t use harsh chemicals to clean your basket. Bleach and strong acids accelerate plastic degradation. Plain water and scrubbing work fine.
Seasonal Storage (For Closing)
If you close your pool for winter, remove the skimmer basket during winterization. Store it indoors, away from UV light and temperature extremes. A basket left in a frozen skimmer can crack when ice expands.
Extend Basket Life
Some products can double your basket’s lifespan:
Skimmer basket socks: These fine mesh bags fit inside your basket and catch small debris like pollen and sand that normally passes through. They reduce clogging and protect the basket from sharp debris.
The Poolmaster 28024 Replacement Skimmer Socks fit most standard baskets and cost pennies per use. Pack of 12 lasts an entire season for most pools.
Basket weights: If your basket floats or shifts, a basket weight holds it in place. Some are designed as stones that sit in the basket; others clip onto the rim.
Troubleshooting Common Problems
Even simple repairs sometimes hit snags. Here’s how to handle the most common issues.
Basket Floats Up
Cause: Air trapped under the basket creates buoyancy.
Fix: Drill three or four 1/4-inch holes in the bottom of the basket. This releases trapped air and allows the basket to sink and stay seated.
Basket Too Loose
Cause: Wrong size or worn skimmer housing.
Fix: First, confirm your measurements. If the basket is correct, try a universal basket with slightly larger dimensions. For severely worn skimmer housings, a basket with a rubber gasket rim creates a tighter seal.
Basket Too Tight
Cause: Slightly oversized basket or debris in housing.
Fix: Clean the skimmer housing walls and check for calcium buildup. If the basket still won’t fit, exchange it for the correct size or sand down the rim slightly.
Water Bypassing the Basket
Cause: Basket not seated properly, wrong size, or warped basket.
Fix: Remove the basket and reseat it. Check that it sits flat and doesn’t tilt. Verify the basket height matches your skimmer depth — a short basket allows water to flow over the top instead of through.
Pump Losing Prime After Replacement
Cause: Air leak in the skimmer or basket not blocking the suction properly.
Fix: Check that the basket fully covers the skimmer throat. Look for cracks in the skimmer housing you may have missed. Ensure the weir door swings freely and seals against the skimmer opening.
Frequently Asked Questions
How often should I replace my pool skimmer basket?
Most standard skimmer baskets last 2-4 years with proper maintenance. Heavy-duty UV-stabilized baskets can last 5-7 years. Replace yours when you see cracks, warping, or significant brittleness — don’t wait for complete failure.
Are all pool skimmer baskets the same size?
No — skimmer baskets vary significantly by manufacturer and model. Sizes range from 4.5 inches to over 8 inches in diameter, with heights from 4 to 7 inches. Always measure your existing basket and identify your skimmer brand before ordering a replacement.
Can I use my pool without a skimmer basket?
Technically yes, but you shouldn’t. Running your pump without a skimmer basket sends debris directly into your plumbing, pump, and filter. A single twig in your pump impeller can cause hundreds of dollars in damage. Even a damaged basket is better than none while you wait for a replacement.
Why does my new skimmer basket float?
Trapped air beneath the basket causes floating. Drill three or four small drainage holes (1/4 inch) in the bottom of the basket to allow air to escape. You can also try adding a basket weight to hold it down.
Can I repair a cracked skimmer basket instead of replacing it?
Not effectively. Plastic welding or gluing a cracked basket creates a temporary fix that fails quickly. The repaired area becomes the weakest point, and chemicals plus UV exposure break down adhesives fast. At $10-$25, replacement is more reliable than repair.
Ready to dial in your pool chemistry after tackling this repair? Use Pool Chemical Calculator to calculate exactly how much chlorine, pH adjuster, alkalinity increaser, calcium hardness increaser, stabilizer, salt, or other chemicals your pool needs. Just enter your pool size and current test results — the app does the math so you never have to guess.
???? iPhone / iPad: https://itunes.apple.com/us/app/pool-chem-calculator/id1453351222
???? Android: https://play.google.com/store/apps/details?id=com.poolchemicalcalculator.poolcalc
???? Full guide: https://poolchemicalcalculator.com/news/pool-skimmer-basket-replacement/
As an Amazon Associate, Pool Chemical Calculator earns from qualifying purchases. Brushing breaks up algae films, dead spots, and wall buildup so chemicals and filtration work. Raises calcium hardness to reduce corrosive water risk in plaster, concrete, and equipment. Accurate readings make every chlorine, pH, alkalinity, calcium, and CYA dose safer.Recommended pool supplies

Get exact pool chemical doses
Pool Chemical Calculator turns your test readings, pool volume, and target levels into exact treatment amounts for chlorine, pH, alkalinity, calcium, stabilizer, salt, and more.
Open the Pool Chemical Calculator app or download it from the App Store and Google Play.