Does Chlorine Kill Lice? Treating Swimming Pools After Lice Exposure

As summer approaches and swimming pools become a popular destination for cooling off and having fun, concerns about hygiene and safety naturally arise. One common question that may come to mind is whether chlorine effectively kills lice in swimming pools. Additionally, if someone with lice has swum in a pool, what steps should be taken to ensure the pool is safe for others? In this blog post, we’ll explore whether chlorine kills lice and discuss proper procedures for treating swimming pools after lice exposure.

Does Chlorine Kill Lice?

Chlorine is a powerful disinfectant commonly used in swimming pools to kill bacteria, viruses, and other microorganisms. However, when it comes to lice, chlorine may not be as effective. Lice are parasites that infest the hair and scalp of humans and feed on blood. While chlorine may temporarily immobilize or drown lice in water, it is unlikely to kill them outright, especially if they are attached to the hair and scalp.

Treating Swimming Pools After Lice Exposure

If someone with lice has swum in a pool, it’s essential to take prompt action to minimize the risk of lice transmission to others. Here are the steps to follow for treating the swimming pool after lice exposure:

  1. Close the Pool: As soon as you become aware that someone with lice has been in the pool, close the pool to prevent further exposure and potential transmission to other swimmers.
  2. Notify Pool Users: Inform anyone who may have been in contact with the infested individual about the situation, advising them to take precautions and refrain from using the pool until it has been treated.
  3. Increase Chlorine Levels: While chlorine may not effectively kill lice, it can help disinfect the pool and reduce the risk of bacterial or viral contamination. Increase the chlorine levels in the pool to the recommended range for superchlorination, typically between 5 and 10 parts per million (ppm).
  4. Maintain Filtration and Circulation: Ensure that the pool’s filtration and circulation systems are operating effectively to help remove any contaminants from the water.
  5. Shock Treatment: Consider performing a shock treatment to further sanitize the pool and eliminate any remaining microorganisms or parasites. Follow the manufacturer’s instructions carefully when adding shock treatment chemicals to the pool.
  6. Monitor Water Quality: Regularly test the pool water to ensure that chlorine levels remain within the recommended range and adjust as needed to maintain proper disinfection.
  7. Wait Before Reopening: Allow sufficient time for the chlorine levels to return to normal and for the water to circulate and filter effectively before reopening the pool to swimmers.

Conclusion:

While chlorine may not be effective at killing lice in swimming pools, it is still important to take precautions and treat the pool properly after lice exposure to minimize the risk of transmission to others. By following the steps outlined above and maintaining proper pool maintenance practices, you can help ensure a safe and enjoyable swimming experience for all. If you have further concerns about lice exposure or pool sanitation, consider consulting with a professional pool technician or healthcare provider for guidance.

Pressure-Side vs. Suction-Side Pool Cleaners: Which Is Right for You?

When it comes to keeping your pool clean, choosing the right pool cleaner is essential. Two popular options are pressure-side and suction-side pool cleaners. But what are the differences between them, and which one is best suited for your pool? In this blog post, we’ll explore the characteristics, pros, and cons of pressure-side and suction-side pool cleaners to help you make an informed decision.

Pressure-Side Pool Cleaners

Pressure-side pool cleaners operate by using the water pressure generated by your pool’s pump to move the cleaner around the pool. Here are some key characteristics, pros, and cons:

Pros:

  1. Efficient Cleaning: Pressure-side cleaners are known for their efficient cleaning capabilities, as they use the force of water pressure to propel the cleaner across the pool surface while simultaneously vacuuming debris.
  2. Independent Operation: Many pressure-side cleaners are equipped with their own debris bags or cartridges, allowing them to operate independently of your pool’s filtration system and reducing strain on the pump and filter.
  3. Effective for Large Debris: Pressure-side cleaners are particularly effective at picking up larger debris such as leaves, twigs, and pebbles, preventing them from clogging your pool’s filtration system.

Cons:

  1. Higher Cost: Pressure-side cleaners tend to be more expensive upfront compared to suction-side cleaners, making them a larger initial investment.
  2. Requires Booster Pump: Some pressure-side cleaners require a booster pump to operate effectively, adding to the overall cost of installation and maintenance.

Suction-Side Pool Cleaners

Suction-side pool cleaners rely on the suction power generated by your pool’s filtration system to operate. Here are their characteristics, pros, and cons:

Pros:

  1. Affordability: Suction-side cleaners are generally more affordable than pressure-side cleaners, making them a budget-friendly option for pool owners.
  2. Low Maintenance: Since suction-side cleaners rely on your pool’s existing filtration system, they typically require less maintenance and fewer additional components compared to pressure-side cleaners.
  3. Effective for Fine Debris: Suction-side cleaners excel at picking up fine debris such as dirt, sand, and algae, helping to maintain water clarity and cleanliness.

Cons:

  1. Reduced Cleaning Power: Suction-side cleaners may not be as powerful or efficient at cleaning as pressure-side cleaners, particularly when it comes to larger debris.
  2. Dependent on Filtration System: Suction-side cleaners are reliant on the suction power of your pool’s filtration system, which can reduce overall circulation and filtration efficiency.

Conclusion:

When choosing between pressure-side and suction-side pool cleaners, it’s essential to consider your pool’s specific needs, budget, and cleaning requirements. Pressure-side cleaners offer efficient cleaning capabilities and independence from the filtration system but come with a higher upfront cost. On the other hand, suction-side cleaners are more affordable and require less maintenance but may not be as powerful at cleaning larger debris. Ultimately, the best choice depends on your priorities and preferences as a pool owner.

Choosing the Best Pool Vacuum for Removing Dead Algae: A Comprehensive Guide

Dealing with algae in your pool can be a frustrating and challenging task. Whether it’s green, black, or mustard algae, getting rid of it requires thorough cleaning and maintenance. In this guide, we’ll explore the best pool vacuum options for removing dead algae and discuss why they’re effective in restoring your pool to its pristine condition.

Understanding Dead Algae

Before diving into the best pool vacuum options, let’s first understand what dead algae is and why it poses a problem for pool owners. Dead algae refers to algae cells that have been killed by sanitizers such as chlorine or algaecides. While the algae may no longer be actively growing, it can still cloud the water and cling to pool surfaces, requiring removal to restore water clarity and cleanliness.

Factors to Consider When Choosing a Pool Vacuum

When selecting a pool vacuum for removing dead algae, several factors come into play:

  1. Suction Power: A pool vacuum with strong suction power is essential for effectively removing dead algae from pool surfaces and capturing it in the filtration system.
  2. Filtration System: Look for a vacuum with a reliable filtration system that can trap even the smallest particles, including dead algae, preventing them from re-entering the pool water.
  3. Versatility: Opt for a pool vacuum that can clean various surfaces, including pool floors, walls, and steps, to ensure thorough cleaning of all areas affected by dead algae.
  4. Ease of Use: Choose a pool vacuum that is easy to assemble, maneuver, and operate, making the cleaning process more convenient and efficient.
  5. Durability: Invest in a high-quality pool vacuum that is built to last, with durable materials and components that can withstand regular use and exposure to pool chemicals.

Best Pool Vacuum Options for Removing Dead Algae

  1. Robotic Pool Vacuum: Robotic pool vacuums are a popular choice for removing dead algae due to their powerful suction and advanced filtration systems. These autonomous cleaners can navigate the pool independently, scrubbing and vacuuming surfaces to remove algae and debris effectively.
  2. Pressure-Side Pool Vacuum: Pressure-side pool vacuums utilize the water pressure from your pool’s pump to propel the cleaner across the pool while simultaneously vacuuming debris. These vacuums often feature built-in filtration bags or cartridges to capture dead algae and other particles.
  3. Suction-Side Pool Vacuum: Suction-side pool vacuums attach to your pool’s skimmer or suction port and rely on the suction power of the filtration system to operate. While they may not be as powerful as robotic or pressure-side vacuums, they can still effectively remove dead algae when used correctly.

Conclusion:

Removing dead algae from your pool requires the right tools and equipment, and choosing the best pool vacuum is essential for achieving optimal results. By considering factors such as suction power, filtration system, versatility, ease of use, and durability, you can select a pool vacuum that meets your needs and effectively removes dead algae, restoring your pool to its pristine condition for enjoyable swimming all season long.

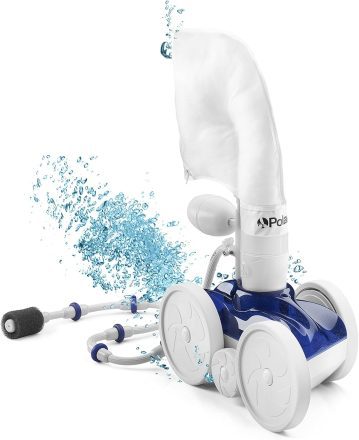
A Beginner’s Guide: How to Hook Up and Use a Suction Side Pool Vacuum Cleaner

Keeping your pool clean is essential for ensuring a safe and enjoyable swimming experience. While manual cleaning methods can be effective, using a pool vacuum cleaner can make the task much easier and more efficient. In this guide, we’ll walk you through the process of hooking up and using a suction side pool vacuum cleaner, perfect for beginners looking to maintain their pool’s cleanliness.

Part 1: Hooking Up the Suction Side Pool Vacuum Cleaner

  1. Gather Your Equipment: Before you begin, ensure you have all the necessary equipment, including the pool vacuum cleaner, telescopic pole, vacuum head, hose, and skimmer or dedicated suction port.
  2. Prepare the Vacuum Head and Hose: Attach the vacuum head to one end of the telescopic pole, and then connect the hose to the other end of the vacuum head.
  3. Prime the Hose: To prevent air from entering the system and ensure proper suction, it’s important to prime the hose. Submerge the entire length of the hose in the pool, ensuring all air bubbles are released.
  4. Attach the Hose to the Skimmer or Suction Port: Depending on your pool’s configuration, you’ll either attach the hose to the skimmer or a dedicated suction port. If using the skimmer, remove the skimmer basket and insert the hose directly into the suction hole. If using a dedicated suction port, attach the hose securely to the port.
  5. Turn on the Pump: Once the hose is securely attached, turn on the pool pump to begin the suction process. You should see water flowing through the hose and into the vacuum head.

Part 2: Using the Suction Side Pool Vacuum Cleaner

  1. Maneuvering the Vacuum Head: Using the telescopic pole, guide the vacuum head along the pool floor, walls, and steps, covering all areas that require cleaning. Move the vacuum head slowly and methodically to ensure thorough cleaning.
  2. Monitoring the Suction: As you vacuum, periodically check the suction to ensure it remains strong and consistent. If the suction weakens, check for any obstructions in the hose or vacuum head and clear them as necessary.
  3. Cleaning Difficult Areas: For hard-to-reach areas such as corners and tight spaces, maneuver the vacuum head as close as possible and use short, precise movements to clean thoroughly.
  4. Emptying the Skimmer Basket: If you’re using the skimmer as the suction point, periodically check and empty the skimmer basket to prevent it from becoming clogged and reducing suction.
  5. Completing the Cleaning Process: Once you’ve vacuumed the entire pool, turn off the pool pump and disconnect the hose from the skimmer or suction port. Remove the vacuum head from the water and detach it from the telescopic pole.
  6. Rinsing and Storing: Rinse the vacuum head, hose, and telescopic pole with clean water to remove any debris and chemicals. Allow the equipment to dry thoroughly before storing it in a clean, dry area.

Conclusion: Using a suction side pool vacuum cleaner is a simple and effective way to keep your pool clean and inviting. By following these step-by-step instructions for hooking up and using the vacuum cleaner, you can maintain a sparkling clean pool all season long. Happy swimming!

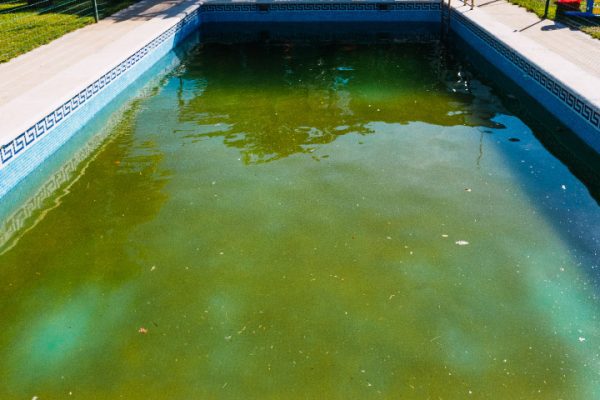
Battling the Slip & Slide: Tackling Slimy Pool Walls

You step into your pool, hoping for a relaxing swim, but instead, you’re met with a slippery sensation under your fingers. Slimy pool walls can quickly turn your refreshing oasis into a less-than-inviting space. Let’s dive into what causes these slimy invaders and how to effectively show them the exit.

1. Why Are My Pool Walls Slimy?

The prime culprits behind slimy pool walls are:

  • Algae Growth: The most common reason. Algae spores can find their way into your pool through wind, rain, or even contaminated pool tools. Once they take hold, they can quickly multiply, forming a slimy layer.
  • Improper Chemical Balance: A pool with imbalanced chemicals, particularly low chlorine levels, can become a breeding ground for algae and bacteria.
  • Biofilm: This is a collection of microorganisms that stick to each other on a surface. It can be a precursor to algae and, if not treated, might lead to persistent algae problems.

2. Curing Slimy Pool Walls:

a. Scrub-A-Dub-Dub: Grab a pool brush and scrub the walls. This physical agitation breaks up the algae or biofilm, making it easier for pool chemicals to act on them.

b. Shock Treatment: Using a good quality pool shock, preferably with a high concentration of chlorine, can effectively kill off algae and bacteria. Follow the manufacturer’s instructions for dosing and ensure the pool pump is running to distribute it evenly.

c. Adjust Your Chemical Levels: Regularly test and adjust the chemical levels in your pool. Ensure chlorine levels are within the recommended range, typically between 1-3 parts per million (ppm).

d. Use an Algaecide: If algae are the primary problem, consider adding an algaecide to your pool maintenance routine. This will help prevent future outbreaks.

e. Filter Maintenance: A clean filter is critical. Backwash or clean the filter regularly to ensure it’s catching all the debris and dead algae.

f. Consider Phosphate Removers: Algae feed on phosphates. Using phosphate removers can starve and reduce algae growth.

3. Preventing Future Slippery Encounters:

a. Regular Maintenance: Consistent pool maintenance, including brushing the walls and floor at least once a week, can keep algae and biofilm at bay.

b. Balanced Chemicals: Regularly test the pool water and adjust chemical levels as necessary. Keeping the water balanced prevents the growth of unwanted microorganisms.

c. Pool Circulation: Ensure your pool pump and filter are running efficiently. Good water circulation helps distribute sanitizing chemicals evenly and prevents algae growth.

d. Check Surroundings: Overhanging trees or shrubs can drop leaves into the pool, providing organic matter for algae to feed on. Regularly clear out leaves and debris from the pool.

Conclusion:

Slimy pool walls might feel like a huge setback, but with the right knowledge and tools, it’s an issue that can be addressed head-on. Remember, prevention is the best cure. By maintaining a clean, chemically balanced pool, you can ensure that every swim is a smooth experience, free from the unexpected slimy surprise!

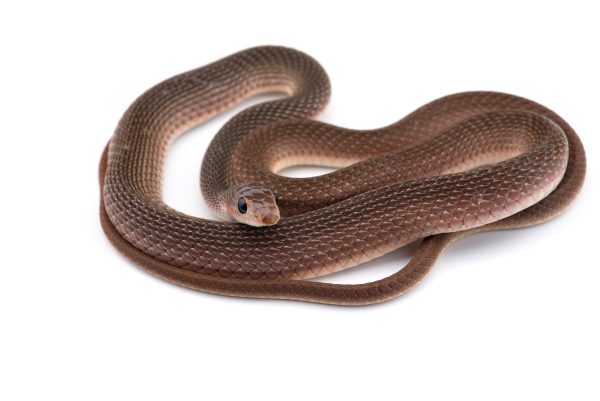
Slithering Surprise: How to Handle a Snake in Your Swimming Pool

Discovering a snake in your pool can be an alarming experience. Whether it’s a harmless garden snake or a more dangerous species, no one wants to share their swim with a slithery intruder. But fear not! Here’s a step-by-step guide on what to do if you find a snake in your swimming pool.

1. Stay Calm and Keep a Safe Distance: It’s important to remember that most snakes are not aggressive unless threatened. If you notice a snake, stay calm, ensure everyone exits the pool safely, and maintain a safe distance.

2. Identify the Snake (if possible): If you live in an area with venomous snakes, try to identify the snake from a distance. Familiarize yourself with local snake species. Remember, many harmless snakes can look similar to their venomous counterparts. If in doubt, treat the snake as if it’s venomous.

3. Safely Remove the Snake: For non-venomous, smaller snakes:

  • Using a long pool skimmer or a similar tool, gently guide the snake towards the edge of the pool.
  • Carefully lift the snake out and let it go in a safe area away from the pool.

For larger or potentially venomous snakes:

  • It’s safer to not handle the snake yourself. Instead, call local animal control or a professional snake removal service to deal with the situation.

4. Prevent Future Unwanted Guests: To minimize the chances of another snake taking a dip:

  • Install a mesh pool fence or barrier around your pool. Ensure the mesh is fine enough to prevent snakes from entering.
  • Regularly trim grass and bushes around the pool area, eliminating hiding spots.
  • Keep the area around the pool free from clutter, food scraps, and trash which can attract rodents – a primary food source for many snakes.

5. What if a Snake Bites Someone? While rare, it’s essential to know what to do in case of a snakebite:

  • Call emergency services immediately.
  • Keep the bitten person calm and still to slow the spread of venom.
  • Do not suck out the venom or cut the bite area.
  • Try to remember the snake’s appearance to help medical personnel determine the best treatment.

6. Snakes are Important Too! It’s essential to remember that snakes play a vital role in our ecosystem, controlling pests and maintaining a balance in nature. If you find a snake in your pool, it’s likely just as scared as you are and is looking for a way out.

Conclusion: While finding a snake in your swimming pool can be startling, with a bit of knowledge and preparation, you can handle the situation calmly and safely. Embrace the beauty of nature, but always prioritize safety first!

Inground vs. Above Ground Pools: Comparing Costs and Considerations for a 10,000-Gallon Pool

Discover the average costs of installing a 10,000-gallon inground pool vs. an above ground pool, and explore the pros and cons of each option to make an informed decision.

When planning to install a 10,000-gallon swimming pool, one of the most significant decisions you’ll need to make is whether to choose an inground or an above ground pool. Both options have their pros and cons, and costs can vary significantly. In this article, we will break down the average costs of installing a 10,000-gallon inground pool vs. an above ground pool, and provide insight into the advantages and disadvantages of each type.

Comparing Costs: Inground vs. Above Ground Pools

  1. Inground Pool Installation

The cost of installing a 10,000-gallon inground pool can vary widely based on factors such as materials, location, and customization options. On average, homeowners can expect to spend between $35,000 and $65,000 for a 10,000-gallon inground pool. This cost includes excavation, pool materials (concrete, fiberglass, or vinyl liner), pool equipment, and labor. Additional features, such as waterfalls, lighting, and heating systems, can increase the total cost.

  1. Above Ground Pool Installation

Installing a 10,000-gallon above ground pool is typically less expensive than an inground pool. On average, the cost of an above ground pool ranges from $1,500 to $5,000, depending on the materials and quality of the pool. This cost includes the pool kit, installation, and basic pool equipment. However, it does not cover the cost of additional features or decking, which can add several thousand dollars to the overall expense.

Inground Pools: Pros and Cons

Pros:

  • Greater customization options: Inground pools offer more flexibility in terms of design, shape, and size.
  • Enhanced aesthetic appeal: Inground pools often look more attractive and blend seamlessly into the landscape.
  • Increased property value: In many cases, inground pools can increase the value of your home, making them a more appealing option for potential buyers.
  • Longer lifespan: Inground pools, especially those made from concrete, tend to last longer than above ground pools.


Cons:

  • Higher installation and maintenance costs: Inground pools require a more significant upfront investment and can be more expensive to maintain.
  • More complex installation: Installing an inground pool often requires more time and labor compared to above ground options.
  • Permitting and zoning requirements: Inground pool installations may be subject to stricter local regulations, requiring permits and adherence to specific zoning rules.

Above Ground Pools: Pros and Cons

Pros:

  • Lower installation and maintenance costs: Above ground pools are generally less expensive to install and maintain than inground pools.
  • Easier installation: Most above ground pools can be installed more quickly and with less disruption to your property.
  • More accessible for relocation or removal: If you decide to move or no longer want a pool, above ground pools are easier to disassemble and relocate or remove entirely.
  • Fewer permitting and zoning issues: Above ground pools typically have fewer local regulations to navigate, making the installation process smoother.

Cons:

  • Limited customization options: Above ground pools usually come in standard shapes and sizes, offering fewer customization choices.
  • Less aesthetic appeal: Some homeowners may find above ground pools less visually appealing than their inground counterparts.
  • Shorter lifespan: Above ground pools generally have a shorter lifespan, especially if they are made from lower-quality materials.
  • Potential for lower resale value: In some cases, an above ground pool may not add to the property value and may even detract from it in the eyes of potential buyers.

The decision between installing a 10,000-gallon inground pool or an above ground pool depends on your budget, preferences, and long-term plans. In general, inground pools offer greater customization options, a more attractive appearance, and a longer lifespan, but they come with higher installation and maintenance costs. On the other hand, above ground pools are more budget-friendly, easier to install and remove, but may have a shorter lifespan and limited design choices.

When considering which type of pool is best for you, carefully weigh the pros and cons of each option, and factor in the installation and maintenance costs. Consult with pool installation professionals to get a clearer understanding of the specific costs and requirements involved in your area. By doing thorough research and understanding the implications of your decision, you can make the best choice for your home and lifestyle, and enjoy your new pool for years to come.

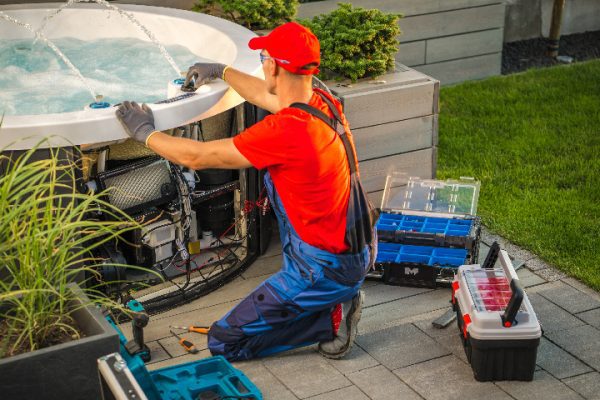
A Step-by-Step Guide to Maintaining Your Chlorine Generator Cell for Salt Water Pool Owners

A salt water pool system offers a luxurious and gentle swimming experience for pool owners, but it also requires regular maintenance to keep it working efficiently. One of the essential components of a salt water pool system is the chlorine generator cell. It is responsible for converting salt into chlorine, keeping your pool water clean and free of harmful bacteria. In this article, we will walk you through how to check, clean, and replace your chlorine generator cell to ensure the longevity and effectiveness of your salt water pool system.

Step 1: Checking the Chlorine Generator Cell

  1. Turn off the pool system: For safety purposes, always turn off the power to your pool system before inspecting or working on the chlorine generator cell. This will help avoid any accidents caused by electrical shock.
  2. Locate the cell: The chlorine generator cell is usually installed near the pool equipment pad. It is a cylindrical component connected to the plumbing system and may have a clear housing that allows you to see inside.
  3. Inspect for damage or wear: Look for any signs of damage, such as cracks in the cell housing, broken wires, or corrosion. If you notice any issues, you may need to replace the cell.
  4. Check for scale buildup: Inspect the cell plates or electrodes for signs of calcium scale buildup. A small amount of buildup is normal, but excessive buildup can reduce the efficiency of the chlorine generator cell and may require cleaning.

Step 2: Cleaning the Chlorine Generator Cell

  1. Remove the cell: Turn off the power and disconnect the cell from the plumbing system. Be sure to follow the manufacturer’s instructions for removing the cell, as the process may vary by model.
  2. Mix a cleaning solution: Prepare a solution of 1 part muriatic acid to 4 parts water in a large, well-ventilated area. Always add the acid to the water, not the other way around. Make sure to wear proper protective gear, such as gloves, goggles, and a mask, when handling muriatic acid.
  3. Soak the cell: Submerge the cell in the cleaning solution for 5-15 minutes or until the scale dissolves. Do not leave the cell in the solution for too long, as it may cause damage to the cell plates.
  4. Rinse the cell: After soaking, remove the cell from the solution and rinse it thoroughly with fresh water. Ensure that all acid residue is removed from the cell before reinstalling it.
  5. Reinstall the cell: Once the cell is clean and dry, follow the manufacturer’s instructions to reconnect it to the pool system. Turn the power back on and monitor the cell to ensure it is working correctly.

Step 3: Replacing the Chlorine Generator Cell

If you have determined that your cell needs to be replaced due to damage, wear, or poor performance, follow these steps:

  1. Purchase a new cell: Choose a cell that is compatible with your salt water pool system. Consult the manufacturer’s documentation or seek advice from a pool professional to ensure you are buying the correct model.
  2. Turn off the power: Before removing the old cell, turn off the power to the pool system.
  3. Remove the old cell: Follow the manufacturer’s instructions to disconnect the old cell from the plumbing system.
  4. Install the new cell: Carefully connect the new cell to the pool system, ensuring all connections are secure and the cell is properly oriented. Consult the manufacturer’s instructions for specific installation guidelines.
  5. Turn on the power: Restore power to the pool system and monitor the new cell’s performance to ensure it is working as expected.

Maintaining your chlorine generator cell is crucial for the longevity and effectiveness of your salt water pool system. Regularly checking for signs of wear and scale buildup, as well as cleaning the cell as needed, can help keep your pool water clean and safe for swimming. Replacing a damaged or worn-out cell when necessary is essential to maintaining your pool’s overall health.

By following the steps outlined in this guide, you can extend the life of your chlorine generator cell and keep your salt water pool system running smoothly. As always, consult your pool system’s manufacturer for specific guidance and recommendations tailored to your unique setup. Don’t hesitate to reach out to a pool professional if you need further assistance or advice on maintaining your salt water pool.

Top Money-Saving Tips for Swimming Pool Maintenance

Owning a swimming pool is a luxury that comes with a fair share of expenses, but maintaining it doesn’t have to break the bank. With a few smart strategies, you can keep your pool in tip-top shape without draining your wallet. In this article, we’ll explore effective, budget-friendly pool maintenance tips that will help you save money while enjoying crystal-clear water all season long.

  1. Keep the Pool Clean with Regular Skimming and Vacuuming

Preventive measures are key to saving money on pool maintenance. By regularly skimming and vacuuming your pool, you can prevent dirt and debris from accumulating and causing more significant problems down the line. Invest in a quality skimmer and pool vacuum, and create a cleaning schedule that fits your needs. This will reduce the likelihood of costly repairs and help you maintain a healthy swimming environment.

  1. Balance Your Pool Chemicals Consistently

Keeping your pool water balanced not only ensures a safe swimming environment but also protects your pool equipment from damage. Test your pool water at least once a week, and adjust the chemical levels as needed. By consistently monitoring and maintaining the water’s pH, chlorine, and alkalinity levels, you can prevent costly problems such as algae blooms, corrosion, and staining.

  1. Choose Energy-Efficient Pool Equipment

Investing in energy-efficient pool equipment like variable-speed pumps, solar heaters, and LED lights can save you money in the long run. These devices may have a higher upfront cost, but they will pay for themselves over time with lower energy bills and longer-lasting performance. Don’t forget to check for rebates or incentives offered by local utilities or government programs to help offset the initial costs.

  1. Cover Your Pool When Not in Use

Using a pool cover is a simple yet effective way to reduce evaporation, retain heat, and keep out debris. By covering your pool when it’s not in use, you’ll save on water, heating costs, and chemical consumption. Additionally, a pool cover will make cleaning easier by preventing leaves, dirt, and insects from entering the water.

  1. Regularly Inspect and Maintain Pool Equipment

Regular equipment maintenance is essential for extending the life of your pool components and preventing costly repairs. Routinely inspect your pump, filter, heater, and other devices for signs of wear or damage. Clean or replace filters as needed, lubricate moving parts, and repair or replace worn-out components promptly. Staying proactive with equipment maintenance will save you money in the long run.

  1. Implement Water Conservation Techniques

Practicing water conservation can lead to significant savings on your water bill. Avoid overfilling your pool, fix leaks promptly, and use a pool cover to reduce evaporation. If you need to drain your pool for maintenance, consider using the water for irrigation purposes. By being mindful of your water usage, you can save money and help the environment.

  1. Learn Basic Pool Maintenance Skills

Hiring a professional for routine pool maintenance can be costly. By learning basic pool care skills, such as testing water chemistry, cleaning filters, and inspecting equipment, you can save money on service fees. There are numerous resources available online, including tutorials and forums, to help you become a pool maintenance pro.

Conclusion

Maintaining a sparkling, inviting swimming pool doesn’t have to be a financial burden. By implementing these money-saving tips, you can enjoy all the benefits of pool ownership without the hefty price tag. Remember, preventive measures and consistent maintenance are key to preserving your pool’s integrity, maximizing its lifespan, and minimizing expenses.

Battle of the Leaves: Winning the War Against Nature’s Pool Invaders

A swimming pool is a refreshing retreat, but it also comes with its fair share of challenges. One of the most persistent problems pool owners face is dealing with leaves constantly finding their way into the water. Although they may seem harmless, leaves can cause multiple issues that can affect your pool’s water quality and performance. In this article, we’ll discuss the problems leaves can create in your pool and explore various solutions to help you win the battle against these natural pool invaders.

  1. The Problems Leaves Cause in Your Pool Leaves may seem like a small nuisance, but they can cause several issues for pool owners:
  • Clogged filters and skimmers: Leaves can accumulate in skimmers, leading to reduced circulation and increased strain on your pool’s pump system. This can result in a shorter lifespan for your pump and potentially costly repairs.
  • Algae growth: As leaves decompose in your pool, they release nutrients that can promote algae growth, leading to murky water and an increased need for chemical treatment.
  • Water chemistry imbalance: Decomposing leaves can alter your pool’s pH levels and alkalinity, making it challenging to maintain proper water chemistry.
  • Unsightly appearance: Leaves floating in your pool can detract from its aesthetic appeal and make it less inviting for swimmers.
  1. Solutions for Managing Leaves in Your Pool There are several ways to tackle the issue of leaves in your pool:
  • Regular skimming: Make it a habit to skim your pool daily to remove leaves and debris before they can sink and cause problems. Using a skimmer with a fine mesh net can help capture even the smallest debris.
  • Pool cover: A pool cover can help keep leaves out of your pool when it’s not in use. Invest in a high-quality, durable cover that fits securely over your pool to keep leaves and other debris at bay.
  • Leaf net: A leaf net is a specially designed pool accessory that can catch leaves before they enter your pool. Simply place the net over the pool, and leaves will accumulate on its surface, making it easy to remove and dispose of them.
  • Landscaping: Consider adjusting the landscaping around your pool to minimize the number of leaves that can find their way into the water. Trim back trees and shrubs near the pool or plant species that are less likely to shed leaves.
  • Leaf vacuum: A leaf vacuum is a device that attaches to your pool’s skimmer or vacuum system, helping you remove leaves from the bottom of the pool more effectively than manual skimming.

Leaves may be a natural part of outdoor living, but they don’t have to ruin your pool experience. By understanding the problems they cause and implementing the right solutions, you can keep your pool looking its best and maintain a clean, healthy swimming environment. With a bit of effort and the right tools, you can win the war against nature’s pool invaders and enjoy your backyard oasis without the leafy intruders.