Pool Pump Air Bubbles in Return Jets: Causes and How to Fix Them
Quick Answer: Air bubbles shooting from your return jets mean air is getting sucked into your pump’s suction side. The most common culprits are low water level, a bad pump lid O-ring, loose fittings, or a stuck skimmer weir. Finding and sealing the air leak restores proper circulation and protects your pump from damage.
Quick answer
Pool Pump Air Bubbles in Return Jets: Causes and How to Fix Them: Quick Answer: Air bubbles shooting from your return jets mean air is getting sucked into your pump's suction side. The most common culprits are low water level, a bad pump lid O-ring, loose fittings, or a stuck skimmer.
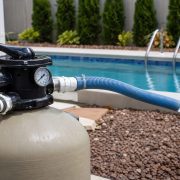
Seeing a steady stream of pool pump air bubbles in return jets is more than just annoying — it’s a warning sign. Your pump is designed to move water, not air. When bubbles appear, somewhere between your skimmer and the pump’s impeller, air is sneaking into the system. Left unchecked, this causes poor circulation, inconsistent chemical distribution, and can burn out your pump motor from running dry.
The good news? Most air leaks are DIY-fixable in under an hour. You just need to know where to look. This guide walks you through every possible cause and exactly how to fix each one.
Before you start, know your pool’s volume — you’ll need it when rebalancing chemicals after any repair that requires draining water.
Why Air Bubbles Are a Problem
A few bubbles during startup are normal. But continuous bubbles? That’s a problem for three reasons:
- Reduced filtration efficiency — Air pockets mean less water moves through your filter. Your pump might show good pressure, but actual flow drops by 20-40%.
- Chemical distribution fails — When you add chlorine or adjust pH, poor circulation means uneven mixing. You’ll have sanitized zones and dead spots.
- Pump damage — Pumps need water for lubrication and cooling. Air creates cavitation, which damages seals and impellers. Running dry for even 30 seconds can warp internal components.
What Causes Air Bubbles in Return Jets
Air enters the suction side — everything between the pool and the pump’s impeller. Here’s every possible cause, ranked by how common they are:
Low Water Level (Most Common)
Your water level should reach the middle of your skimmer opening. When it drops below the bottom of the skimmer throat, the pump sucks air along with water. Even 1-2 inches too low causes intermittent bubbling.
Stuck or Missing Skimmer Weir
That floating door in your skimmer (the weir) helps maintain suction even when water levels fluctuate slightly. If it’s stuck open, cracked, or missing entirely, air gets pulled in during pump cycles.
Bad Pump Lid O-Ring
This is the #1 mechanical cause. The O-ring creates an airtight seal between your pump lid and housing. Over time, it dries out, cracks, or gets coated with debris. A compromised O-ring lets air in with every pump rotation.
Loose or Cracked Drain Plugs
Your pump has one or two drain plugs at the bottom of the housing. If these weren’t tightened properly after winterizing or maintenance, air seeps in. Hairline cracks in the plugs cause the same issue.
Suction-Side Union Fittings
The threaded unions connecting your pump to the plumbing have their own O-rings. These fail over time, especially if someone over-tightened them and cracked the plastic.
Valve Problems
Three-way valves directing flow from skimmers and main drains can develop air leaks at their stems or handles. The internal seals wear out, and air gets pulled through.
Cracked Pump Lid
Inspect your pump lid carefully — especially around the threads. Hairline cracks are hard to spot but let air in constantly. UV damage from sun exposure accelerates this.
Clogged Skimmer or Pump Basket
A basket stuffed with leaves restricts water flow. The pump compensates by pulling harder, which can suck air through any weak point in the system. It also causes the water level in the skimmer to drop below the weir.
Clogged Impeller
Debris that gets past the baskets can jam the impeller. This restricts flow and creates the same air-pulling conditions as a clogged basket.
Underground Plumbing Leak
This is the worst-case scenario. A crack in buried suction lines lets air in and water out. You’ll often notice water loss alongside the bubbles.
Air Relief Valve or Startup Bubbles
Sometimes air trapped in the filter releases through the returns during startup. This should clear within 1-2 minutes. If your filter’s air relief valve is stuck closed, air can’t escape properly and may push through the returns instead.
⚠️ Safety Warning
Never let your pump run dry. If your pump won’t prime within 2-3 minutes, shut it off immediately. Running without water for even a short time destroys seals, warps the housing, and can burn out the motor. The repair cost jumps from a $15 O-ring to a $400+ pump replacement.
Step-by-Step Troubleshooting Guide
Work through these steps in order. Most air leaks hide in the first few items.
Step 1: Check and Adjust Water Level
Turn off your pump. Look at your skimmer — water should cover at least the bottom half of the opening. If it’s low, add water with your garden hose until it reaches the middle of the skimmer throat. Restart the pump and check for bubbles.
Time needed: 15-30 minutes depending on how much water you need.
Step 2: Inspect the Skimmer Weir
With the pump off, reach into the skimmer and check the weir door. It should swing freely on its hinges. Look for cracks, missing pieces, or debris jamming it open. Replace if damaged — they’re about $8-12 at any pool supply store.
While you’re there, check that your skimmer basket isn’t cracked or overflowing with debris. Using skimmer socks catches fine debris and prevents basket overflow.
Step 3: Examine the Pump Lid and O-Ring
This is your most likely culprit. Open the pump lid and pull out the O-ring. Check for:
- Cracks or flat spots
- Dried, brittle texture
- Debris or dirt embedded in it
- Stretched or misshapen sections
Even if it looks okay, apply a thin layer of pool O-ring lubricant and reseat it. The lubricant helps maintain the seal and extends O-ring life.
If your O-ring is damaged, replace it with the correct size for your pump model. Don’t use petroleum jelly — it degrades rubber.
Also inspect the pump lid itself. Run your finger around the threads and look for hairline cracks. Hold it up to sunlight to spot thin areas. A cracked lid needs replacement.
Step 4: Check Pump Drain Plugs
Look at the bottom of your pump housing. You’ll see one or two drain plugs. Make sure they’re:
- Tight (hand-tight plus 1/4 turn with pliers)
- Not cracked
- Have intact O-rings or Teflon tape
Replacement drain plugs are inexpensive insurance. Keep spares on hand.
Step 5: Tighten Suction-Side Unions and Fittings
Follow the pipe from your pump back toward the pool. At each union fitting, hand-tighten firmly. Don’t use tools — you’ll crack the plastic. Check that the O-rings inside these unions aren’t pinched or deteriorated.
If a union continues leaking air, disassemble it, clean both surfaces, lubricate the O-ring, and reassemble.
Step 6: Inspect All Valves
Check any valves on your suction lines — especially three-way or diverter valves. Look for:
- Water dripping from the valve stem
- Cracks in the valve body
- Air bubbles visible around the handle
Valve rebuilds are possible, but replacement is often easier and more reliable.
Step 7: Clean the Pump Basket and Impeller
Remove the pump basket and clear any debris. Then, with the pump off and power disconnected at the breaker, reach into the volute (the chamber behind the basket) and feel for debris wrapped around the impeller.
Rubber bands, hair ties, and small twigs commonly jam impellers. Remove anything you find and rotate the impeller by hand to ensure it spins freely.
For more on pump basket problems, check out our guide: Pool Pump Basket Not Filling With Water
Step 8: Test for Underground Plumbing Leaks
If you’ve checked everything above and still have bubbles, you might have a suction-line leak underground. Here’s how to test:
- Close the main drain valve (if you have one) so the pump pulls only from skimmers
- Run the pump and observe bubbles
- Close the skimmer valves and open only the main drain
- Compare bubble production
If bubbles only appear from one source, that line likely has the leak.
For pinpointing leaks, pool leak detection dye helps. Squirt it near suspected areas with the pump off — it’ll get pulled toward any leak.
Underground leaks require professional repair. Call a leak detection specialist before digging.
Step 9: Check the Filter Air Relief Valve
On top of your filter, you’ll find a small air relief valve. Open it during startup to purge trapped air. If this valve is stuck or clogged, air can’t escape and may push through your returns instead.
Clean or replace the valve if it won’t open. After priming, always open this valve until water sprays out, then close it.
How to Tell When It’s Fixed
Success looks like this:
- Clear, steady flow from return jets with no visible bubbles
- Pump basket stays completely full during operation
- Consistent pressure on your filter gauge (typically 10-15 PSI for most systems)
- No air hissing sounds from the pump area
Give it a full 5 minutes of run time before declaring victory. Some air takes time to work through the system.
Preventing Future Air Leaks
A few simple habits keep bubbles away:
- Check water level weekly — Mark your ideal level on the skimmer with a permanent marker
- Lubricate the pump lid O-ring monthly — Takes 30 seconds
- Empty baskets before they overflow — Skimmer socks help
- Inspect equipment each spring — O-rings and gaskets deteriorate over winter
- Store drain plugs somewhere you won’t lose them — And always use Teflon tape or thread sealant
Frequently Asked Questions
Why do I only see air bubbles when the pump first starts?
That’s normal. Air trapped in the filter housing and plumbing escapes through the returns during the first 1-2 minutes. Open your filter’s air relief valve during startup to speed this up. If bubbles continue past 2 minutes, you have a suction-side leak.
Can air bubbles damage my pool pump?
Yes. Air causes cavitation — rapid bubble formation and collapse that erodes the impeller and seals. It also means less water cooling and lubricating the mechanical seal. Extended operation with air leaks significantly shortens pump life.
How do I know if the leak is in my skimmer line vs. my pump?
Isolate each suction source by closing valves. Run the pump with only the main drain open, then only the skimmers. Whichever line produces more bubbles contains the leak. If bubbles persist with all suction lines closed, the leak is at the pump itself.
Is it okay to run my pump with a few small bubbles?
Occasional tiny bubbles may be tolerable short-term. But even small leaks worsen over time and reduce efficiency. Fix them when you spot them — a $4 tube of O-ring lube now prevents a $400 pump replacement later.
My pump loses prime overnight but runs fine during the day. What’s wrong?
This usually indicates a suction-side leak that’s too small to cause bubbles during operation but allows air to slowly fill the lines when the pump is off. Check all unions, the pump lid O-ring, and drain plugs. The leak is often at a fitting that’s just slightly loose.
Keep Your Pool Running Smoothly
Air bubbles are annoying, but they’re also fixable. Work through the troubleshooting steps above, starting with the simplest checks. Most pool owners solve their bubble problem within an hour using basic tools.
Once your system is running bubble-free, make sure your chemistry stays balanced. Our free Pool Chemical Calculator app tells you exactly what to add based on your pool’s size and current readings. No guessing, no math — just clear water.
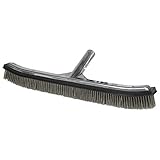
As an Amazon Associate, Pool Chemical Calculator earns from qualifying purchases. Brushing breaks up algae films, dead spots, and wall buildup so chemicals and filtration work. Accurate readings make every chlorine, pH, alkalinity, calcium, and CYA dose safer. Raises free chlorine quickly without adding stabilizer, which is useful when CYA is already high.Recommended pool supplies
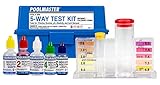

Get exact pool chemical doses
Pool Chemical Calculator turns your test readings, pool volume, and target levels into exact treatment amounts for chlorine, pH, alkalinity, calcium, stabilizer, salt, and more.
Open the Pool Chemical Calculator app for iOS, Android, or web.