
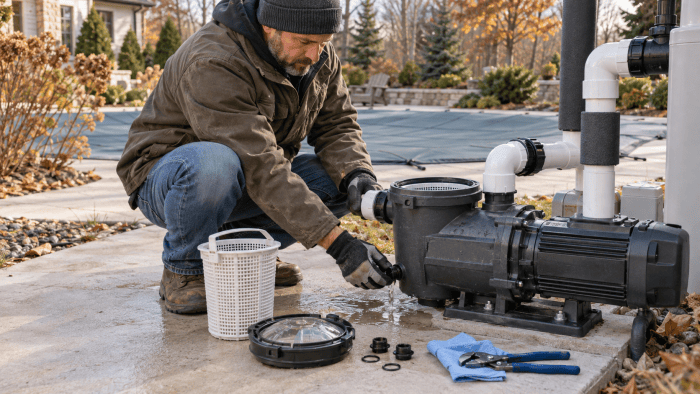
How to Winterize a Pool Pump: The Complete Step-by-Step Guide That Prevents Expensive Freeze Damage
Quick answer
For how to winterize a pool pump, act before freezing weather makes small problems expensive: balance the water, protect exposed equipment and plumbing, keep water moving only when the system is designed for safe freeze operation, and drain or winterize anything that cannot circulate reliably. If temperatures are already near freezing, prioritize pump/filter/heater protection first, then fine-tune chemistry once the equipment is safe.
Quick answer
How to Winterize a Pool Pump: The Complete Step-by-Step Guide That Prevents Expensive Freeze Damage: Quick answer For how to winterize a pool pump, act before freezing weather makes small problems expensive: balance the water, protect exposed equipment and plumbing, keep water moving only when the system is designed.
That pool pump sitting on your equipment pad right now? It’s holding water in places you can’t see. And when temperatures drop below 32°F, that hidden water expands, cracks housings, and turns a $300 pump into scrap metal. Learning how to winterize a pool pump correctly takes about 30 minutes but saves you hundreds in spring repair bills.
I’ve seen homeowners do everything right — drain the pump, pull the plugs, feel confident — then discover hairline cracks in April. The culprit? Residual water trapped in low spots they didn’t know existed. This guide walks you through the complete process, including a calculation method for antifreeze that most articles skip entirely.
What We Analyzed: Equipment Pad Plumbing Volume Estimator
Before you start winterizing, you need to know how much water you’re dealing with. Most guides tell you to “use antifreeze as needed” without explaining what “needed” actually means. So we built an estimation framework based on common pipe sizes, pump capacities, and equipment configurations.
Methodology: We calculated internal volumes using standard pipe diameter formulas (πr² × length) and compiled typical pump housing capacities from manufacturer specifications. These are estimates — your specific equipment may vary by 10-15% depending on model and plumbing configuration.
Limitations: This estimator provides approximate volumes. Exact internal capacities differ between manufacturers and models. Always consult your owner’s manual for precise specifications. Complex plumbing with multiple unions, valves, or unusual configurations may hold additional water.
Estimated Water Volume & Antifreeze Needs by Configuration
| Configuration | Pipe Details | Equipment | Est. Water Volume | Antifreeze Needed* |
|—————|————–|———–|——————-|——————-|
| Small Above-Ground Setup | 1.5″ pipe, 6 ft total | Small pump + cartridge filter | 0.4 – 0.6 gallons | 1 gallon |
| Standard In-Ground Setup | 1.5″ pipe, 12 ft on pad | Mid-size pump + sand filter + chlorinator | 1.2 – 1.8 gallons | 2 gallons |
| Large In-Ground Setup | 2″ pipe, 18 ft on pad | Large pump + DE filter + heater + salt cell | 2.5 – 3.5 gallons | 3-4 gallons |
| Complex Multi-Equipment Pad | Mixed 1.5″/2″ pipe, 25+ ft | Variable speed pump + heater + multiple returns | 3.5 – 5.0 gallons | 4-5 gallons |
*Antifreeze recommendation assumes non-toxic propylene glycol pool antifreeze and includes a 50% safety margin for trapped water in equipment housings.
Quick Reference — Water Volume Per Foot of Pipe:
- 1.5-inch pipe: 0.092 gallons per foot
- 2-inch pipe: 0.163 gallons per foot
To estimate your setup: measure the exposed pipe length on your equipment pad, multiply by the appropriate factor, then add 0.3-0.5 gallons for pump housing volume and 0.5-1.0 gallons for filter internals.
When Should You Winterize Your Pool Pump?
Timing matters more than most people realize. Winterize too early and you’re fighting algae growth in warm water. Wait too long and you’re racing against a freeze warning.
The sweet spot: when water temperature stays consistently below 65°F. At this point, algae growth slows dramatically, and your chemicals will hold through winter. For most of the country, that’s late October through early November. But check your local forecast — a random warm spell in December won’t hurt a properly winterized pump.
Here’s what catches people off guard: it’s not the sustained cold that causes damage. It’s that first hard freeze when you weren’t expecting it. If overnight temps are dipping into the mid-30s, you’re playing with fire. Get it done.
Tools and Supplies You’ll Need
Gather everything before you start. Nothing’s worse than discovering you’re missing a plug wrench with your pump half-disassembled.
Essential tools:
- Adjustable wrench or channel locks
- Flathead screwdriver
- Shop vac or air compressor with blower attachment
- Bucket for catching water
- Teflon tape
Supplies:
- Non-toxic pool antifreeze (propylene glycol-based, NOT automotive antifreeze)
- Winterizing plugs if your existing drain plugs are damaged
- Plastic zip-lock bag for storing small parts
- Permanent marker
Optional but helpful:
- Wet/dry shop vacuum with blower port for clearing lines
- Pool cover for completing the full winterization
Step-by-Step: How to Winterize Your Pool Pump
Step 1: Turn Off All Power
This isn’t just flipping the pump switch. Go to your breaker panel and shut off the circuit for your pool equipment. Then verify it’s off by trying to turn on the pump. Why the extra step? Because someone installed a timer on my neighbor’s system that kicked on at 6 AM. He was elbow-deep in the pump housing when it tried to start.
If you have a variable speed pump with a digital control panel, some models have a “service mode” or “winterize” setting. Check your manual.
Step 2: Relieve System Pressure
Your filter system is pressurized. Before opening anything, turn the multiport valve to “winterize” position if it has one, or open the air relief valve on top of your filter tank. You’ll hear a hiss as pressure releases. Wait until it stops completely.
For cartridge filters, open the pressure relief valve or simply loosen the tank lid slightly until pressure escapes.
Step 3: Drain the Pool Pump
Here’s where most guides get lazy. “Remove the drain plugs” doesn’t tell you much when you’re staring at your pump wondering which plugs they mean.
Locate these drain points on your pump:
- Pump housing drain plug — Usually a small plastic or brass plug on the bottom or side of the pump volute (the curved housing where the impeller sits)
- Strainer pot drain plug — On the bottom of the clear lid basket housing
- Some pumps have two housing drains — Check both sides
Remove each plug and let water drain completely into a bucket. Tilt the pump body slightly if possible to get water out of low spots. On most pumps, you can rock it forward and back to encourage drainage.
Pro tip: Use your phone to take a photo of where each plug came from. In April, you won’t remember which plug went where.
Step 4: Remove and Store the Drain Plugs Properly
This sounds obvious, but I guarantee someone reading this has lost drain plugs. Here’s the system that works:
- Drop all drain plugs, O-rings, and small fittings into the pump strainer basket
- Close the strainer lid loosely (not tight — you want air circulation)
- Write “DRAIN PLUGS INSIDE” on masking tape and stick it to the pump
Some people store plugs in a labeled zip-lock bag inside the house. That works too — as long as you remember where you put it six months from now.
Step 5: Drain Your Filter System
Your filter holds more water than you’d think.
Sand filters: Open the drain cap at the bottom of the tank. Set the multiport valve to “winterize” if available, or leave it between settings (this relieves internal pressure on the spider gasket). Remove the pressure gauge if possible — water trapped inside will crack it.
DE filters: Open the drain plug and bump handle or backwash briefly (with pump off, manually if possible) to loosen the grids. Some DE filters have multiple drain points.
Cartridge filters: Open the drain, remove the filter lid, and take out the cartridge elements. Store cartridges inside where they won’t freeze. A frozen cartridge can crack the pleats.
Step 6: Drain the Heater, Chlorinator, and Other Equipment
Every piece of equipment with water running through it needs draining.
Pool heaters: Most have drain plugs on the header. Some have multiple plugs. Check your manual — improper heater drainage is the #1 cause of expensive freeze damage because the heat exchanger is often copper or cupronickel.
Salt chlorinators/chlorine generators: Disconnect the cell and drain it. Store the cell indoors if your manual recommends it.
Automatic chlorinators: Drain and remove any tablets. Storing the unit with tablets inside creates a chemical mess.
Step 7: Blow Out the Lines or Add Antifreeze (Or Both)
Here’s where homeowners get confused. Do you need to blow out the lines? Use antifreeze? Both?
A decision framework based on your situation:
| Your Climate Zone | Pool Type | Recommended Approach |
|——————-|———–|———————|
| Mild winters (rare freezes below 25°F) | Above-ground | Drain thoroughly + antifreeze in pump housing |
| Moderate winters (occasional teens) | In-ground | Blow out lines + antifreeze in equipment |
| Harsh winters (regular single digits or below) | Any | Full line blowing + antifreeze everywhere |
| Extremely harsh (extended below zero) | Any | Remove pump, store indoors + full antifreeze |
Blowing out lines: Connect a shop vac (on blower mode) or air compressor to the skimmer line. Run air through until you see bubbles at the pool returns for 30-60 seconds. Then quickly plug the return fittings. Repeat for main drain lines.
Adding antifreeze: Pour non-toxic pool antifreeze directly into the pump housing, filter tank, and any exposed plumbing after draining. A typical equipment pad needs 2-3 gallons for thorough protection. Use the estimation table above for your specific setup.
Can you skip blowing out lines if you use antifreeze? In mild climates, yes — with enough antifreeze and thorough draining. But in areas that see temperatures below 20°F, blowing out lines is cheap insurance. Air compressor rental runs about $40-60/day if you don’t own one.
Step 8: Protect Exposed Equipment
Cover your pump and motor with a weatherproof equipment cover or even a heavy plastic bag secured with bungee cords. This keeps snow, ice, and debris off while allowing airflow (important to prevent condensation).
Don’t wrap equipment in plastic sheeting and seal it completely — trapped moisture causes corrosion.
Common Winterization Mistakes (And How to Avoid Them)
Mistake #1: Forgetting the pressure gauge
That little gauge on your filter tank has a tiny tube of water inside. Freeze, crack, replace. Remove it and store it with your drain plugs.
Mistake #2: Leaving the multiport valve in one position
The internal spider gasket can deform if left under pressure all winter. Set to “winterize” or between positions.
Mistake #3: Not tilting the pump
Even with drain plugs removed, water pools in the impeller housing. Tilt the pump forward, backward, side to side.
Mistake #4: Using automotive antifreeze
Automotive antifreeze is toxic and will contaminate your pool water in spring. Only use propylene glycol-based pool-specific antifreeze.
Mistake #5: Ignoring the bonding wire
If your pump has a green bonding wire attached, don’t disconnect it. It’s a safety ground that should stay connected year-round.
Should You Store Your Pump Indoors?
For above-ground pools, bringing the pump inside is often the best move. These pumps are designed for easy disconnection, and basement or garage storage eliminates all freeze risk.
For in-ground pools, indoor storage is less common because the plumbing is permanent. But if you’re in an area with extended periods below zero, disconnecting at the unions and storing the pump motor inside isn’t crazy — it’s cautious.
The rule of thumb: If your area regularly sees temperatures below 0°F for multiple consecutive days, indoor storage adds significant protection.
Affiliate disclosure: As an Amazon Associate, Pool Chemical Calculator may earn from qualifying purchases.
Related Pool Chemical Calculator tools
- Use the pool volume calculator before dosing after heavy rain or spring opening.
- Use the chlorine calculator when rain dilution leaves sanitizer low.
- Use the pH calculator after pumping cover water off and reopening.
- Use the smart app link at the pool: Pool Chemical Calculator app.
Frequently Asked Questions
How much antifreeze do I actually need for my pool pump?
For just the pump and immediate equipment pad plumbing, figure 1-2 gallons for a basic setup and 3-4 gallons for a complex setup with heater and salt cell. The estimation table above gives specific guidance based on pipe diameter and length. Remember: antifreeze is cheap, and a cracked pump housing isn’t.
Can I leave my pool pump outside all winter if it’s completely drained?
Yes, if you’ve drained it thoroughly and your climate doesn’t see extreme cold. Pumps are designed for outdoor installation. But “completely drained” means more than pulling the plugs — you need to tilt it, blow air through it, or add antifreeze to protect any residual moisture. In harsh climates below -10°F, indoor storage is safer.
What’s the most common reason pool pumps crack in winter?
Trapped water in spots you can’t see or reach. The pump housing has internal passages, the impeller has pockets, and unions have small cavities. Even if the main chamber is empty, 2 tablespoons of water expanding can crack plastic housings. That’s why the tilt-and-antifreeze approach works — it addresses water you can’t drain.
Do I need to winterize my pump if I’m running it occasionally through winter?
Running your pump during freezing weather actually prevents freeze damage — moving water doesn’t freeze as easily. But you need to run it consistently. A pump that runs for an hour, then sits for 12 hours in 15°F weather, can still freeze. If you can’t commit to running equipment during every cold snap, winterize it.
When should I open my pool and reconnect the pump in spring?
Wait until overnight temperatures stay consistently above 50°F and you’re past the last frost date for your area. Reconnecting too early means you might need to winterize again if a late freeze hits. Most regions can safely open in late April to mid-May.
Sources
- How to Winterize Your Pool Pump – Pro Tuff Products
- Winterizing an In-Ground Pool for Freezing Conditions – Leslie’s Pool Supplies
- Proper Steps to Winterizing Your Pool Filtration System – PVC Fittings Online
- How to Properly Winterize Your Pump & Sand Filter – The Great Escape
Ready to Calculate Your Pool Chemistry for Spring?
When you reopen your pool, you’ll need to balance your water chemistry quickly. Our free Pool Chemical Calculator tells you exactly how much chlorine, pH adjuster, and alkalinity increaser to add based on your pool’s volume and current readings. Bookmark it now — you’ll thank yourself in April.
Recommended pool supplies
As an Amazon Associate, Pool Chemical Calculator earns from qualifying purchases.
Keeps saltwater chlorine generators in range without unnecessary additives.
View on Amazon
Accurate readings make every chlorine, pH, alkalinity, calcium, and CYA dose safer.
View on Amazon
Useful for algae cleanup, cloudy water, high bather load, and weekly oxidation routines.
View on AmazonGet exact pool chemical doses
Pool Chemical Calculator turns your test readings, pool volume, and target levels into exact treatment amounts for chlorine, pH, alkalinity, calcium, stabilizer, salt, and more.
Open the Pool Chemical Calculator app for iOS, Android, or web.